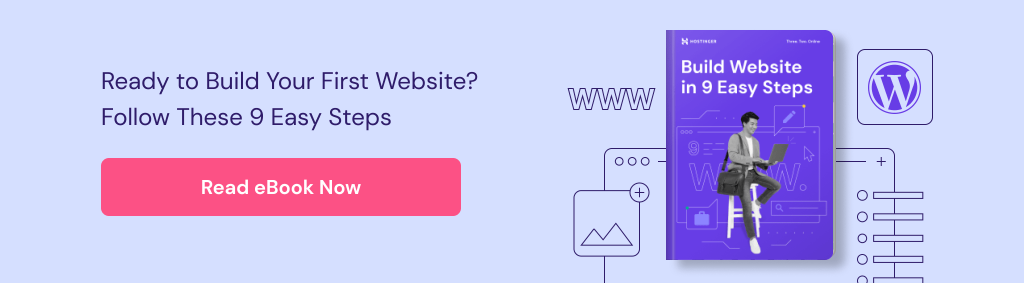
How to Make a Website From Scratch: A Beginner’s Guide
Whether you’re looking to expand your business online, showcase your portfolio, or start a blog, a website is your gateway to reaching a wider audience. Having one will boost brand awareness, open up potential revenue streams, and foster a loyal following, among other benefits.
Despite this, some might still be hesitant to make their own website from scratch. Coding complexity, web development costs, and time investment often discourage people from using websites to boost their brand.
In reality, building a website is now easier and more cost-effective due to the growing popularity of user-friendly web development platforms and tools. For example, Hostinger Website Builder uses artificial intelligence (AI) to streamline the process in under an hour.
Keep reading as we’ll guide you through the steps of building your own website using a website builder or WordPress. First, let’s review the prerequisites for using these platforms.
Website Creation Prerequisites
The following are three crucial elements for a smooth web development process.
Web Development Platform
A website-building platform lets you set up a site without any coding knowledge. It comes in two types ‒ content management system (CMS) and website builder.
WordPress is a popular CMS that offers a wide range of customization options. It has a wide range of plugins and themes to modify your site’s look and functionality, making it a great choice for creating a customized website.
Alternatively, a website builder like Hostinger’s website maker provides an all-in-one solution for website creation. Many website builders provide ready-to-use templates and a drag-and-drop editor, simplifying the process for beginners or those pressed for time.
Check out our comparison of Hostinger Website Builder vs WordPress to explore their features, pros, and cons.
Web Hosting
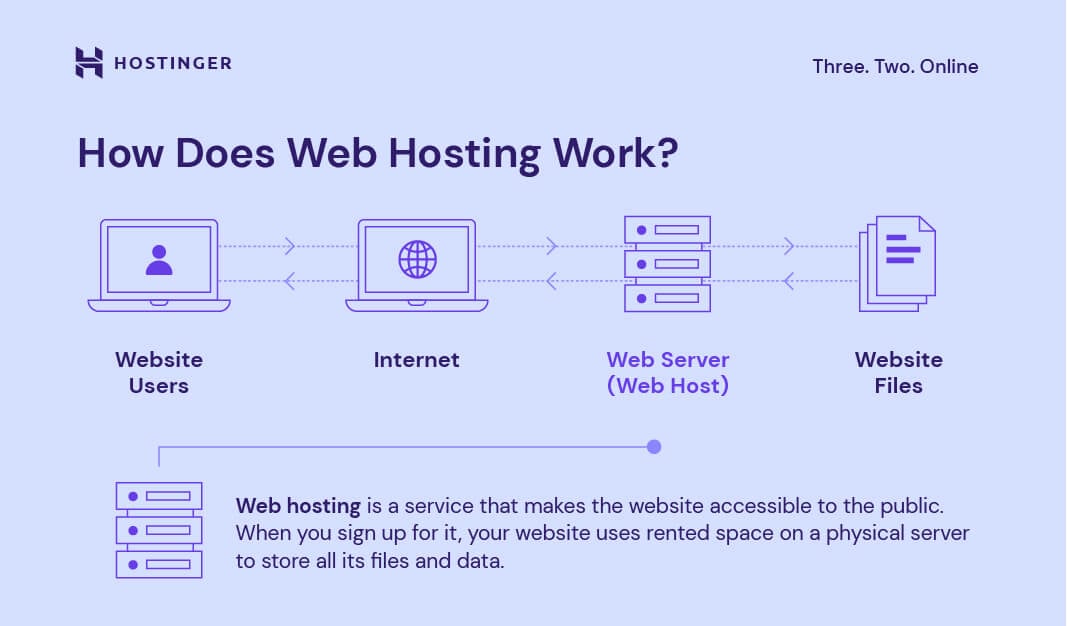
Web hosting is like renting space on the internet for your website. Hosting providers store your site’s data on their servers, ensuring it’s accessible online.
Besides server space, hosting providers also offer performance and security enhancements. That’s why choosing the right hosting plan is crucial for your site’s growth.
Consider Hostinger’s Business Web Hosting for both personal and business websites. At $3.99/month, it features increased performance, daily backups, unlimited Secure Sockets Layer (SSL) certificates for secure connections, and robust protection against cyber threats.
Our hosting plans include a no-code website builder and easy one-click WordPress installation for various web development needs. Leverage the 30-day money-back guarantee feature to test out our hosting features risk-free.
Check out our guide to learn more about hosting a website, covering the steps and tips for selecting a hosting provider.

Domain Name
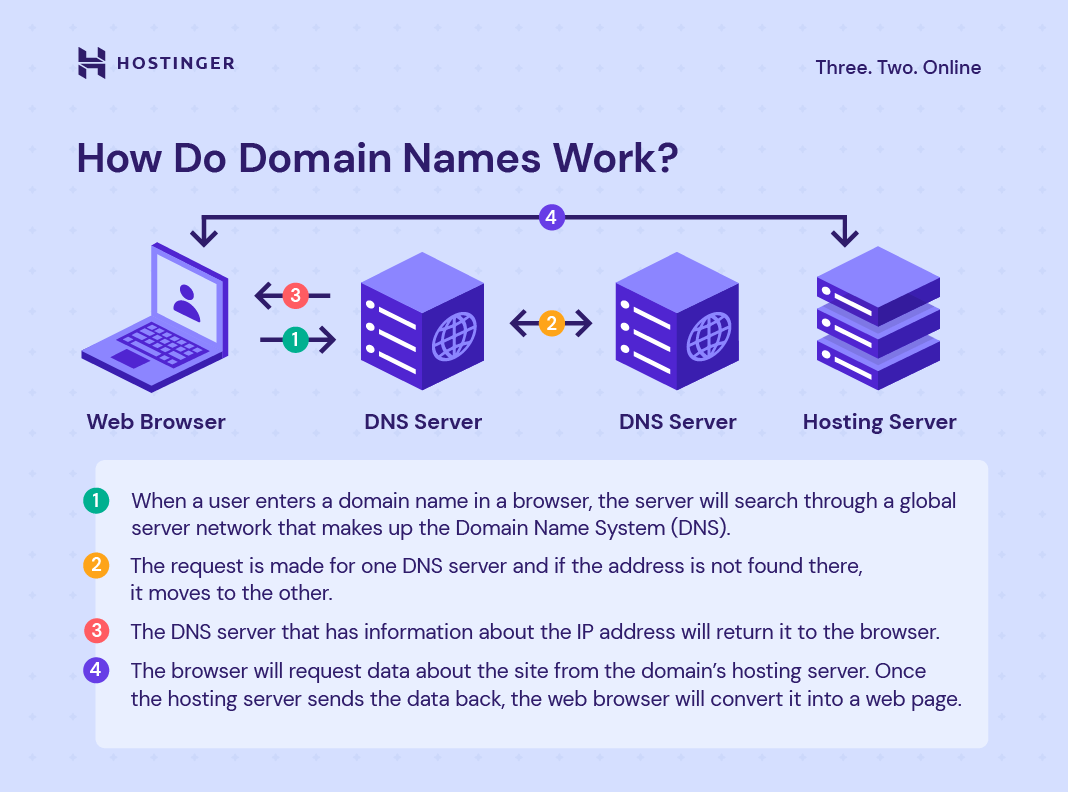
A domain name is a unique address, such as “hostinger.com”, which lets internet users visit your website. It’s a key element of your branding strategy, representing the first interaction website visitors have with your online presence.
Selecting the right domain extension, also known as the top-level domain (TLD), is just as important as the name itself. Extensions like .com, .net, and .org categorize your site and shape user perception. For example, businesses often choose .com for its broad recognition, while networks or tech sites may opt for .net.
You can buy a domain through a domain name registrar, which is a company that manages domain name reservations. Domain name costs generally depend on the extension and subscription period.
However, opting for a hosting provider that includes free domains with its plans is simpler and more cost-effective.
All Hostinger hosting plans come with a free domain, simplifying hosting and domain management under one account. Leverage our domain name checker to browse all the available domains.
Naming Your Website
Choose the right domain name that’s memorable, reflects your brand identity, and resonates with your target audience.
Domain Name Checker
Instantly check domain name availability.
How to Make a Website With a Website Builder
After purchasing a Hostinger hosting plan and picking a domain, you’re set to establish your online presence. Let’s review the steps to build a website from scratch using Hostinger Website Builder.

1. Pick and Personalize Your Template
A template decides the look and feel of your website, so you’d want to pick one that aligns with your branding.
Hostinger offers 150 responsive templates for various niches, all made with mobile optimization in mind. They ensure your website is mobile-friendly, offering a consistent user experience on desktop and mobile devices. If you’re on the move and wondering how to create a website with a phone, explore our straightforward guide.
Alternatively, let AI customize a template to fit your preferences. Here’s how to set up a simple website with AI-generated web design using our site builder:
- Go to Websites from hPanel, Hostinger’s control panel, and select Add website → Hostinger Website Builder.

- Click Start creating to begin the AI onboarding.
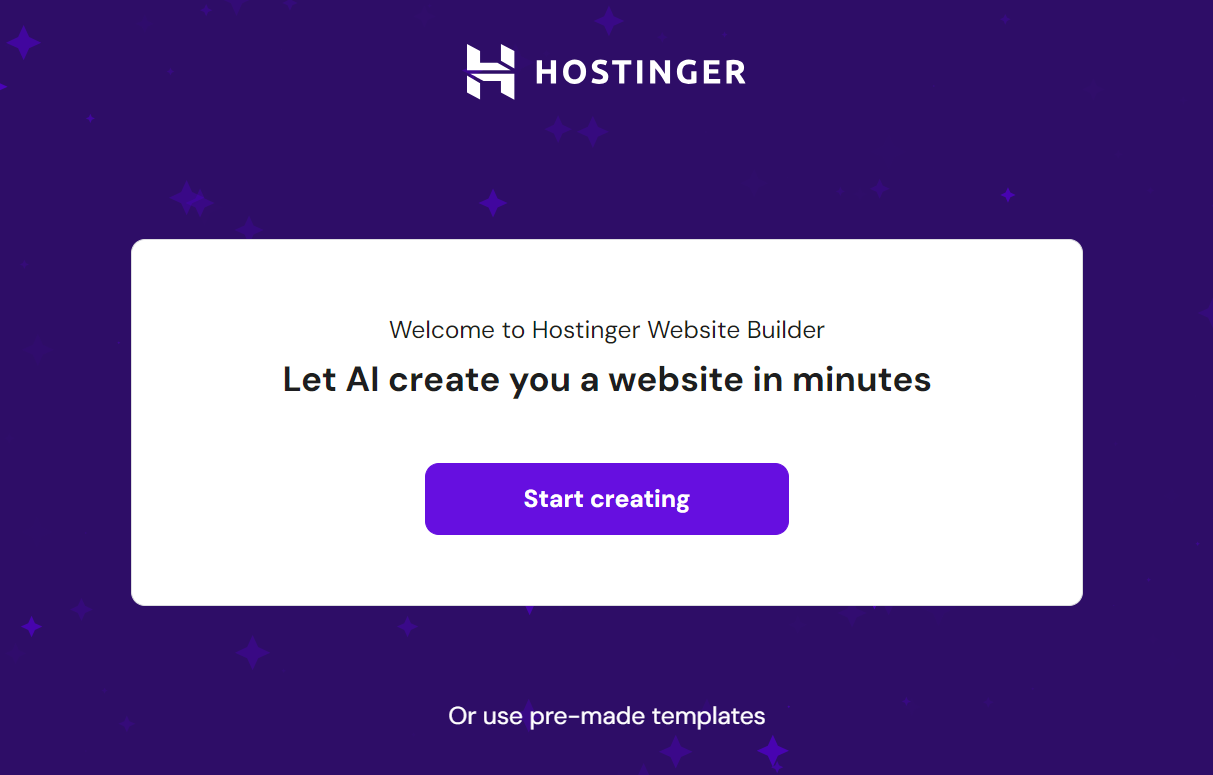
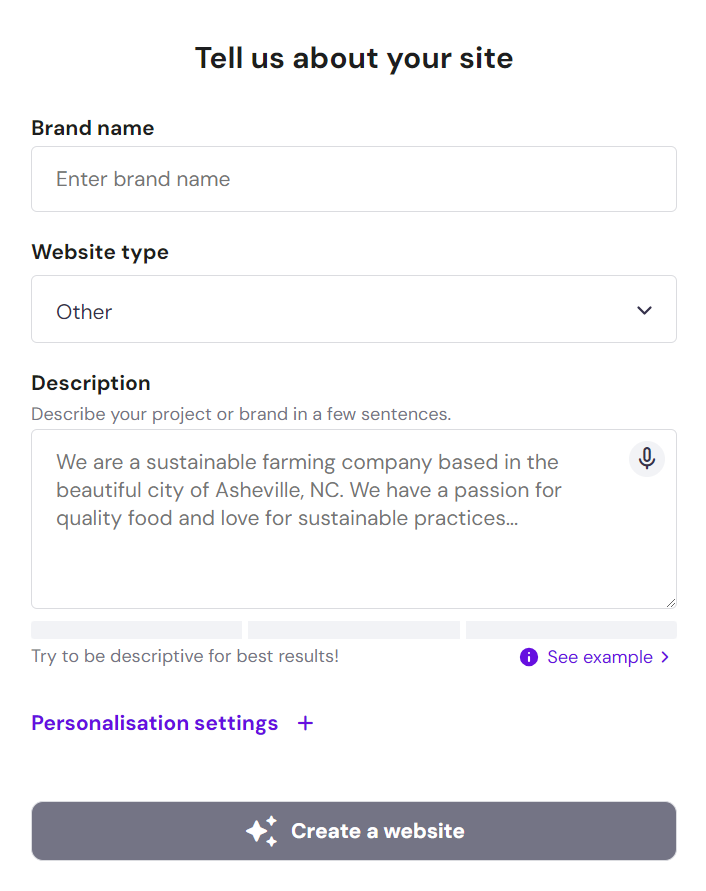
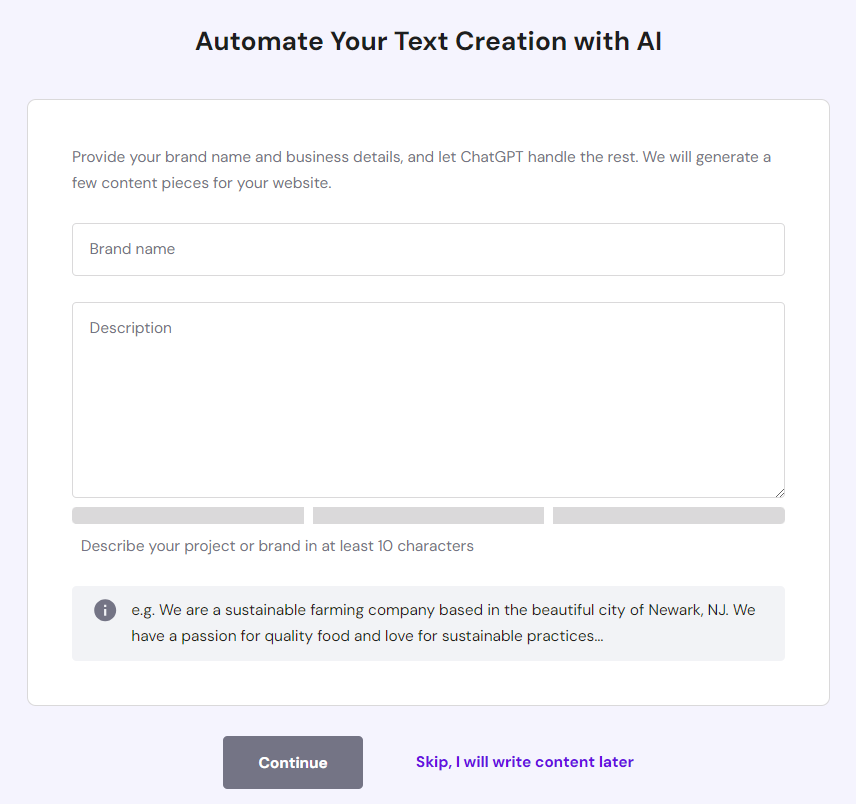
- Enter your brand details and website type. Be as descriptive as you can to help AI understand your needs. Expand Personalization settings to set your preferred style and color palette instead of randomizing them. Once you’re done, hit Create a website.
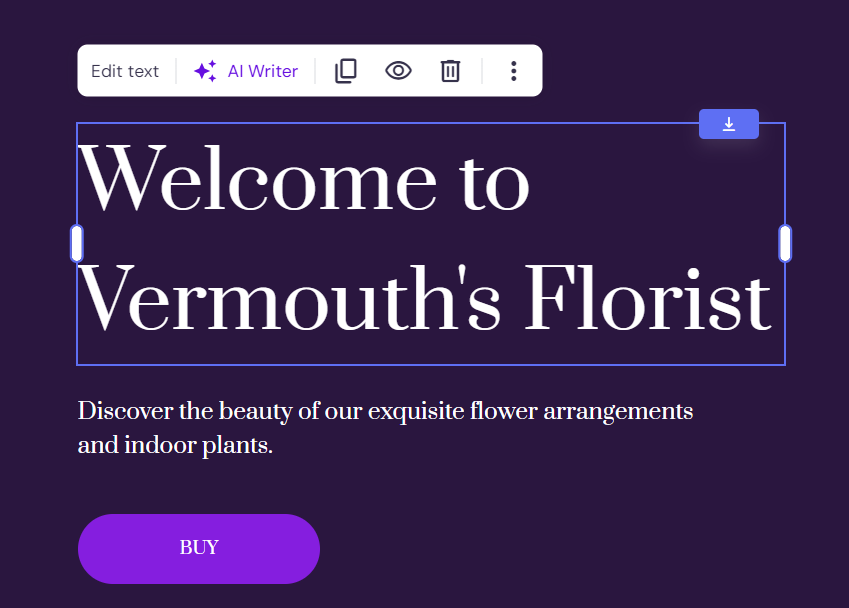
- The site builder will preview the first iteration of your website. Click Edit site to customize the layout and content or go Back to AI form to change the prompt and create a new website design.
- On the site editor, rearrange pre-added elements by dragging and dropping them with grid assistance for precise placement. Click an element to show its toolbar for adjusting position, visibility, and style. The site editor includes an autosave feature that automatically stores all changes.
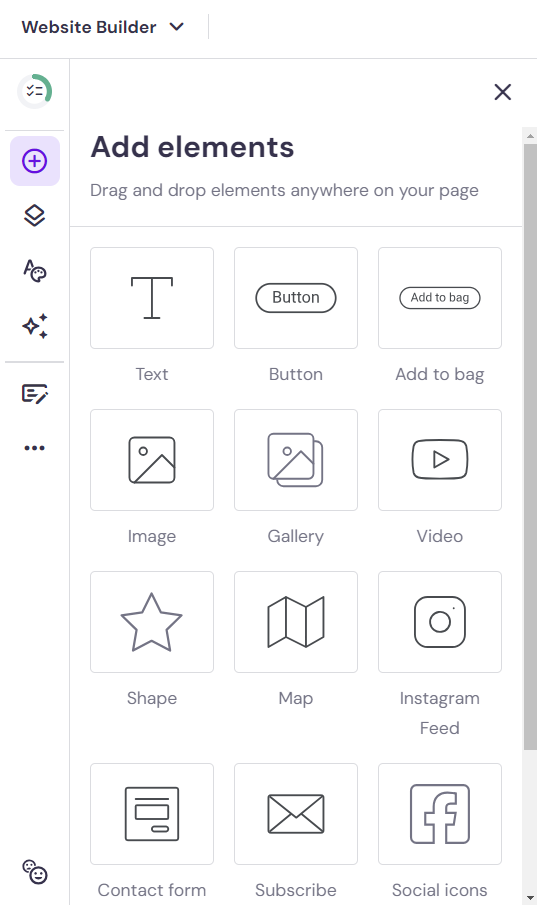
- To insert a new element, click on the (+) button on the sidebar and drag and drop one from the available options to the editor.
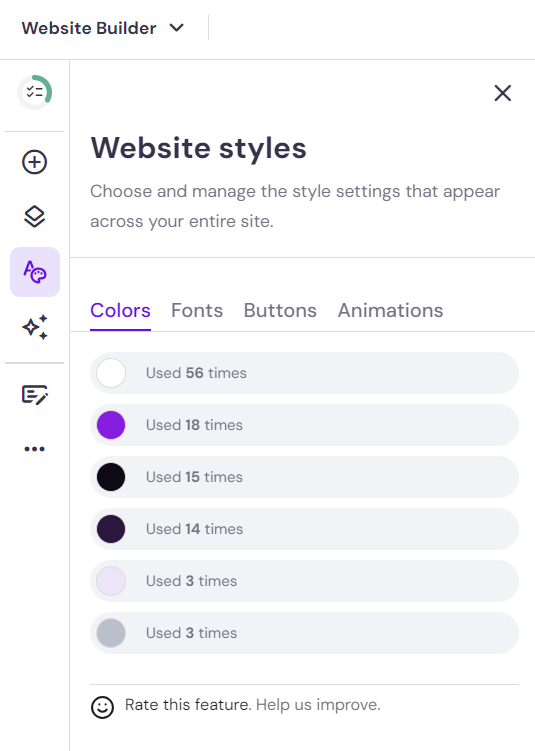
- Access Website styles to make global changes to your site’s appearance. This setting lets you adjust colors in the palette, text styles, buttons, and animations for elements.
See our guide on designing a website for detailed instructions and key focus areas. We’ve also compiled web design best practices to help you create a visually appealing look for a lasting impression.
2. Create Site Pages
One of the best advantages of leveraging our site builder’s AI onboarding flow is the time saved by not creating web pages from scratch. List the pages you require in the onboarding form, and AI will make them for you to customize further.
If you need more, making a web page yourself is easy and quick. Here’s how to make a web page using our website builder:
- Open Pages and navigation on the sidebar and click Add page.
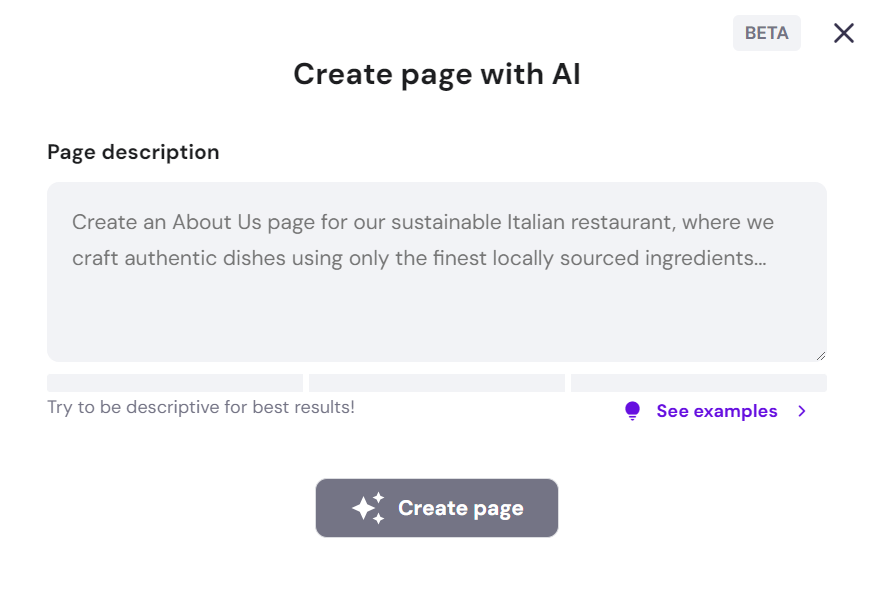
- Pick one of the ready-to-use page templates, create an empty page, or use AI to generate a custom page. For this tutorial, we choose to Generate page with AI.
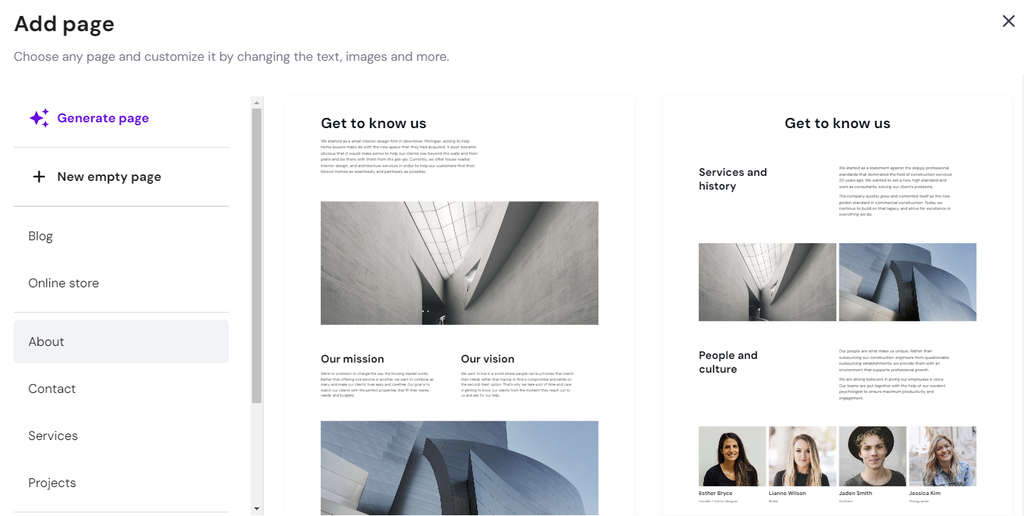
- Describe the page you want to make in the form, then hit Create page.
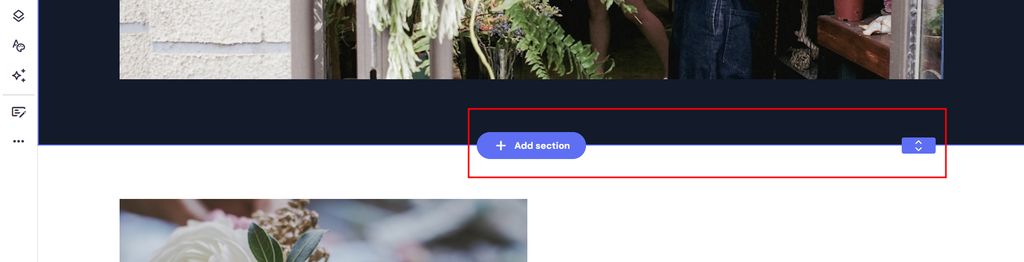
- The newly created page will come with several sections to start with. Hover between existing ones and click Add section to make a new one using a pre-built section template or AI. Raise or lower the Section height bar next to the section addition button to adjust each part’s height.
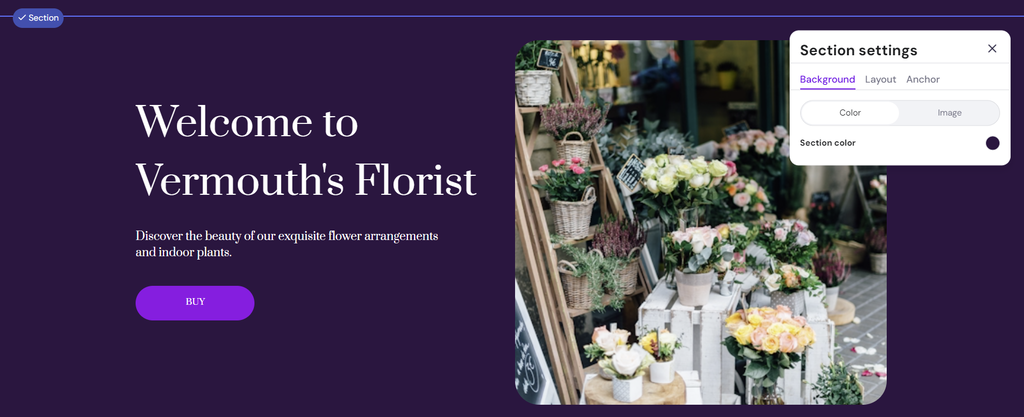
- Click on a section to display its toolbar for changing its background, layout, and order.
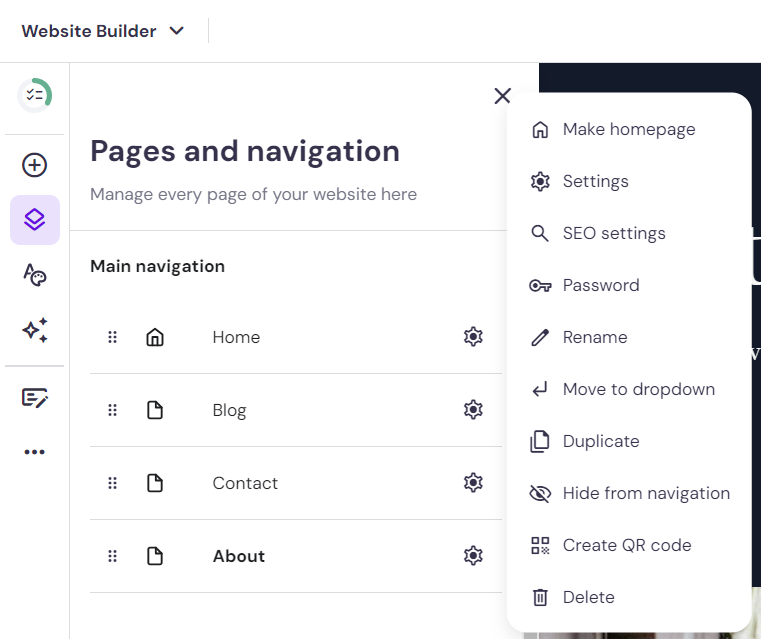
- Once you’re happy with the page’s design, return to Pages and navigation to configure its settings. Use the gear icon next to your new page for options like setting it as the homepage, adding a password, generating a QR code, or hiding it from navigation.
When adding main pages, ensure they align with your website goals. Each page should have a clear purpose, whether it’s to inform, engage, or convert visitors. For example, an effective About Me page should express the brand’s origin story and values. See our top About Me page examples for ideas.
Avoid cluttering the site structure with unnecessary pages, as this can confuse users and make finding information harder.
Consistent page layout and design across your site can improve user experience, creating a cohesive and intuitive navigation journey. Leverage the Website styles feature and the Preview mode to make site-wide adjustments quickly and see how your pages look together.
3. Add Functionality to Your Website
Depending on your goals, you may want to scale the site’s functionality with additional features. Blogging capabilities, for example, help enhance user engagement and visibility in search results. With eCommerce functionality, you can turn the website into an online store.
Here are the steps to add a blog to your website using Hostinger’s site creator:
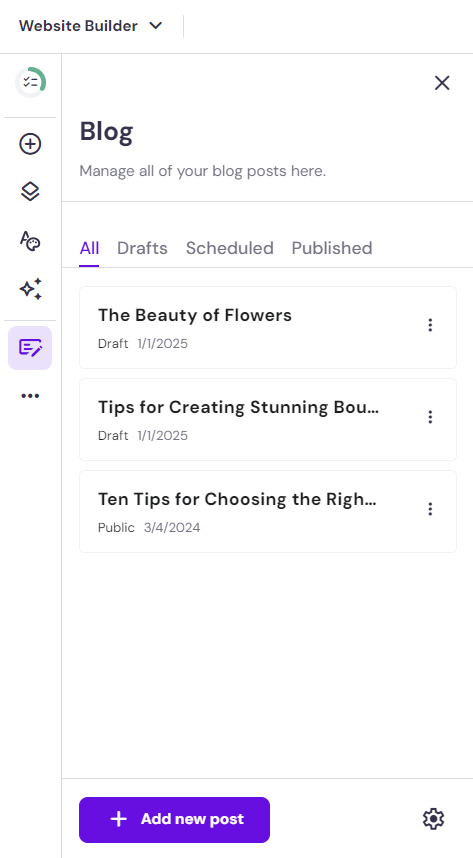
- Open Pages and navigation on the sidebar and click Add page. Pick Blog as the page type and select the pre-built blog template.
- Expand the Blog menu to manage your blog’s drafts, scheduled posts, and published pieces. Select Add new post to write new content.
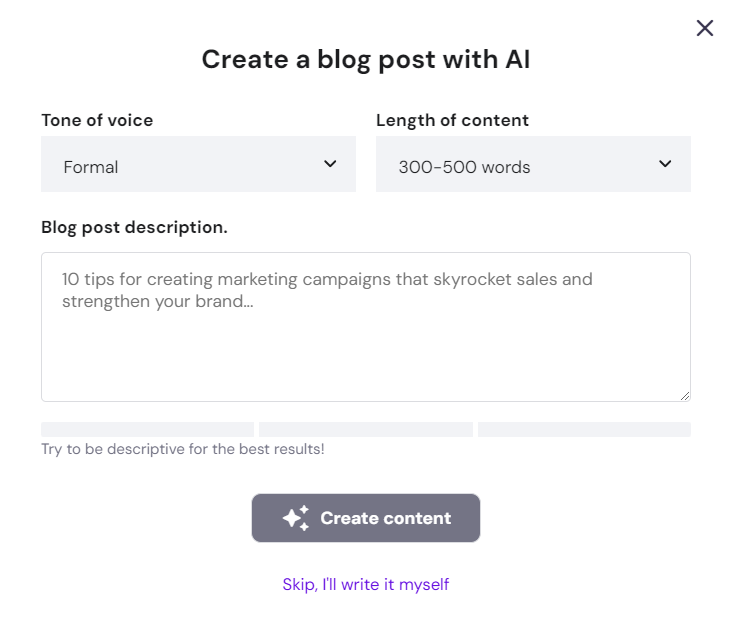
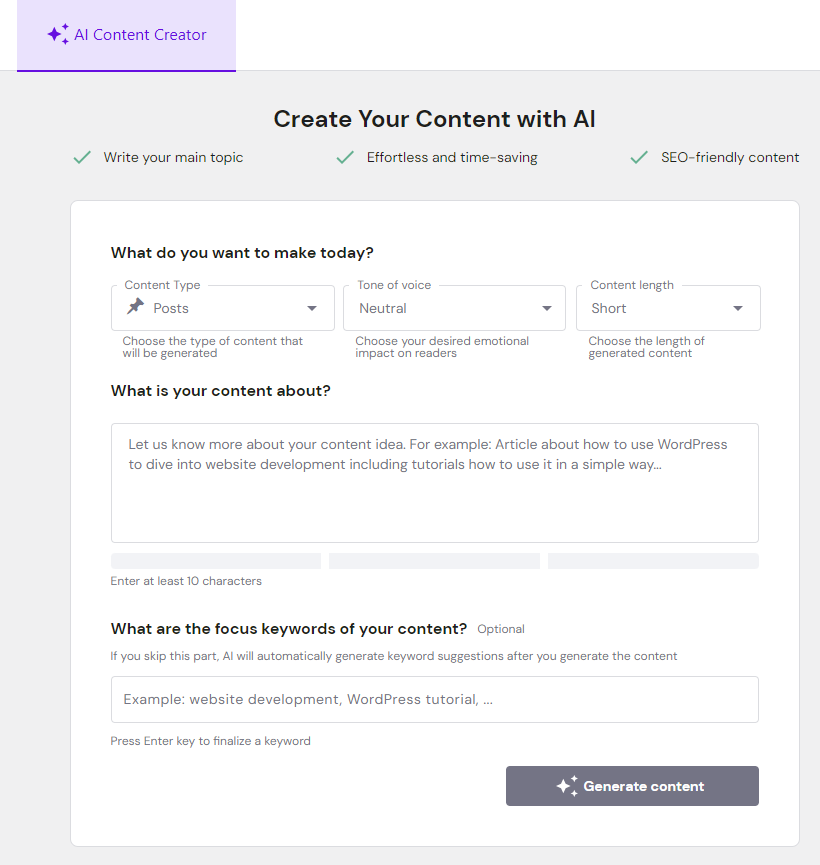
- Skip the form to write the blog post yourself. If you’re going to leverage AI, decide on the blog post’s tone of voice, length, and content and click Create content.
- Customize the blog post’s text and image elements as needed using the tools in their respective toolbar. Once you’re happy with the post, click the Status menu at the top of the main menu to make it Public when the site goes live.

See our guide on starting a blog for beginner-friendly best practices and ways to capitalize on it.
Follow these steps to enable eCommerce features on your website and start making money online:
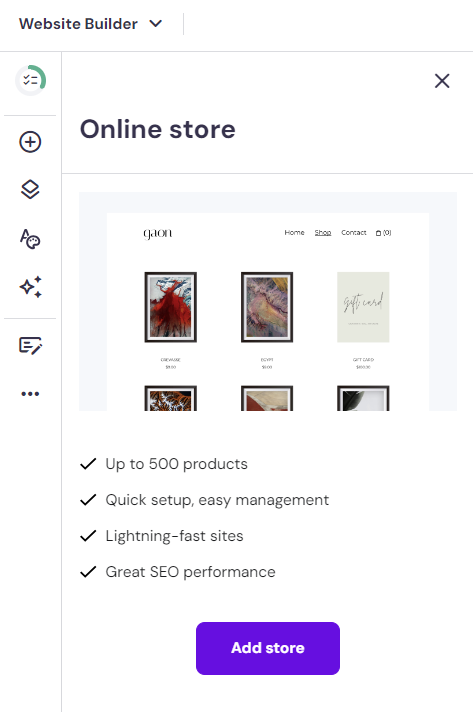
- Expand the Website settings menu on the sidebar and select Online store → Add store. The platform will create a new store page with a product list section.
- Return to the Online store menu and click Manage store to access the store manager.
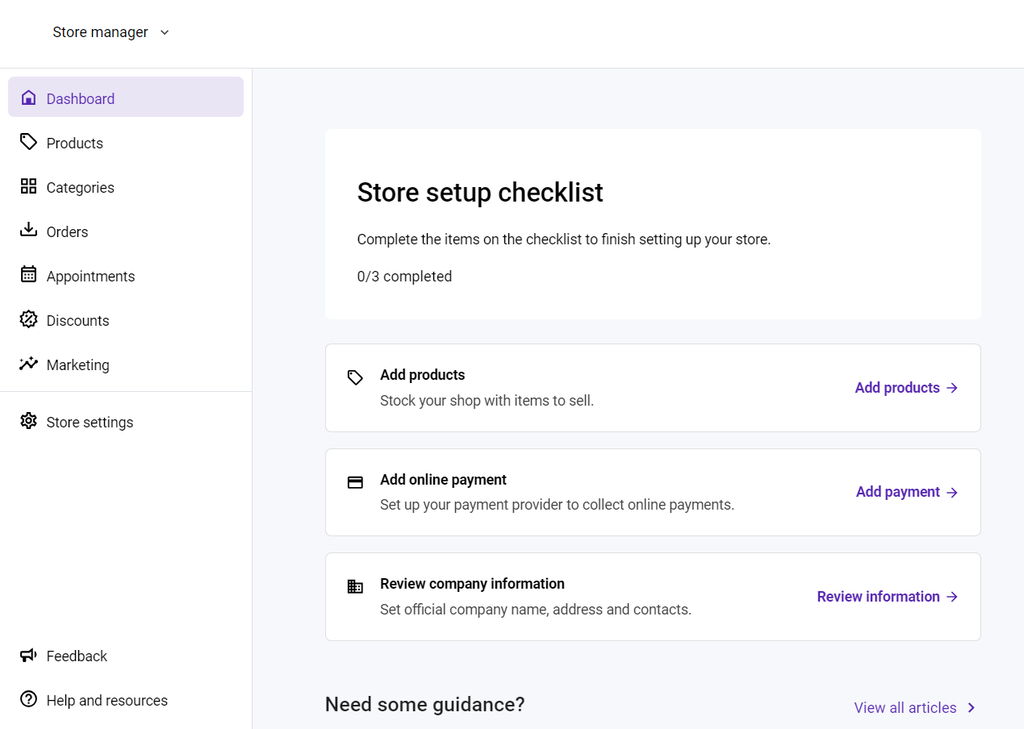
- Start setting up your online store by entering the store name, country, and preferred currency. Hit Continue.
- You’ll enter the store management area once the onboarding process is complete. Follow the store setup checklist to finish setting up your store, including adding products or services and payment methods.
Defining your business strategy, target audience, and marketing efforts are some of the key steps to starting a successful online store. Explore our tutorial to build a strong foundation for your online business.
4. Populate Pages With Engaging Content
Now that your site structure is ready, start adding content to the site.
You’ve learned how to insert new elements into your website in the first step. The following steps will show you how to leverage Hostinger’s integrated AI tools to populate your site with engaging content:
- Drag and drop the text element into the page to add text-based content. As the toolbar appears, choose AI Writer.
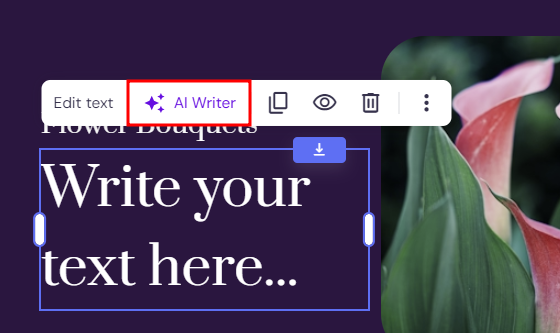
- Describe the content you want in detail, then click Generate Text.

- Discard to remove the AI-generated text, ask AI to try again if needed, or keep the copy and continue writing. Double-click the text element to modify the copy and style.
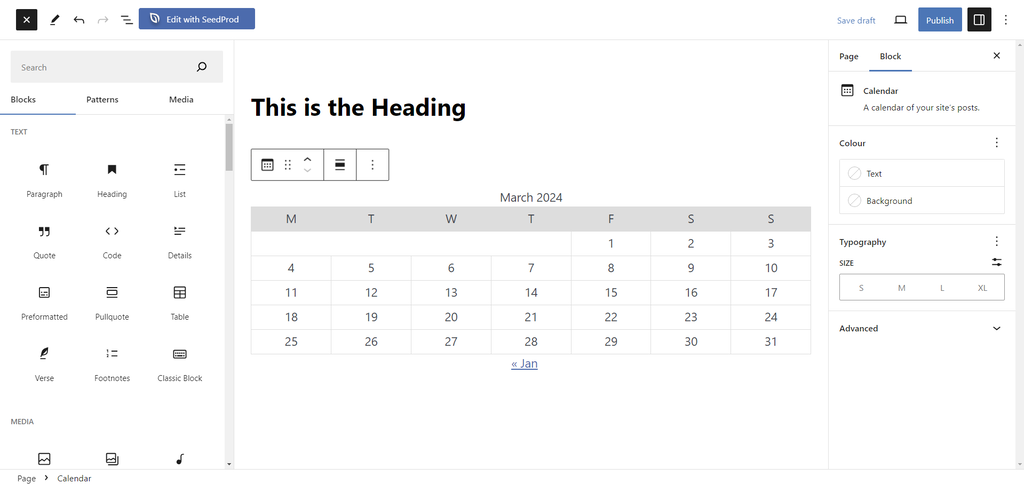
- Next, populate your website design with visuals using AI Image Generator. Drag and drop the image element into the page and choose Generate image.
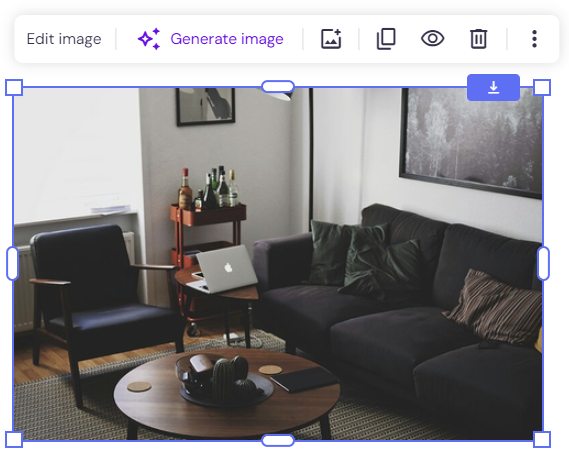
- Describe the image you want and choose the style. Click Create images.
- The AI tool will create several images in PNG format to choose from. Pick one that fits your preferences best, or go back to form and try a different prompt.

- To change the image, select the image element and select Edit image from the toolbar. Choose Replace image, then switch it with another AI image generated earlier or upload your own. All AI images are accessible in the media library.

Access AI Writer and AI Image Generator anytime via the AI tools menu on the sidebar. By default, the latter gives you five credits to generate five free images. Choose the Buy more option to purchase more credits. Check out our guide on maximizing AI Image Generator usage.
Feel free to populate your website with other content types from the elements directory, such as galleries, videos, and contact forms. Make sure each element has a specific purpose to maintain the web design’s aesthetic and clarity.
5. Optimize Your Website for Search Engines
Optimizing your website for search engines, also known as search engine optimization (SEO), boosts its chances of showing up in search engine results pages as visitors browse for relevant keywords in your niche. It’s a continuous process that brings your site traffic and conversions without paying for ads.
One of the most effective SEO practices is integrating keywords into your website’s titles, descriptions, headers, and body text. These keywords are terms or phrases people search online to find what your site offers.
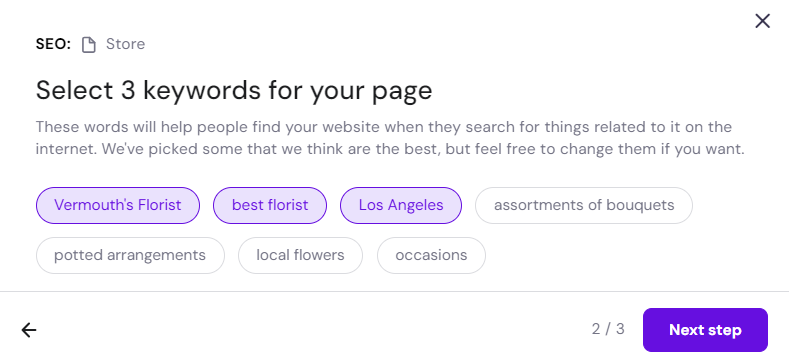
Leverage tools like Google Keyword Planner or Keyword Tool to research popular search terms related to your niche. For instance, using keywords such as “Los Angeles florist” and “best Los Angeles florist” in a local florist’s website content can enhance its online visibility.
Once you compile a list of keywords, follow these steps to fine-tune your website’s look on search engine result pages:
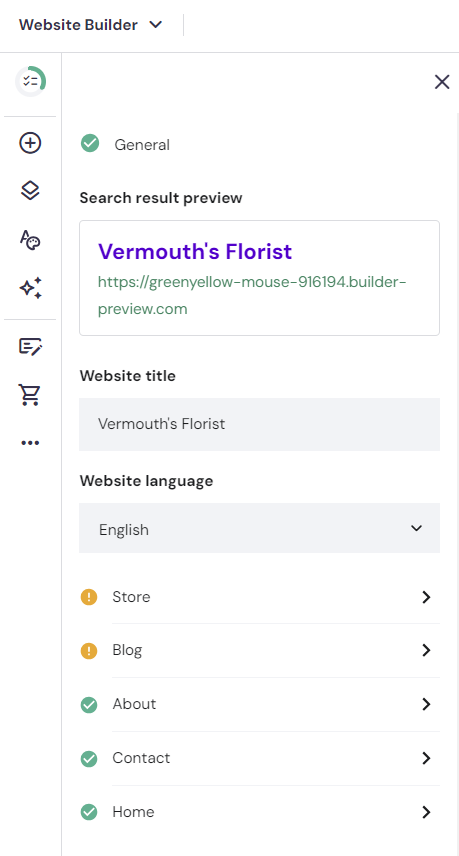
- Go to Website settings → SEO from the sidebar to access all the customizable search engine optimization settings.
- A yellow exclamation mark by a page title indicates missed SEO opportunities. Click the highlighted title to optimize it.
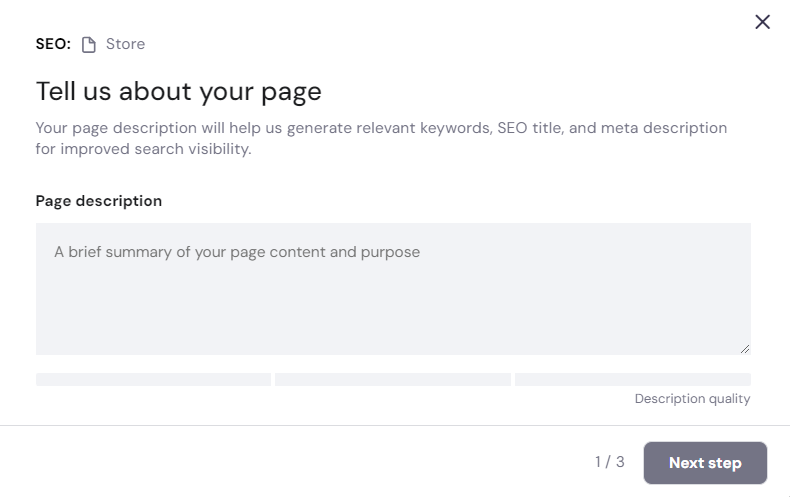
- Create a concise summary outlining the page’s content with relevant keywords. For search engine visibility, keep the page description under 160 characters to avoid Google truncation. Click Next step.
- The platform will provide keywords for your page’s ranking based on the page description. Select three keywords to represent your page, then click Next step.
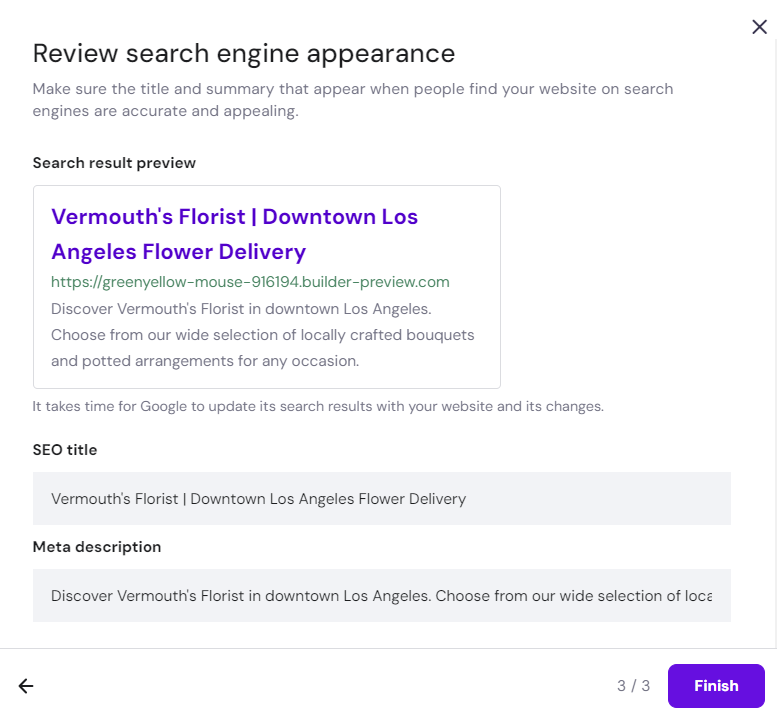
- The last step is refining the page’s SEO title and meta description, which will be visible in search results. Once you’re happy with the preview, click Finish.
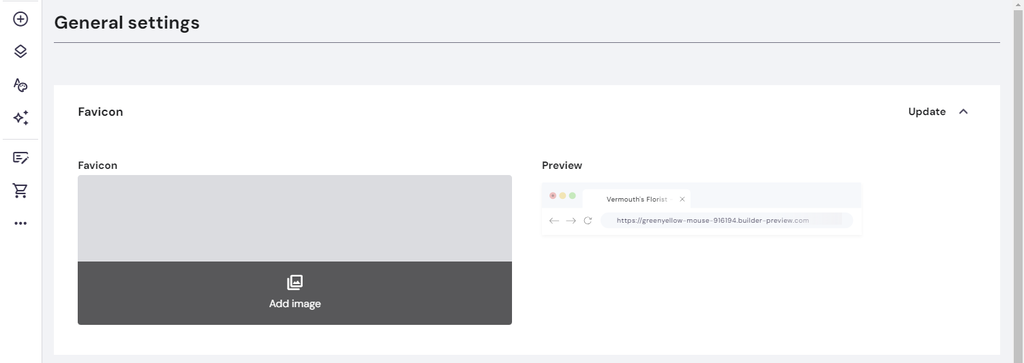
- Return to Website settings and access General settings. Expand the Favicon section and click Add image. This icon will show next to the page title in the browser tab, so we recommend using a custom logo design to boost brand visibility.
There are more SEO tasks a website owner should perform to increase their online visibility, such as optimizing site speed, mobile responsiveness, and images. Luckily, our website builder automates them right from the start.
6. Publish Your Website
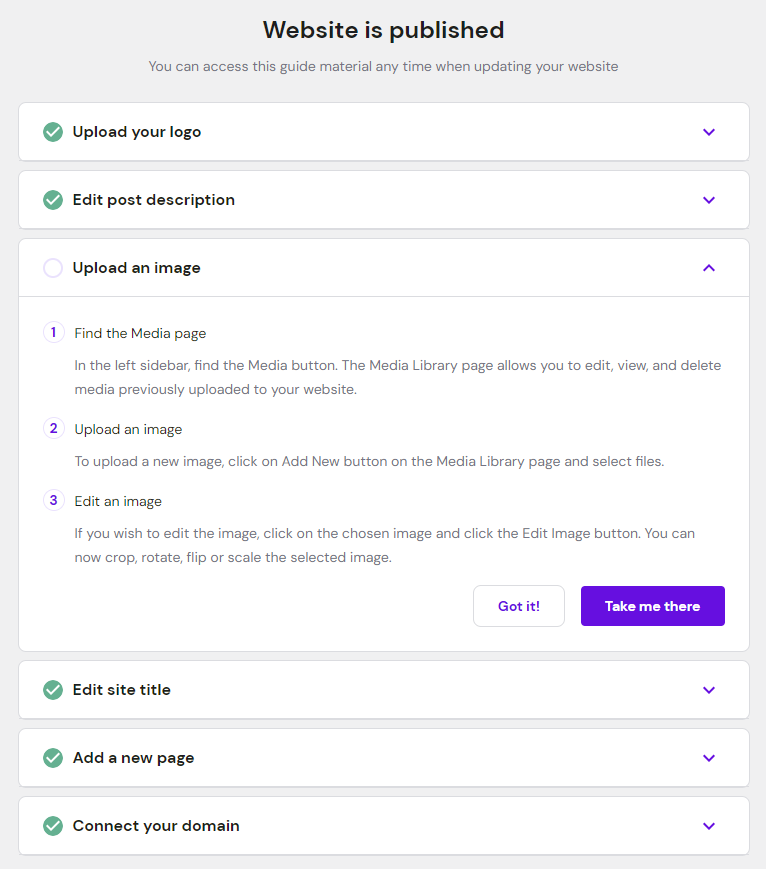
We’ve gone through all the basic steps to build a website using Hostinger’s site creator. Open the Site setup checklist on the sidebar to complete the remaining tasks, such as adjusting the web design for mobile viewing and adding social media links.

Once you’re happy with the website and ready, hit Go live at the top right corner of the page to launch it.
How to Make a Website With WordPress
With Hostinger, creating a website with WordPress is similar to using our website builder. Let’s go through the steps to set up a website using the popular CMS.

1. Install WordPress
While there are several ways to install WordPress, we’ll cover the easiest installation method ‒ using hPanel’s WordPress onboarding flow. Here’s how to do it:
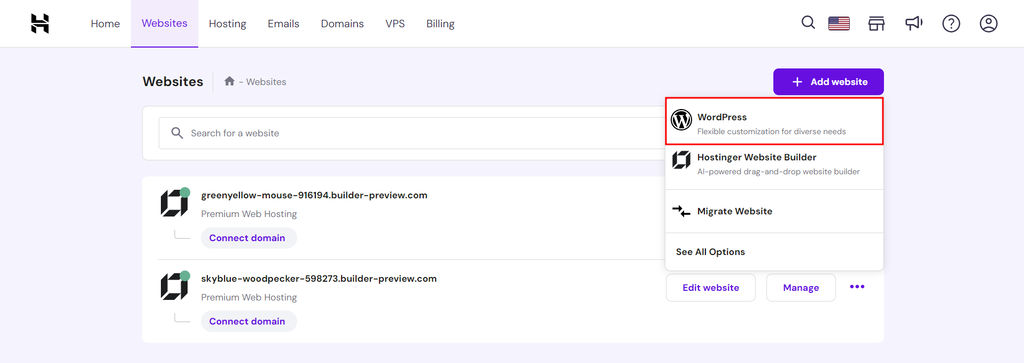
- Go to Websites from hPanel and select Add website → WordPress.
- Pick the type of website you want to build. For this tutorial, we’re creating a blog.
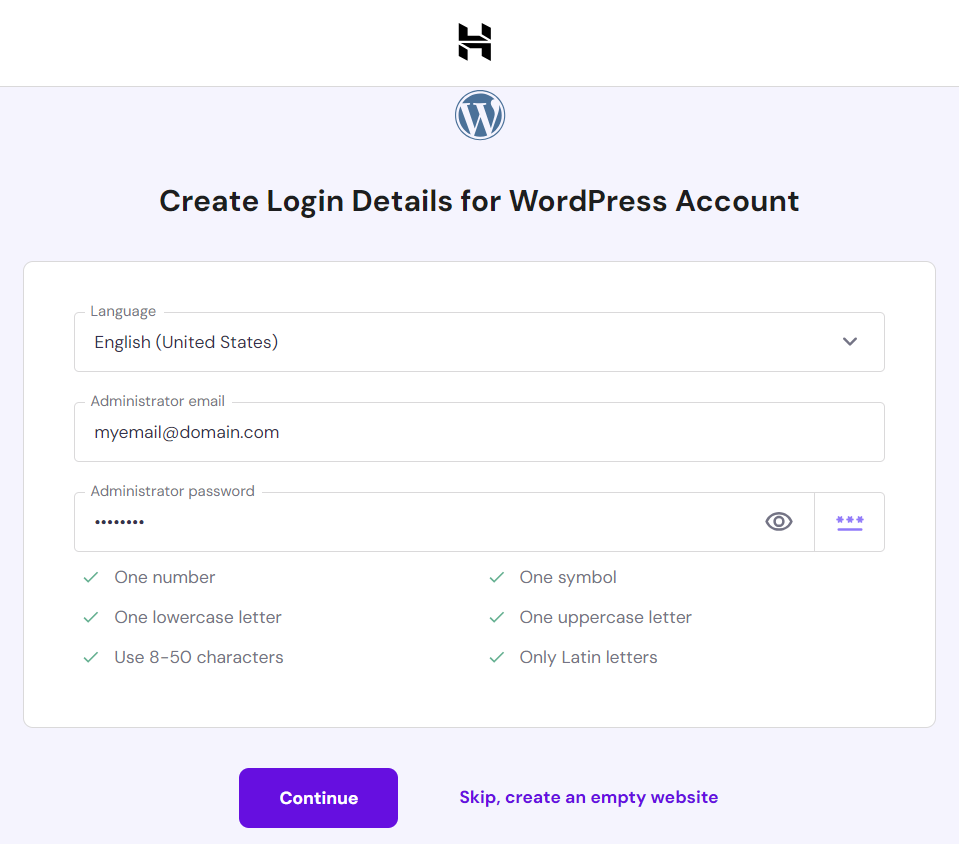
- Choose your preferred language and create login details for your new WordPress account. Click Continue.
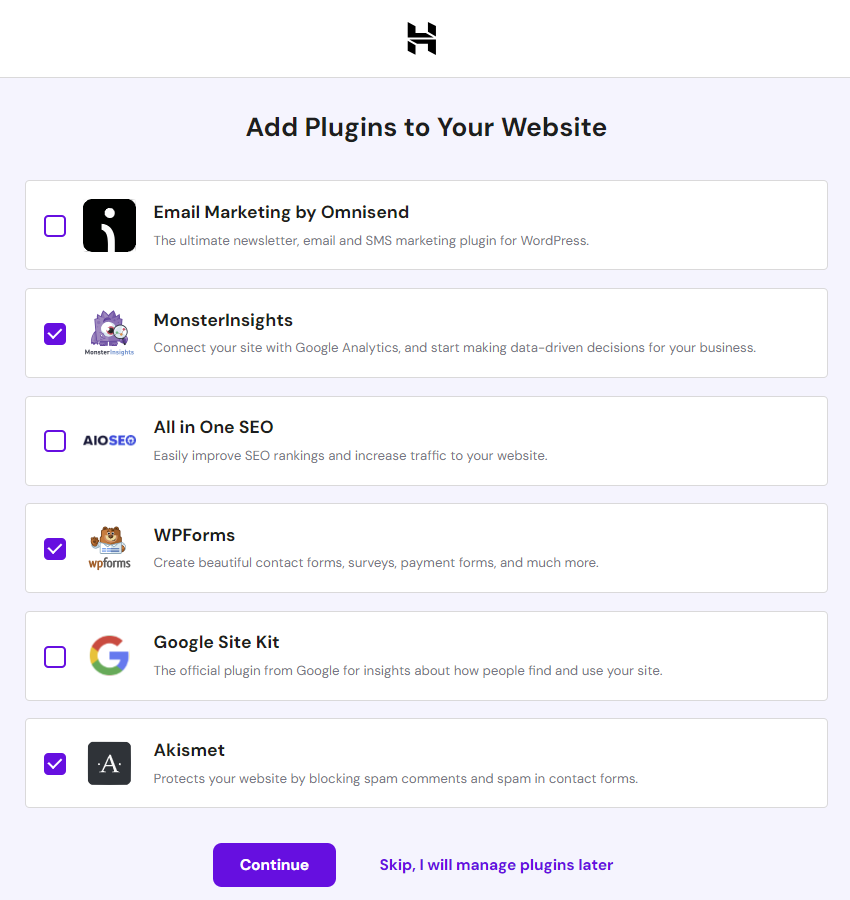
- WordPress lets you scale its functionality with plugins, which are software that extends existing functionality. Since you might not know which functions you need yet, skip this step to build a simple site.
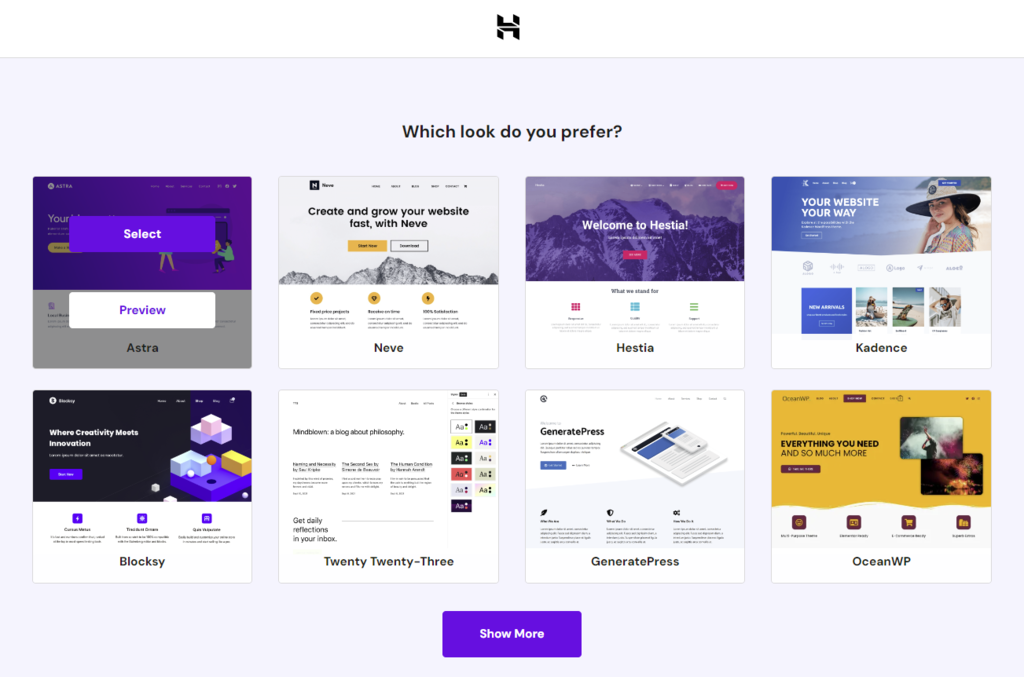
- The next step is picking a WordPress theme, which determines your site’s look. Hover over each and click Preview to see their design, then hit Select when you’re ready. We recommend going with Astra, as it works with all website types.
- Like Hostinger Website Builder, we also integrate AI into the WordPress onboarding flow to streamline the process. Add your brand name and describe the site’s purpose. Our WordPress AI tools will populate the site with content based on this information. Click Continue.
- Register the free domain name you get with the hosting plan and start the installation process.
- After installing WordPress, return to Websites in hPanel and click Admin Panel next to the newly created site to access the WordPress admin area.
Technically, your site is now accessible to anyone who knows its URL address. If you’re not ready for visitors, navigate to Settings → Reading from the WordPress dashboard, check the Search engine visibility option, and hit Save Changes.
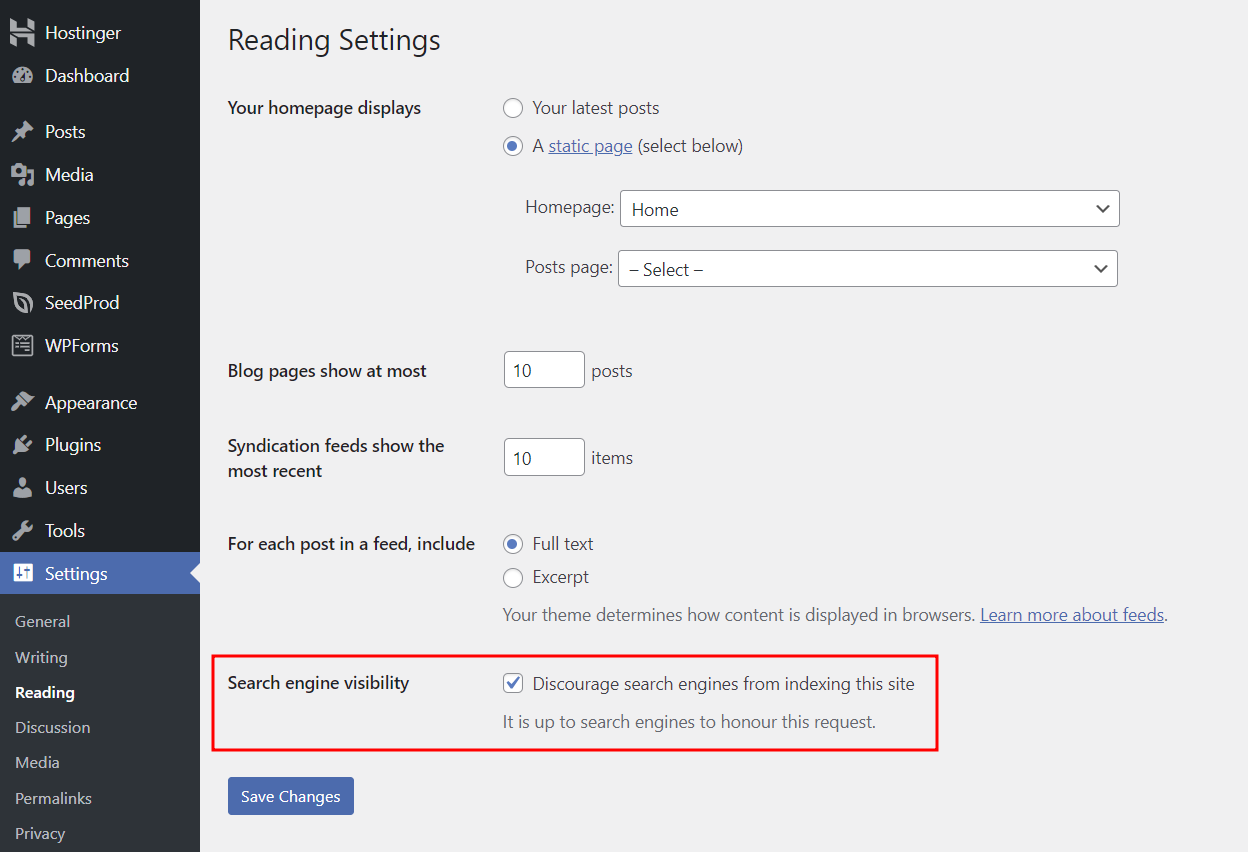
This mode prevents search engines from indexing and showing your site in search results.
2. Install a WordPress Theme
Hostinger integrates theme installation in onboarding so you can start customizing and populating your site right away. If you’re unsure about your chosen theme or haven’t decided yet, you can easily install one from your WordPress admin dashboard.
Here’s how to change a theme in WordPress:
- Navigate to Appearance → Themes from your admin dashboard. Select Add New Theme at the top of the page.
- Find the right theme for your website using the search functionality or Feature Filter. Hover over one and select Preview to see its web design. Click Install on your choice.
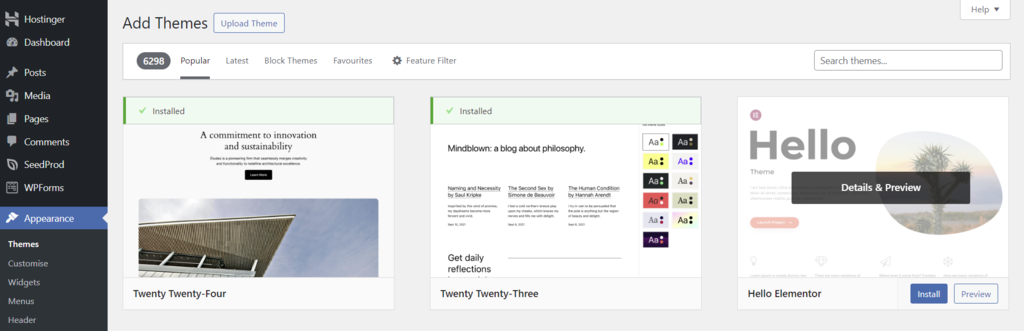
- After installing the theme, click Activate to start using it.
Explore our top free WordPress themes to streamline your search. Consider the theme’s rating, mobile compatibility, and relevance to your niche.
Furthermore, remember to thoroughly test your new theme before going live on your site. Changing themes after publishing could impact your site’s layout and functionality.
3. Install WordPress Plugins
Many excellent WordPress plugins can help you build all kinds of websites. For now, let’s install SeedProd, one of the best WordPress page builders for no-code customization.
Here’s how to install a WordPress plugin:
- Navigate to Plugins → Add New Plugin from the admin dashboard.
- Locate SeedProd using the search bar, then hit Install Now.

- After the installation is complete, click Activate. Your installation and active plugins are accessible via the Plugins menu.
Despite their use, installing too many plugins can slow your website down. Choose the best plugins for your site’s needs and keep them updated through Dashboard → Updates or hPanel for optimal website performance.
Hostinger users on Business Hosting and Cloud Hosting plans get AI Assistant pre-installed for streamlined content creation and importation. This in-house plugin helps you tailor posts and pages to match your preferred tone of voice, length, and focus keywords.
4. Create Site Pages and Navigation Menu
The easiest way to create pages is using AI Assistant. Alternatively, add pages manually by following these steps:
- Go to Pages → Add New Page from the admin dashboard.
- Add the page title and body text to the page editor.
- To add WordPress widgets or elements, click on the plus (+) button at the top left of the page and drag and drop them to the editor. Customize each block using the toolbar and right sidebar settings.
- Add images to the WordPress page using the image block or as a featured image through the page settings on the right sidebar.
- Preview the page to check the page’s look and Save draft for future customization. Once you’re happy with it, hit Publish.
As a robust CMS, WordPress lets you create a custom navigation menu with pages, posts, and category pages. This feature can improve visitors’ experience and direct traffic to high-converting pages.
Here’s how to add a page to a WordPress navigation menu:
- Go to Appearance → Menus from the admin dashboard.
- Check all the Pages, Posts, or Categories you wish to Add to Menu. You can also add Custom Links as menu items.
- Drag and drop menu items under the Menu Structure section to reorder them. To create a sub-menu, place a menu item under the primary item.

- Add the menu name and hit Save Menu.
If you want to target an international audience, consider adding menu icons to increase your navigation menu’s accessibility. Leverage plugins like WP Menu Icons and Menu Image to simplify the process.
5. Populate the Website With Engaging Content
WordPress comes with built-in blogging functionality, allowing you to start publishing blog posts to attract traffic. Despite sharing similar creation steps with a page, a WordPress post allows for easier organization with categories and tags. Check out our comparison of WordPress pages vs posts for optimal use.
Here’s how to create a post in WordPress:
- Navigate to Posts → Add a New Post from the admin dashboard.
- Add post title, body text, visuals, and widgets to the post editor.
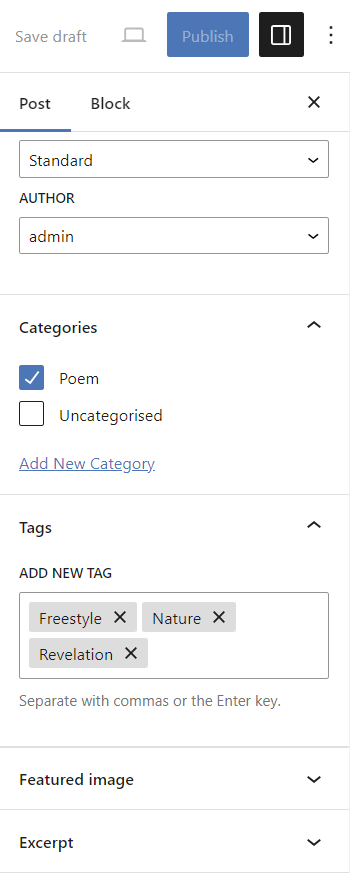
- Assign one or multiple Categories and Tags through the page settings on the right sidebar. Categories cover the blog’s general topics, while tags are more specific to each post.
- Configure the post’s Visibility and Publish settings if you want to limit access with a password, keep it private, or schedule its publish date and time.
- Once you’re done, hit Publish.
Check out our top WordPress website examples for content ideas.
6. Optimize Your Website for Search Engines
An SEO-friendly theme and keyword-optimized content give you a head start in search engine rankings. However, you can boost your SEO efforts even further by adding WordPress meta descriptions to pages and posts.
Here’s how to add WordPress meta descriptions using Yoast SEO, one of the best SEO plugins for improved online visibility:
- Install and activate the Yoast SEO plugin.
- Go to Posts → All Posts from the admin dashboard. Hover over the post you want to optimize, then hit Edit.
- In the post editor, scroll down to the Yoast SEO plugin section.
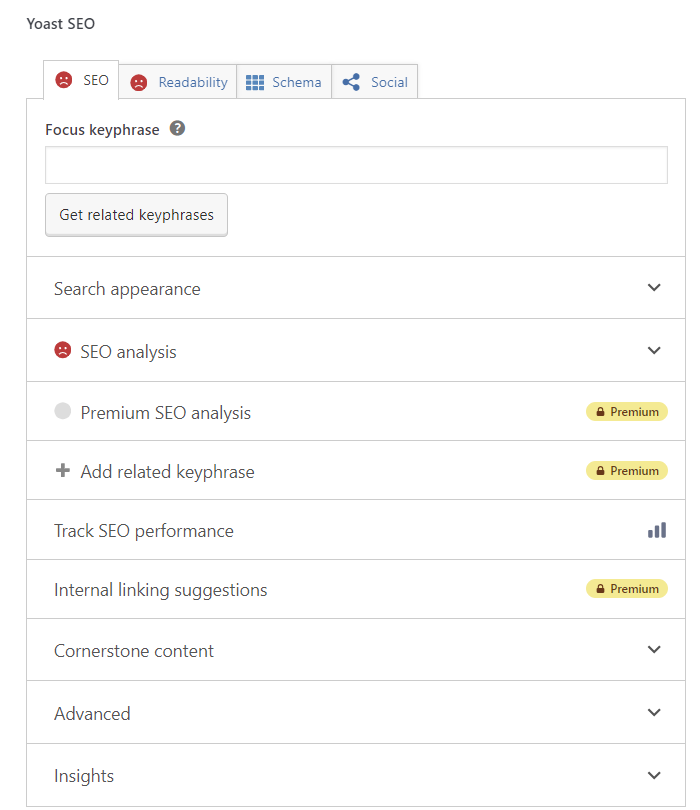
- Enter the Focus keyphrase you want the post to rank. Keep in mind that a focus keyphrase should be unique for each post or page.
- Expand the Search appearance section and type in the SEO title and meta description using relevant keywords. Preview their appearance on desktop and mobile results.
- Expand the SEO analysis section for any flagged issues and improvements to boost online visibility. Address all items until the tab icon is green.
- Update the post once you’re done.
Like website builders, WordPress also allows users to add a custom website logo via Appearance → Customize. As for your WordPress favicon, we recommend using a favicon plugin for easier customization.
See our guide for WordPress SEO tips, best practices, and plugin recommendations to simplify your optimization efforts.
7. Publish Your Website
Do a final review of your website by hovering over your website name on the top left corner of the page and clicking Visit Site. Verify all links, images, forms, and functions to ensure they work properly.
Head to Hostinger → Get Started from the admin dashboard for any website setup steps you might miss. If there’s an incomplete step, expand it and select Take me there to act on it.
Once you’re happy with the site, navigate to Settings → Reading and uncheck the Search engine visibility option to make it visible in search results.
Having Second Thoughts?
If you’re unsure about WordPress or want to compare it with another website development solution, you can easily switch to Hostinger Website Builder. Locate your site in the Websites section and select the ellipsis (…) button → Change to Hostinger Builder. You’ll have 14 days to revert this change
How to Make a Website – Video Tutorial
Watch this video tutorial for step-by-step instructions on setting up a website using Hostinger’s site builder.

Your Website Is Now Online – What’s Next?
Launching a website is only half the battle. The next steps are crucial for engaging with your audience, securing the site, and ensuring its growth and sustainability.
Here are the key areas to focus on after your website goes live:
Marketing Efforts
Traffic is essential for your website’s growth, so it’s important to start promoting your site to your target audience as soon as possible.
A simple and cost-effective way to start is by using social media platforms to share content and increase website traffic. Choose platforms frequented by your audience to maximize your marketing impact. For example, Facebook is ideal for reaching an audience over 30, while Instagram tends to attract a younger demographic.
Consider starting an email newsletter to boost conversions by keeping subscribers engaged with updates, promotions, and exclusive content. Add a subscription form to the site with incentives for visitors who sign up.
If you’re interested in blogging, we compiled effective blog marketing strategies to help promote your content. For business websites, check out our eCommerce marketing strategies for expert tips and best practices.
Performance Monitoring
Understanding how your website performs post-launch is essential for making data-driven improvements. Regular monitoring provides insights into visitor behavior, page loading times, and user experience, all crucial to enhancing your website.
Use Google Analytics to track vital metrics like visitor numbers, bounce rates, and average session duration. Additionally, leverage tools such as GTmetrix and Pingdom to analyze site speed and pinpoint ways to enhance visitor engagement and retention.
Check out our guide for website performance analysis tips and tools.
Security and Maintenance
Securing your website is vital for protecting data and content, especially when collecting visitors’ personal information. Hostinger’s site builder streamlines tasks with automated updates and security monitoring, letting you concentrate on creating and growing your website.
With WordPress, update the core software, plugins, and themes via the admin dashboard or hPanel. See our guide for WordPress update methods and steps. Removing unused plugins and themes and installing SSL certificates can also help secure your WordPress site.
Additionally, create website backups to prevent data loss and reduce downtime in case of a security breach or data loss. Hostinger also automates this crucial process for all hosting plans, ensuring peace of mind and easy recovery options.
SEO Improvements
Adapting your SEO strategy is essential for making your website more visible on search engine results pages.
Refreshing your content periodically with up-to-date information, new visuals, and trending keywords is one way to enhance online visibility. This is especially important for dynamic sections in your website, like blog posts and product pages, where new content can drive more traffic and improve conversion rates.
If you wish to create a business site catering to local markets, consider setting up a Google My Business profile. This free listing ensures your business info shows on Google Maps and local search results, which is crucial for local SEO.
Check out our guide for more tips on making an SEO-friendly website that ranks well.
Monetization Options
Whether you’re launching a blog or an online store, there are several ways to turn your website into a revenue stream. One common method is through advertising platforms like Google AdSense, where you can earn money based on site traffic and ad clicks.
If you enjoy writing or video production, affiliate marketing lets you earn commissions by promoting products or services that align with your content and audience.
Alternatively, nurture a dedicated following by offering memberships with exclusive content, discount codes, or other perks as incentives. This strategy is effective for websites with niche or specialized content where users value unique insights or resources.
You can also join referral programs and earn a commission for every person you successfully refer. For example, our Hostinger Referral Program offers a 20% commission for each successful referral, while your referral gets 20% off, too.
Successful monetization depends on balancing valuable content for your audience with income strategies that align with your site’s values. Prioritize making high-quality content before exploring monetization strategies that align with your brand and audience.
Conclusion
A website is vital for growing personal and business brands. It opens doors to various opportunities, expanding your reach to connect with a global audience. With a ton of user-friendly platforms and tools available, even beginners can make professional websites without technical expertise.
Hostinger’s no-code site builder is the perfect solution for those just starting. Designed for ease of use, it provides a seamless experience with all essential tools and features in one place. Integrated AI tools further simplify the process in a few clicks for busy users.
On the other hand, WordPress caters to users who want more customization options. It’s perfect for crafting personalized websites, offering a wide range of plugins and themes for deep customization.
Whichever platform you choose, remember that it’s all about finding the best fit for your needs and goals.
We hope this article helped you understand how to design a website from scratch. Check out the FAQ section or leave a comment below if you still have any questions. Good luck!
How to Make a Website FAQ
This section answers common questions about making a website from scratch.
Do You Need Technical Knowledge to Make a Website?
No, you don’t need technical knowledge to build a website. Many platforms offer drag-and-drop tools that eliminate coding from the website creation process. Templates and guides are also available to help even beginners create an online presence.
How Much Does It Cost to Create a Website?
Website development costs vary based on your chosen platform. With Hostinger Website Builder, you can spend as low as $2.99/month to create any type of website. This cost includes hosting, domain registration, and access to various website-building tools. Check out our web development cost guide for a detailed price breakdown.
How Do I Create a Business Website?
Creating a business website is similar to making a personal site. The key difference is adding eCommerce functionality, such as a product catalog and payment processing. Hostinger’s site creator provides eCommerce features with multiple payment options to support your business needs.
How Do Website Owners Get Paid?
Website owners can earn money through various methods, such as displaying ads, selling products or services, affiliate marketing, and sponsored content. Hostinger’s site builder, for example, lets you accept online payments and connect Google AdSense, turning your website into a revenue channel.
How Long Does It Take to Create a Website?
The duration of building a website from scratch depends on the chosen platform, the number of pages, and the required functionality. You can develop a website in under an hour using Hostinger’s fast website builder. A custom website with complex features may take a few days to customize according to your needs.
How Many Products Can I Sell With Hostinger Website Builder?
You can sell up to 500 products with Hostinger’s online store maker.

Jordana is a Senior Content Writer with over 5 years of experience in digital marketing and web development. When she’s not busy with work, she dabbles in creative writing and movie reviewing. Follow her on LinkedIn.

Comments
November 19 2018
I always thought you needed extensive coding knowledge to build a site. Seems like it's no longer the case. Thank you for opening my eyes, Hostinger! What a time to be alive...
July 11 2020
Ok I love your perspectives and your methods I have stolen one or another tip I have shared your article in my successful networks thanks for your content
July 14 2020
We are always happy to help Didier! :)
October 01 2020
Nicely informed post. Thanks for sharing this post
November 18 2020
Always happy to help.
April 30 2021
I found your article truly informative and very helpful. I am looking to create a website. I appreciate that you shared some tips on how to make a website.
May 06 2021
Hi Shivkumar! Happy to hear that this article helped :)
September 23 2021
Loved reading this post. Very informative even for me as an upcoming web dev.
October 06 2021
I really like your blog very informative and helpful my thanks for the info.
February 16 2022
Thank you for the beginner guide. the article is very very helpful for beginner bloggers, this article plays a great role to build up their career.
February 22 2022
Happy to hear it was useful!
March 07 2022
This is a very purposeful and useful information one should have. The in formation provided above can be seen in only some articles like this. I personally thank the article writer for writing such knowledgeable information with all of us. thank you.
March 09 2022
Happy to hear it was useful!
May 03 2022
Do I need to buy hostinger and zyro together? Intending to build a blog
May 04 2022
Hi there! You either need one or the other - depending on which platform you'd like to use to build your website. If you wish to use WordPress or another open-source platform, Hostinger is the way to go; however, if you'd like to build with an easy-to-use website builder, Zyro would probably be the better option for you :)
November 27 2023
I really enjoyed reading your informative and helpful article. As I am currently in the process of creating a website, I found your tips on how to make a website to be particularly useful. Thank you for sharing your knowledge!
November 30 2023
Thank you for your kind words! Glad to hear that. We're always happy to share our knowledge and help others create their own websites. Please don't hesitate to reach out to our Customer Success Team if you have any further questions or need additional guidance ?