How to Cancel a Bluehost Account and Migrate Your Services to Another Platform
Bluehost is a popular web hosting company that is known for its cheap hosting plans and easy new account creation process. However, canceling Bluehost services can be quite complicated and time-intensive.
Whether you’re dealing with poor performance, a confusing control panel, or other issues, you’re always able to take the necessary steps to improve your website experience.
As such, we’re here to ensure a smooth Bluehost cancellation process through this step-by-step Bluehost account closure guide and help you migrate to a different web host.
Download guide to using Hostinger
Why Cancel a Bluehost Account
The decision to cancel your Bluehost hosting account can come from a range of issues. Here are some common problems existing users face that push them to opt for other hosting providers:
Dissatisfaction With the Service
The overall service offered by the Bluehost customer support team often falls short of user expectations. Issues such as inconsistent chat support and complicated billing procedures make the web host a less attractive option for users with long-term web hosting needs.
Technical Limitations
Bluehost hosting services may not meet all the technical requirements for specialized or growing projects. Whether it’s the lack of globally distributed data centers with full-page caching or insufficient scalability options due to low storage and bandwidth, existing users are often searching for a more robust hosting service.
Performance Issues
Performance issues increasingly prompt Bluehost account cancellations, with slow loading times often cited as the primary concern. Although the web host is marketed as one of the fastest providers, certain aspects like CPU throttling and low inode limits can inadvertently impact site speed and availability.
Security Concerns
While Bluehost offers basic security features, some users need more support for their site. For instance, the SiteLock Security Essential software comes with an additional cost, and automatic backups are not included in their two cheapest shared hosting plans. These limitations are commonly cited as one of the key reasons to cancel a Bluehost account.
Lack of Modern Features
While Bluehost offers a range of features, it may fall short for those looking for more specialized functionalities. This lack of specific features is pushing many users to consider Bluehost alternatives that can offer more comprehensive solutions.
For instance, Hostinger Website Builder combines essential hosting capabilities and modern features like a drag-and-drop website builder, AI website creation, and a host of analytical and marketing integrations, such as an AI Copywriting Tool and AI SEO features.

Steps to Cancel a Bluehost Account
To permanently delete a Bluehost account, you’ll need to carefully navigate a series of critical steps. The following instructions will ensure that you’re discontinuing your Bluehost subscription in an effective manner, leaving no loose ends.
1. Log into Your Bluehost Account
Log into your account using your credentials to initiate the process to terminate Bluehost services.
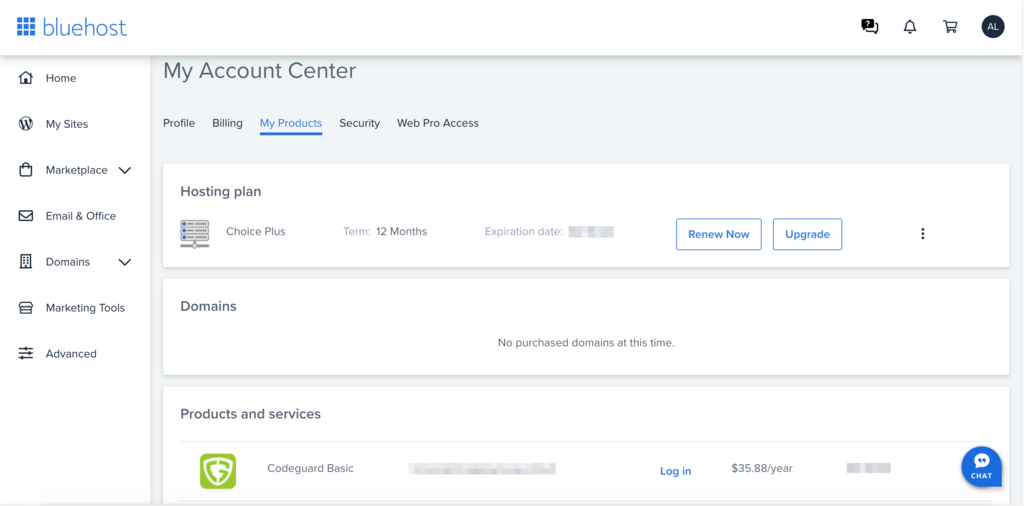
Once you’re in, navigate to the account settings section within your dashboard and click on Products.
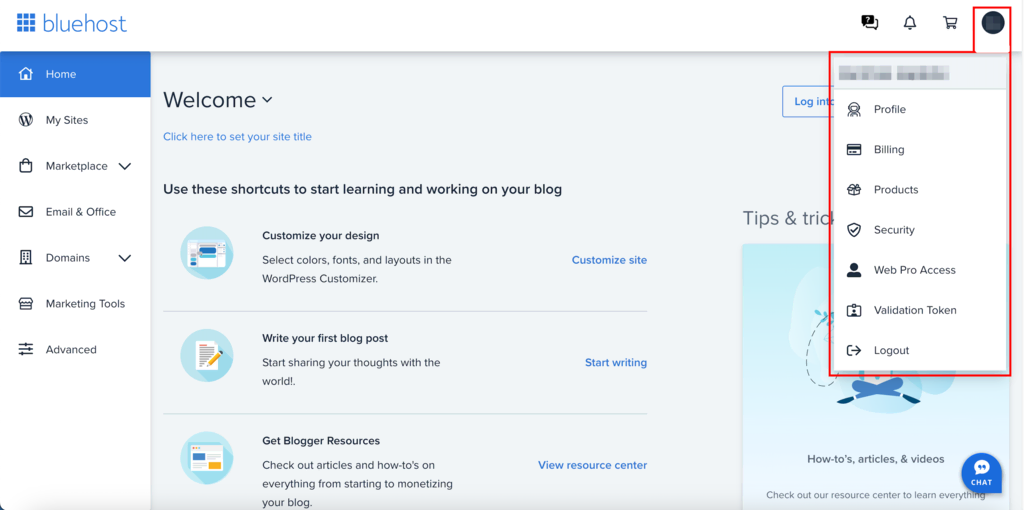
You will be taken to the My Products tab under the My Account Center section. The tab gives you easy access to all the products and hosting services you’ve purchased from the web host, including your hosting plans and domain names.
2. Turn Off Automatic Renewal
Now that we’re in the My Products tab, we can go ahead and take care of a crucial step: turning off automatic renewal and closing your Bluehost hosting plan.
This action ensures you won’t incur additional charges after the cancellation.
To do this:
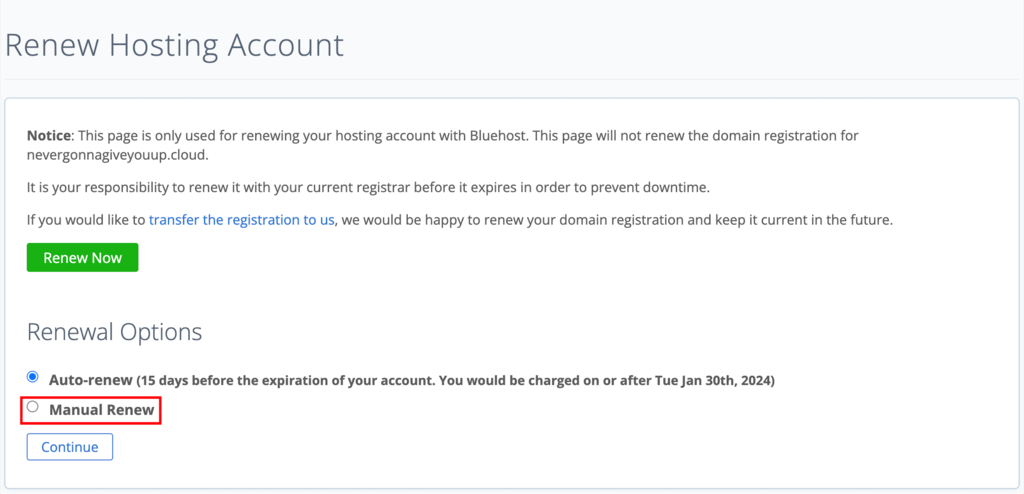
- Click on the three dots next to your hosting plan and then click on Renewal options.
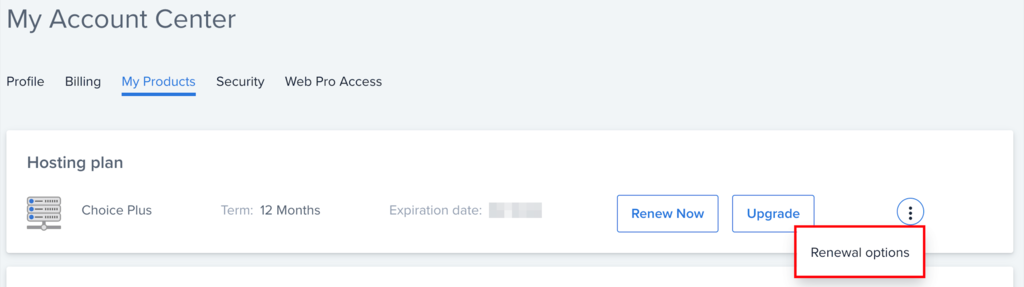
- Select the Manual Renew radio button in the new window that opens, and then click Continue.
3. Back Up Your Website Data
Next, let’s move on to the most important precautionary measure: backing up your site data.
This action ensures that all your important files and databases are safe and sound, even if something goes wrong during the cancellation process.
Here’s how you can do this:
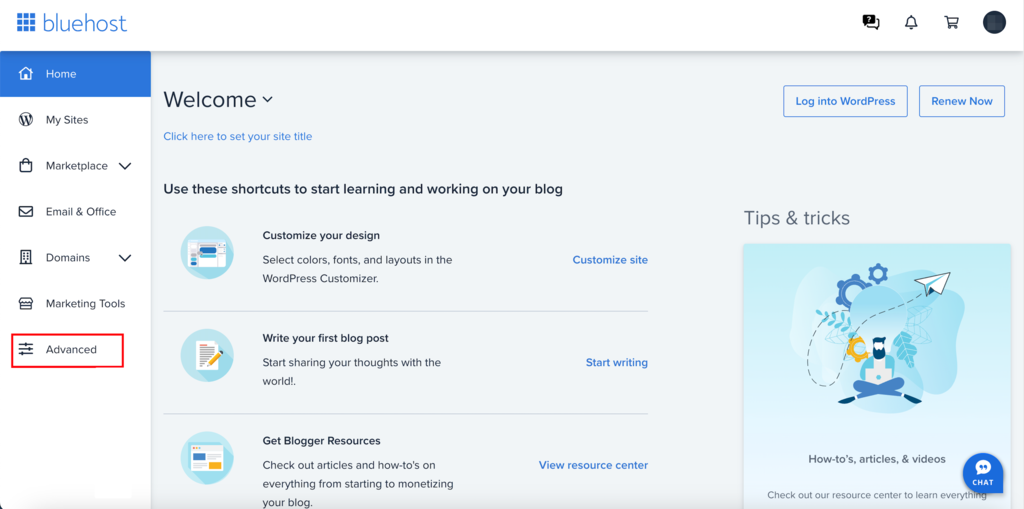
In your Bluehost dashboard, click on Advanced in the menu bar to the left of your screen. It will take you to your control panel.
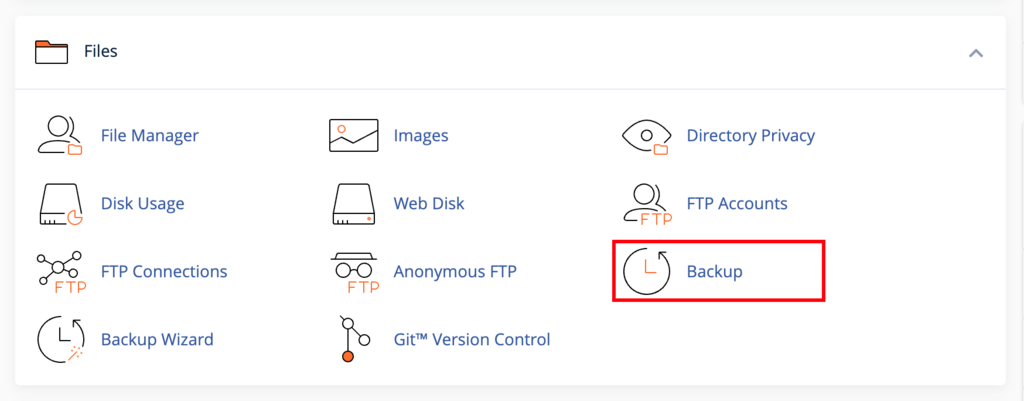
Once inside the control panel, scroll to the Files section and click Backup.
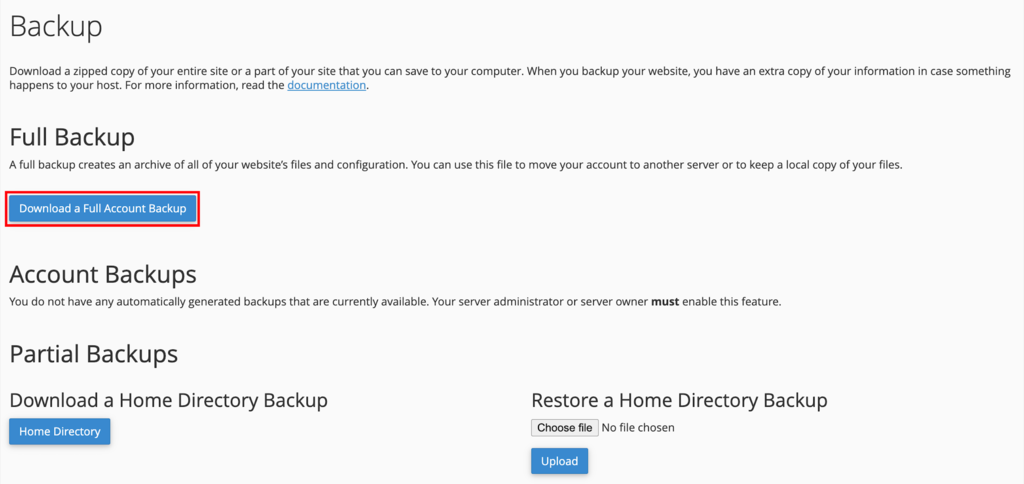
In the Backup window, click on the Download a Full Account Backup button under the Full Backup section.
Click on the most recent full hosting account backup in the next window to download it to your computer.
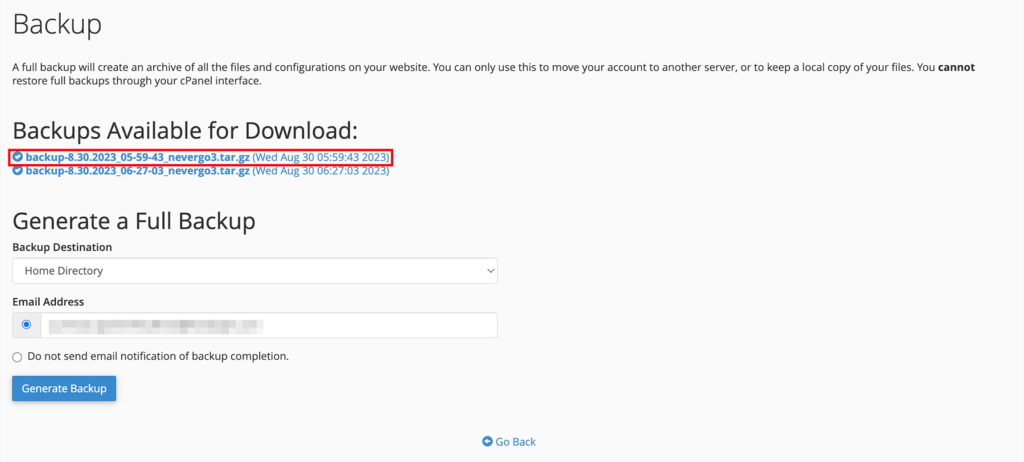
If there are no full backups listed under Backups Available for Download label, you can generate a full backup by just clicking on the Generate Backup button below Generate a Full Backup label.
4. Initiate the Cancellation Process
With the website backup secured and automatic renewal turned off, you can now safely initiate the next step toward ending your Bluehost account.
Unlike some other hosting services, Bluehost requires you to contact their support team directly to cancel your hosting account. This can be done through phone or chat support.
To cancel Bluehost web hosting, simply go to the web hosts’ contact page and click on the Chat Now button or call the phone number listed below.

While speaking with the support specialist, make it clear that you intend to cancel your account.
Upon initiating the cancellation request, the Bluehost customer service team will ask you for a final acknowledgment of the impact of your decision.
Specifically, you will no longer have access to any services linked to your web hosting account once you cancel your Bluehost subscription, including:
- Web hosting package
- Domain registration
- Email hosting package
After you successfully cancel your Bluehost web hosting account, your websites hosted on Bluehost will be automatically deleted.
Important! Note that the refund process is not automatically triggered after you cancel your account. If you’re within the 30-day signup window, you’ll need to request a refund for hosting services separately. For this, you can contact Bluehost support again through either chat support or a phone call.
If you’ve registered your domain through Bluehost or another web host, you can transfer it to another registrar.
Similarly, email hosting can be transitioned to a new provider or a third-party service. If you’re planning to move to Hostinger, explore our tutorial on how to use Hostinger Email.
5. Check for Billing or Domain Renewals
While the cancellation process is ongoing, conduct a final review of your product billing dates and Bluehost domain renewals to avoid any surprise charges.
Even after you cancel your hosting account, you could still be billed for certain services or domain renewals if they’re set to automatically renew.
Billings
Navigate to the My Products section within your Bluehost hosting account and scroll down to the Products and services.
Click on the three dots menu next to the active products and services, and then click on the Set to Expire option.
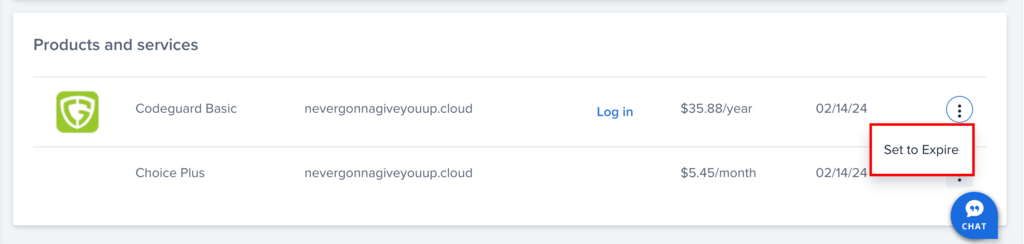
This action will ensure that the product or service won’t automatically renew once it nears its expiration date.
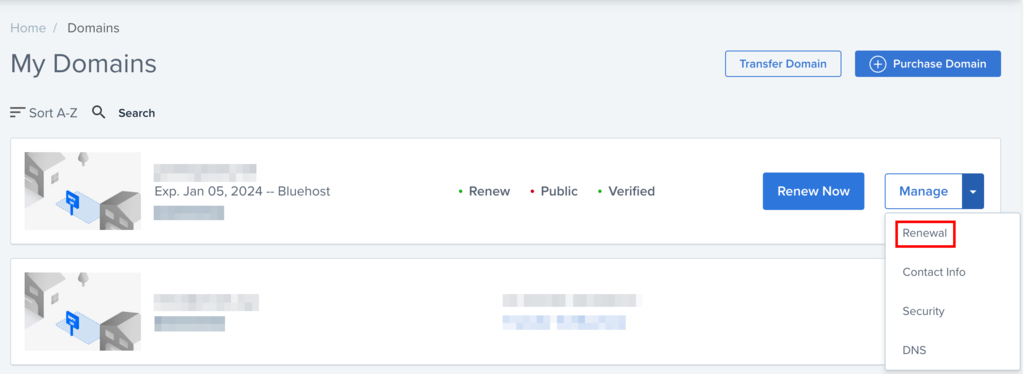
Domains
For Bluehost domains specifically, go to your Bluehost Domain Manager by clicking on Domains→My Domains.

In the next window, go to the domain names you’re hosting through Bluehost, and click on the the drop-down button next to Manage, and then click on Renewals.
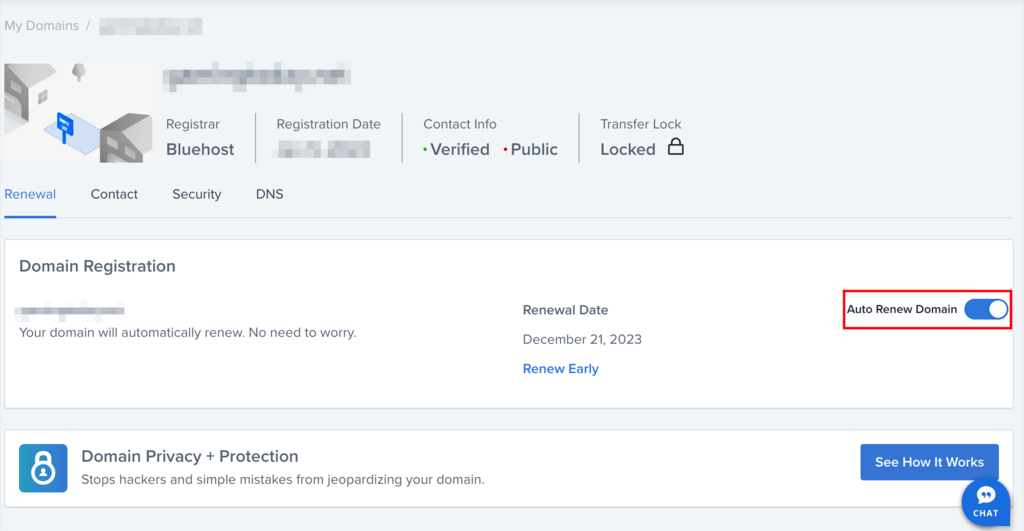
Next, toggle the Auto Renew Domain off.
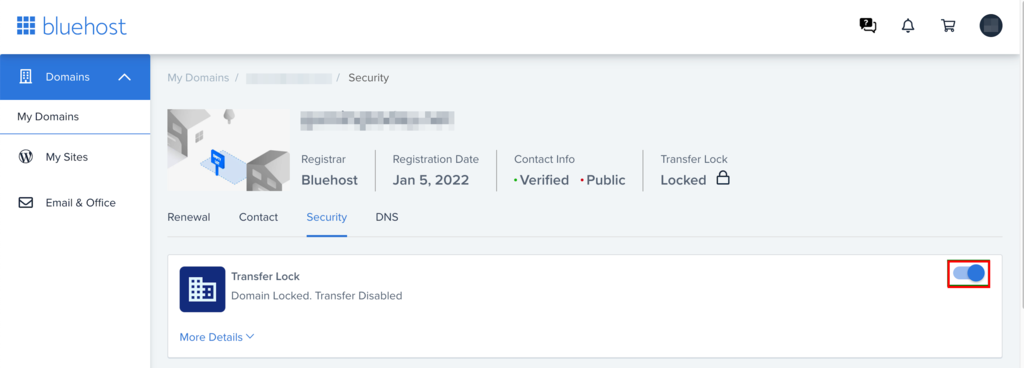
While you’re here, click on the Security tab and deactivate the domain transfer lock to ready your domain for migration to the new hosting service.
6. Confirm Cancellation and Account Closure
After finalizing the cancellation with Bluehost support, keep an eye on your email for an official confirmation.
This email serves as proof that the account has been successfully closed and outlines which services have been terminated, along with any other relevant information.
If the confirmation email doesn’t arrive within a reasonable timeframe, we recommend that you contact Bluehost support to verify that the account has been fully closed.
How to Migrate From Bluehost to Hostinger
While you close your Bluehost web hosting account, it is important that you transfer your website to a new host. It ensures that your site and domain names remain with you even after you cancel your Bluehost account.
Free site migration services are a rarity in the hosting industry. To give you some context, providers like DreamHost charge $99 for this service, while Kinsta offers one complimentary premium migration before implementing a $100/site fee for each subsequent site transfer.
Hostinger sets itself apart by offering free, unlimited site migrations with its hosting plans, ensuring a smooth, convenient, and cost-effective transfer for site owners.
Our migration experts manage all the technical details, making transitioning from Bluehost to Hostinger a hassle-free process.
Here’s how you can smoothly transition from Bluehost to Hostinger.
1. Choose a Hostinger Hosting Plan
Your first step is to select the right Hostinger plan for your site. With options ranging from basic web hosting to advanced VPS and cloud solutions, Hostinger tailors its web hosting services to meet a variety of website needs.
Factor in your site’s traffic, storage, and security requirements. Also, consider the specialized features you’ll need, including the type of content management system (CMS), server locations, and backup options.
2. Set Up Your Hostinger Account
After selecting your perfect hosting plan, it’s time to create your new Hostinger account. Click on the Add to Cart button beside your chosen plan and select your preferred billing cycle, which can range from monthly to yearly options.
Then, enter your email address to sign up, or speed up the process by using your Facebook or Google account.
Next, fill in your payment details to buy hosting. Once your payment is confirmed, you’ll gain access to your brand-new account. We recommend you enable two-factor authentication for added security.
3. Initiate the Migration Process
Website
With your Hostinger account set up, you can initiate the website migration request to bring your site over.
To start, click on Account in the upper right corner and then click on Migrate Website. Next, click on Add request and fill in the requested information to submit your migration request.
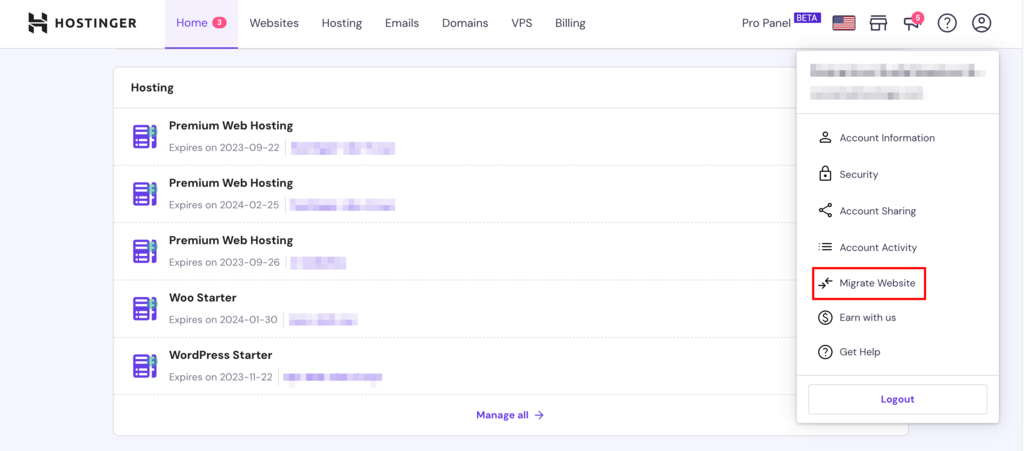
Hostinger’s expert migration team will take it from there, ensuring a smooth transition of all your data, files, and databases.
Domain
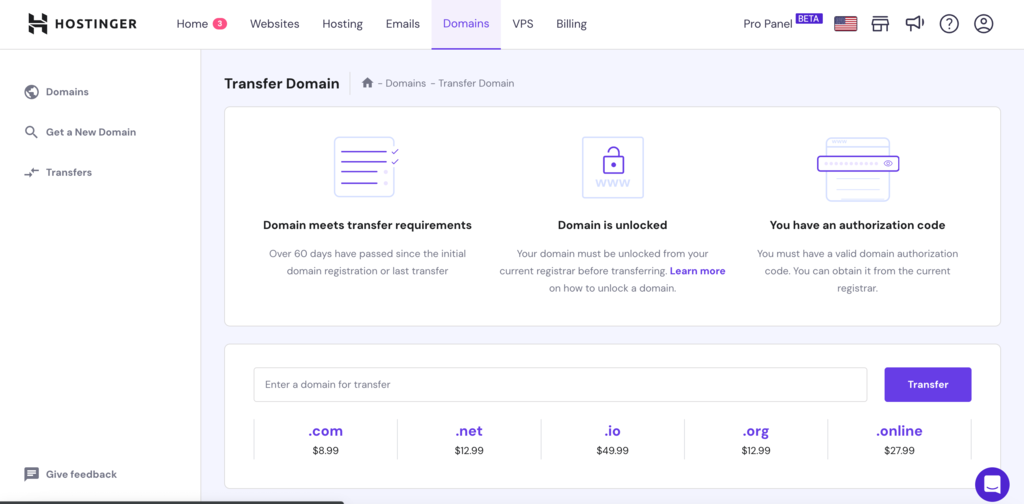
While your website data is in expert hands, you can also transfer your domain from Bluehost to Hostinger. To do so, you’ll need your EPP code from Bluehost. This code, sometimes referred to as the domain authorization code, is essential for initiating the domain transfer process.
Once you have the code, head to the Domains section on your Hostinger dashboard and click on Transfer an existing domain.
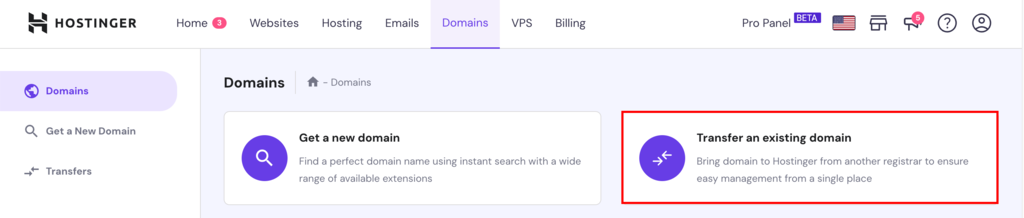
Next, fill in the domain name you want transferred and follow the instructions.
Suggested Reading
If you intend to retain domain hosting through Bluehost servers, check out our articles on
How to Point a Domain Name to Hostinger
How to Use Hostinger’s DNS Zone Editor
5. Test and Verify the Migration
After your site and domain names are safely migrated to Hostinger, we recommend that you test and verify that everything is functioning as it should.
Site Check
Quickly navigate through your site to ensure all pages load correctly, and all features function as they should. Check on both desktop and mobile.
File Check
Scan your databases and files to make sure everything is transferred without issues. This can be as simple as checking if all your blog posts or product listings are showing up. Additionally, explore File Manager to make sure everything works.
DNS Verification
It takes up to 48 hours for DNS changes to propagate. After that period, confirm your domain is pointing to your new Hostinger account.
Performance
Use Hostinger’s intuitive control panel, hPanel, to quickly check site performance, ensuring load times are optimal.
If you encounter any issues, feel free to contact the Hostinger customer success team for assistance.
Conclusion
Switching from Bluehost to Hostinger can enhance your website experience, offering you benefits like faster speeds and more reliable uptime.
Let’s quickly recap the key steps you’ll need to follow:
Turn off auto-renewals – make sure to deactivate any automatic renewals in your Bluehost account to avoid unexpected charges.
Check billing and domain settings – before you finalize the cancellation, double-check your billing details and domain settings to avoid any post-cancellation surprises.
Initiate cancellation – begin the process of closing down your Bluehost account, following the necessary steps to ensure a clean exit.
Migrate to Hostinger – take the necessary actions to configure your new hosting environment on Hostinger, aiming for a smooth transition of your website and domain.
We also strongly advise backing up your Bluehost account data before you proceed with cancellation or migration.
If you have any more questions or suggestions, feel free to leave a comment below.
Cancel Bluehost FAQ
Let’s address some common questions you might have about canceling your Bluehost account.
Can I Cancel My Bluehost Account at Any Time?
Yes, you can cancel your Bluehost account at any time. However, it’s best to disable auto-renewals and back up your data first to avoid any complications.
Will I Lose My Website Data if I Cancel My Bluehost Account?
You will lose access to all hosted data once you cancel your Bluehost account. As such, it is important to back up your website data before initiating the cancellation process.
Will I Be Charged Any Cancellation Fees?
Bluehost does not charge any specific cancellation fees. Furthermore, you’re eligible for a refund from Bluehost if you cancel within 30 days of your initial purchase and payment.

Akshay is a Senior Content Writer who loves writing about technology. As a Computer Engineering graduate and a certified digital marketer, he aims to make tech easier for everyone. He also enjoys cooking, traveling, and learning new languages. Follow him on LinkedIn.