How to Buy Hosting From Hostinger: Main Benefits + Plans Comparison
Hostinger offers various web hosting plans to cater to different user needs. Whether this is your first time creating a website or you want to migrate from your current provider, having a reliable web host ensures your website offers the best user experience around the clock.
This article will explain the different types of web hosting available at Hostinger and how to buy a hosting plan in four simple steps. We will also explain the benefits of purchasing hosting from us and what to do after you’ve made your purchase.
Download guide to using Hostinger
Why Buy Hosting From Hostinger
When choosing a web hosting provider, consider factors like server reliability, security, add-on features, and customer support to ensure your website runs smoothly and safely. With us, you get:
- 24/7 support. Our multilingual Customer Success team is available anytime via live chat.
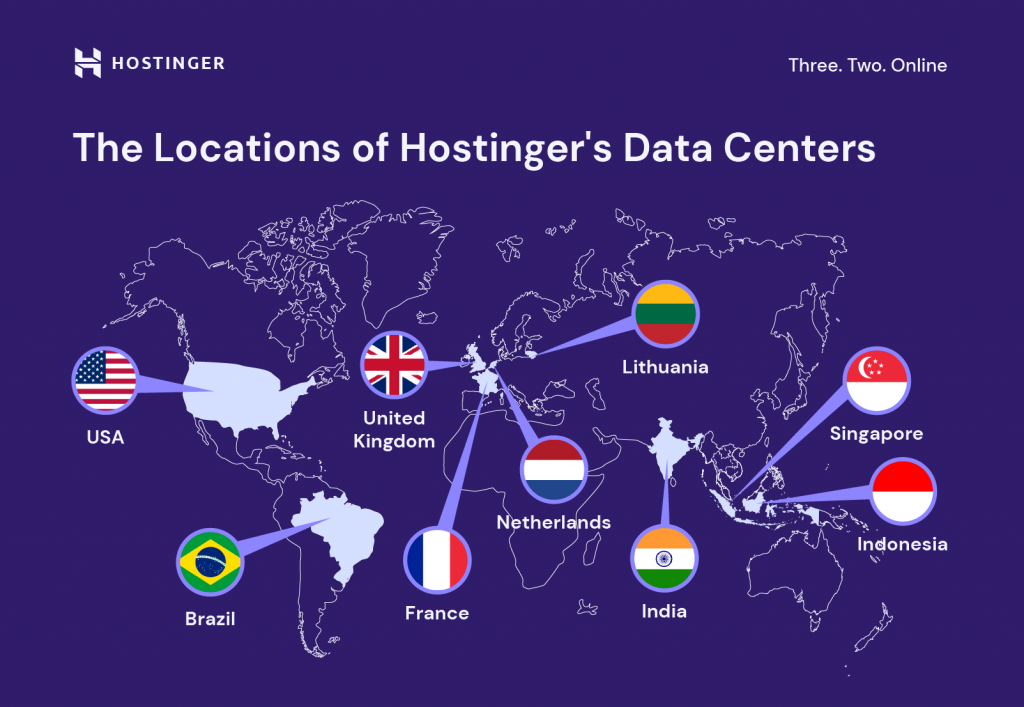
- Top performance. Hostinger has multiple data centers worldwide and uses LiteSpeed web servers to ensure optimal performance.

- Reliability. Our hosting plans have a 99.9% uptime guarantee, and we use solid-state drive (SSD) storage, which is more durable than traditional hard disk drives.
- Free benefits. Most Hostinger web hosting packages include a free domain, a custom email address, an AI-powered website builder for a quick launch, and free website migration.
- Money-back guarantee. You can request a refund within 30 days of your purchase. This goes for all hosting plans.
Pro Tip
New to web hosting? Check out these articles to learn more:
What Is Web Hosting
How to Host a Website
How to Buy Hosting From Hostinger in 4 Steps
This section will explain how to buy web hosting from Hostinger in four simple steps, helping you get your website up and running in no time.
1. Choose Your Hosting Plan
There are various hosting plans to choose from, depending on your goals and the purpose of your website. A portfolio website, for example, needs resources different than an online store.
To help you choose a hosting plan that’s right for your website, here’s an overview of the different plans, their main features, and ideal use cases:
Web Hosting
With standard web hosting, one server hosts multiple websites and divides its resources among them. It is the most affordable option, making it popular for personal use and small to medium-sized businesses.
Hostinger offers Premium, Business, and Cloud Startup web hosting plans starting at ₱89.00/month. They differ in resource allocation and features included.
Note that all web hosting and cloud hosting plans come with Hostinger Website Builder. This tool allows you to create your website by customizing pre-made templates with a drag-and-drop website editor.
You can also use artificial intelligence (AI) to create a bespoke website with Hostinger Website Builder. Specify the name and type of your website, and describe it in a few words – our AI will generate a website for you in a matter of minutes, giving you a good starting point.
Web Hosting Features:
- Unlimited SSL certificates enhance security
- 100 GB to 200 GB of storage supports content-heavy websites
- Unlimited bandwidth helps tackle high traffic without performance drops
- Weekly or daily automated backups ensure quick data recovery
- AI tools to aid with website and content creation with higher-tier plans
We recommend the Premium Web Hosting plan for new users as it includes a free domain name and domain-based email addresses when you subscribe for 12 months or longer.

Cloud Hosting
Cloud server hosting offers the simplicity of traditional web hosting with the performance level of a virtual private server (VPS) without the complexities of managing one yourself.
Thanks to its larger resources, our managed cloud hosting is ideal for resource-intensive web applications or high-traffic websites like large online stores.
You can upgrade your hosting plan anytime through our custom control panel, hPanel. Choose from three different cloud plans, starting at ₱499.00/month.
Cloud Hosting Features:
- Host up to 300 websites and 100 email accounts
- Up to 300 GB of storage, 12 GB RAM, and 6 CPU cores
- Unlimited bandwidth and daily backups
- Free CDN
- AI tools for website and content creation
Pro Tip
If you want to try a higher-performance plan before committing to an upgrade, we recommend boosting your existing hosting account. Once a month, you can upgrade your plan for 24 hours for free.
Managed WordPress Hosting
Managed WordPress hosting is similar to regular web hosting, but these plans come with adjustments to boost performance and help users set up and manage their WordPress websites easily.
Recommended by WordPress.org, our managed WordPress plans run on LiteSpeed servers, resulting in lightning-fast page loading speeds and an optimal visitor experience. Our in-house developed WordPress AI tools, such as AI Troubleshooter and AI Assistant, are available on higher-tier plans, helping you create content and troubleshoot issues faster.
Choose from three different plans, starting at ₱49.00/month.
Managed WordPress Hosting Features:
- Easy WordPress installation through our auto-installer
- Up to 300 websites
- Free domain
- Weekly or daily backups
- Up to 200 GB of storage
- WordPress AI tools on higher-tier plans

VPS Hosting
Virtual private server hosting (VPS) provides users full access to dedicated resources from a virtual server’s partition. This type of hosting offers the best performance, flexibility, and customizability.
Commonly, VPS hosting is used for resource-intensive web applications, such as SaaS platforms, high-traffic blogs, and online communities, where stability, scalability, and security are crucial.
It’s worth noting that managing a VPS is more difficult than web or cloud hosting as it requires technical expertise. Luckily, if you’re a beginner, simply follow our setup wizard after purchasing a VPS plan. It will assist you with all the key steps so that you get your server up and running smoothly.
Moving forward, our VPS AI Assistant can help you with server management and configuration – simply prompt and get relevant answers or instructions. For more information, refer to our complete guide on how to get started with VPS.
Hostinger offers four VPS plans with different server resource allocations, starting at ₱299.00 /month.
VPS Hosting Features:
- Up to 8 vCPU cores, 32 GB of RAM, and 400 GB of storage
- 4 TB to 32 TB of bandwidth per month
- Dedicated IP address
- VPS templates
- Server snapshot and weekly backups

Game Server Hosting
Game server hosting enables players to host their online multiplayer game servers and have better control over the gaming experience. This type of hosting is designed to enhance gaming performance, stability, and customization, offering an immersive experience for players.
Hostinger gaming hosting plans come with an intuitive Game Panel, a centralized dashboard to help you create your custom game servers, configure in-game settings, and check logs. Normally, these tasks require running Linux commands and having technical expertise.
Additionally, our Game Panel supports over 100 popular games, such as Counter-Strike and Call of Duty, ensuring you have the flexibility to host your favorite games. We also regularly update this panel to include new game releases so you are always up-to-date with the most recent trends in the gaming industry.
Gaming Hosting Features:
- Intuitive Game Panel for easy game server installation and configuration
- Advanced CPU and RAM allocations for an uninterrupted gaming experience
- Generous bandwidth for servers with high player counts
- Dedicated gaming IPs for secure, stable connections
- Snapshot and backup options for keeping your game data safe
2. Select the Hosting Period
After choosing a plan, select your hosting period. We offer 1, 12, 24, and 48-month subscriptions – all with a 30-day money-back guarantee. Choosing the longer periods will help reduce your website hosting costs, as the discount is bigger.
To pick a hosting period, follow these steps:
- Open the Hostinger homepage and choose Hosting, WordPress, or Website Builder in the top menu. Then, select your desired hosting type from the drop-down menu.
- Click Add to Cart next to the desired plan.
- On the checkout page, select your preferred hosting period.

It’s easy to change your billing cycle anytime through hPanel. If you upgrade your Hostinger plans, we will convert your investment and add the remaining subscription length to the new plan.
3. Enter Account Information
Once you’ve chosen the subscription length, enter your account information. If you already have an account, click Log in and enter the login credentials.

Otherwise, provide an email address to create a new Hostinger account. Once you log in successfully, the Log Out button will appear on the top right of your screen.
4. Make the Payment
Select your preferred payment method and enter the required information. The available payment methods and currencies vary depending on your region, but generally, we accept the following:
- Debit, prepaid, and credit cards
- eWallets
- Cryptocurrencies

After double-checking the payment information, click Submit Secure Payment to proceed.
Once you complete the purchase, the Set New Password pop-up window will appear. Enter your password and click Confirm to finish the process.
What to Do After You Buy Hosting From Hostinger
After you buy a hosting plan from Hostinger, configure your account. To do so, open hPanel and click the profile icon at the top right corner of your screen → Account Information.

Enter your phone number, company profile if applicable, and any additional information that needs to be shown on invoices. You can also enable two-factor authentication (2FA) and account sharing here.
What to Do Next
For new users, explore our tutorial on how to use Hostinger to teach you more about our control panel, services, and features.
Create a New Website
If you don’t have a website, create a new one and connect it to your hosting plan. Before proceeding, claim your free domain name if you’ve chosen a plan that includes one. Then, follow these steps:
- In the Websites menu, select + Add website and choose your desired platform. For beginners, we recommend Hostinger Website Builder as it is fast and intuitive to learn and set up.

- From the dropdown menu, select the plan to which you want to add your website. Click Select Plan to confirm.

- Select Follow the on-screen instructions. Once the website generation process finishes, you can start customizing your site.
For a more detailed guide, check out our tutorial on how to use Hostinger Website Builder and its features.
Migrate Your Website
If you have an existing website, migrating it to your new hosting provider is easier and faster than creating it again from scratch. We offer free website migration, support email account migration, and offer domain transfer services, making it easy to manage everything related to your website from one dashboard.
Begin the website migration process like this:
- In the Websites menu, select + Add website and Migrate Website.
- From the dropdown menu, select the plan to which you want to migrate your website. Click Select Plan to confirm.
- Enter the domain name of the website you want to migrate. You can also migrate a subdomain.
- If you are migrating a WordPress website, the system should detect this automatically. Otherwise, select the platform you use to manage your website. For more information, follow this website migration guide.
Conclusion
Hostinger is a web hosting service provider offering reliable, high-performance hosting plans. Starting at ₱49.00/month, our hosting plans come with a free domain for the first year, free business email, unlimited bandwidth, 24/7 customer support, and various AI tools, ensuring you get the best bang for your buck.
In this article, we have explained how to buy hosting from Hostinger in four simple steps:
- Choose your hosting plan. Pick between web, cloud, VPS, and Managed WordPress hosting. Ensure to select one that fits your site needs and budget.
- Select the hosting period. Choose between 1, 12, 24, or 48-month subscription. The longer the hosting period is, the cheaper your monthly fee will be.
- Enter your account information. Log in to your existing account or enter your email address to create a new one.
- Make the payment. Choose your preferred payment method and enter the required information. Then, click the submit payment button to finish the process.
After purchasing a plan, log in to hPanel and configure your account. Then, migrate your existing site to Hostinger or create a new one.
How to Buy Hosting From Hostinger FAQ
In this section, we answer some of the most common questions on how to buy hosting from Hostinger.
Is Hostinger Good for Web Hosting?
Hostinger is good for web hosting because of its reliable and high-performing servers. We offer premium services with a 99.9% uptime guarantee starting at ₱49.00/month. Look at different migration cases on our blog to learn more about customers’ experience with our services.
Can I Change My Hostinger Hosting Plan?
Yes, you can upgrade your hosting plan anytime through hPanel. However, you must contact our Customer Success team to request a downgrade. When switching to a cloud or WordPress hosting package, your data will be transferred automatically to the new plan. If you switch to VPS, you must migrate the site files manually.
Does Hostinger Offer a Free Domain Name With Its Hosting Plans?
Yes, our web, cloud, and Managed WordPress hosting plans include a free domain name when you opt for a plan with a subscription period of 12 months or more.


