A Beginner’s Guide to WordPress React Development Projects
WordPress is a powerful content management system (CMS) that lets you build everything from simple sites to sophisticated and complex eCommerce stores. To integrate the platform’s PHP code with JavaScript, you can leverage WP REST API and WordPress React.
Developed by Facebook, React is a user interface (UI) library that uses a simple, component-based approach for building scalable, cross-platform applications that are easy to understand. However, it’s important to learn how to use it properly to make the most of its features and functions.
In this guide, we’ll explain how to use React with WordPress. We’ll discuss what the framework is, outline its benefits, and show you how to use it. Let’s jump in!
Download all in one WordPress cheat sheet
An Introduction to React
Before we get started, we first want to ask the question, “what is React?”. Also known as ReactJS, it’s one of the most popular JavaScript libraries you can use for web development.
Created and maintained by Facebook, it includes an extensive array of JavaScript code snippets that can be used for building UI components.
Contrary to popular belief, ReactJS is not a JavaScript framework since it only renders components of an application’s view layer. Therefore, you can pair it with an actual framework like Vue.js if you’re looking for more sophisticated functions.
It’s also important to note that there’s ReactJS and React Native. The latter is an open-source JavaScript framework built on the React library. You can use it to create cross-platform apps and platform-specific components for iOS and Android.
React Features and Functions
To understand the benefits of React, it’s helpful to know how it works. Here are some of its most significant features and functions:
JSX
The main JavaScript syntax extension used in React is JSX. You can use it to embed HTML code in JavaScript objects and simplify complex code structures.
JSX also helps prevent cross-site scripting (XSS) attacks by making it difficult for third parties to inject extra code through user input that isn’t explicitly written in the application.
JSX tags include a name, children, and attributes. A typical HTML image tag would look something like this:
<img class="" src="" alt="" >
However, a JSX tag would look like the following:
<img className="" src="" alt="" />
Also, the numeric values are written inside curly brackets. Similar to JavaScript, the quotation marks represent strings:
const name = 'John Doe’;
const element = <h1>Hello, {name}</h1>;

ReactDOM.render(
  element,
  document.getElementById('root')
);
You can put any valid JavaScript expression inside the curly brackets. For example, it could be “user.firstName” or “formatName(user)”.
Virtual DOM
The Document Object Model (DOM) presents a web page in a data tree structure, which React stores in its memory. React can implement updates to certain parts of the tree rather than re-render it entirely.
The Virtual DOM offers one-way data binding. This makes manipulating and updating it quicker than the original DOM.
It uses a process known as diffing. This is when React generates a new Virtual DOM tree, compares it to the old one, then finds the most efficient way to apply changes to the real DOM. This takes less time and requires fewer resources, which is beneficial for large projects that involve a lot of user interaction.
The DOM also supports the declarative API. This means you can tell React which state you want the UI to be in to ensure that the DOM will match that state.
Components
As we mentioned, React components are standalone, reusable pieces of code that make up the UI. These components work similarly to JavaScript functions. They accept props, which are arbitrary inputs. When a function component returns an element, it influences how the UI will look.
Props are read-only. Here’s an example:
import React, { useState } from 'react'
import ReactDOM from 'react-dom'

const ParentComponent = () => {
    const [stateVariable, setStateVariable] = useState('this is the starting value for the variable');

    return (
        <div>
            <h1>This is a function component view</h1>
            <ChildComponent exampleProp={stateVariable} />
        </div>
    )
}

const ChildComponent = (props) => {
    return (
        <div>
            <h2>{props.exampleProp}</h2>
        </div>
    )
}


ReactDOM.render( <ParentComponent />, document.getElementById('app') );
There are two main types – class components and functional components. Class components use lifecycle WordPress hooks and API calls:
class ExampleComponent extends React.Component {
  constructor(props) {
    super(props);
    this.state = { };
  }
  render() {
    return (
      <div>
        <h1>This is a view created by a class component</h1>
      </div>
    );
  }
}
Meanwhile, a functional component looks something like the example below:
const ExampleComponent = (props) => {
    const [stateVariable, setStateVariable] = useState('');
    return (
        <div>
            <h1>This is a function component view</h1>
        </div>
    )
}
Functional components are for rendering views without data requests or state management.
State
State refers to the built-in object of React components. This is where you store property values of elements. If the state changes, the component re-renders.
State management is the process of managing these application states and storing data in state management libraries. You can use a handful of state management libraries, including Redux and Recoil, with the latter being more beginner-friendly.

Why Use React?
There are many benefits to using React for WordPress development. For starters, it’s beginner-friendly, and all popular hosting solutions support its use.
Since it relies on plain JavaScript and components, you can use it to create web-based applications after only a few days of learning it. There are also plenty of websites to learn how to code for free online. A solid understanding of JavaScript basics can streamline the process.
Another benefit of React is that it lets you reuse components in other applications. It’s open-source, so you can pre-build your components and nest them between others without bloating your code.
React components are also relatively straightforward to write, thanks to the JSX integration, which we’ll discuss in a moment. You can incorporate HTML typography, tags and leverage multiple functions rendering for dynamic application development.
With React, you can also use the official command-line interface (CLI) – Create React App – to expedite single-page application development. It comes with pre-configured tools that can help you streamline the setup and learning process.
Finally, React is also SEO-friendly. The Virtual DOM implementation helps increase page speed, boosting performance and server-side rendering, making it easier for bots to crawl your site.
An Overview of WP REST API
WordPress REST application program interface (API) enables developers to integrate JavaScript frameworks such as React with WordPress. You can access WP REST API from the front-end of your site, add custom post types, and build a React app backed by this API.
WP REST API is a set of protocols used for building software applications. They define how information and data are shared between programs and how their components interact. REST, short for Representational State Transfer, refers to the style-defining architectural constraints of programs.
The format for structuring data to be read by applications is called JavaScript Object Notation (JSON). It helps streamline communication between WordPress and other applications and programs.
WP REST API results in a decoupling environment that lets users treat WordPress as a headless CMS. This means that a variety of front-end frameworks can be used to hook the back end of WordPress. This is advantageous for developers who aren’t overly enthusiastic about PHP.
React – Before Getting Started
A basic knowledge of JavaScript, CSS, and HTML would help to learn React. In addition, the learning process can be more efficient if you’re familiar with ECMAScript 6 (also known as ES6), functional programming, and object-oriented programming.
Program-wise, you’ll also need a few dependencies installed on your computer. This includes NodeJS and npm and a text editor. Optionally, you may also want to use Git for version controlling.
The most popular way to develop React projects for WordPress is to use Create React App:
CRA provides a simple environment for learning React and using it to build single-page applications. Note that in order to use it, you’ll first need Node and npm on your device.
To create a new project, you can run the following command in your terminal:
npx create-react-app wp-react-demo
If you haven’t done so already, it will confirm that you want to install Create React App before creating the demo. This makes a boilerplate template. You can also replace “wp-react-demo” with your own name.
Next, run the following:
cd wp-react-demo
npm start
The directory structure will look like this:
├── README.md
├── package.json
├── public
│ ├── favicon.ico
│ ├── index.html
│ └── manifest.json
├── src
│ ├── App.css
│ ├── App.js
│ ├── App.test.js
│ ├── index.css
│ ├── index.js
│ ├── logo.svg
│ └── registerServiceWorker.js
In the src directory, you’ll find all the JavaScript files you’ll be working on. Now, you can visit localhost:3000 to load the index.html file.
The public/index.html file doesn’t contain much. However, you can find the following line, which will be the starting point for your project:
<div id="root"></div>
Under the index.js file of the src directory, you’ll find the following:
import React from 'react';
import ReactDOM from 'react-dom';
import App from './App';

ReactDOM.render(<App />, document.getElementById('root'));
This means it’s rendering the App component, which you can find under src./App.js. You can replace this with your own HTML content. We can use HTML insider render() thanks to the JSX syntax extension.
How to Query WP REST API from React
By default, you can make a GET request to use WP REST API on the front-end of your site. For example, you can use /wp-json/wp/v2/posts to get all your posts. Sticking with the previous example, this post data would be located in http://localhost/wp-json/wp/v2/posts/.
To get started with React, you can run this command in your terminal:
npx create-react-app react-app
Then, run the following:
cd react-app
npm install @material-ui/core
Next, you can enter the example below:
import React, { useEffect, useState } from 'react';
import Card from '@material-ui/core/Card';
import CardContent from '@material-ui/core/CardContent';
import Typography from '@material-ui/core/Typography';
import Grid from '@material-ui/core/Grid';

export default function Posts() {
    const [posts, setPosts] = useState([]);
    useEffect(() => {
        async function loadPosts() {
            const response = await fetch('/wp-json/wp/v2/posts');
            if(!response.ok) {
                // oups! something went wrong
                return;
            }

            const posts = await response.json();
            setPosts(posts);
        }

        loadPosts();
   }, [])
  return (
    <Grid container spacing={2}>
      {posts.map((post, index) => (
      <Grid item xs={4} key={index}>
        <Card>
           <CardContent>
                <Typography
                    color="textSecondary"
                    gutterBottom
                    dangerouslySetInnerHTML={{__html: post.title.rendered}} />
                <Typography
                    variant="body2"
                    component="p"
                    dangerouslySetInnerHTML={{__html: post.content.rendered}} />
            </CardContent>
        </Card>
      </Grid>
     ))}
    </Grid>
 );
}
The above example uses the React Hooks useEffect and useState. The former declares the array of posts and calls to update it, whereas the latter fetches the code.
Warning! When using dangerouslySetInnerHTML in your code, be aware of the following risks:
1. Security Vulnerabilities: Improper usage can expose your application to cross-site scripting (XSS) attacks.
2. Code Maintainability: It becomes harder to maintain and debug code when HTML is injected directly.
How to Create a Custom Post Type With React
You can also use React to create a WordPress custom post type. However, there are a few tools that you’ll need to install ahead of time. This will help make the process as seamless and straightforward as possible.
First, you’ll need to add the Custom Post Type UI WordPress plugin.
This plugin simplifies the process of creating custom post types in WordPress.
We also recommend installing Advanced Custom Fields (ACF).

This is also a free tool. The plugin can be used to create and add custom fields to your custom post types. We also suggest installing ACF to REST API to make your custom fields available to your post types.
To get started, navigate to CPT UI > Add/Edit Post Types from your admin area. In our example, we’ll use the name “Books”. We’ll also select the option to auto-populate the rest of the fields.
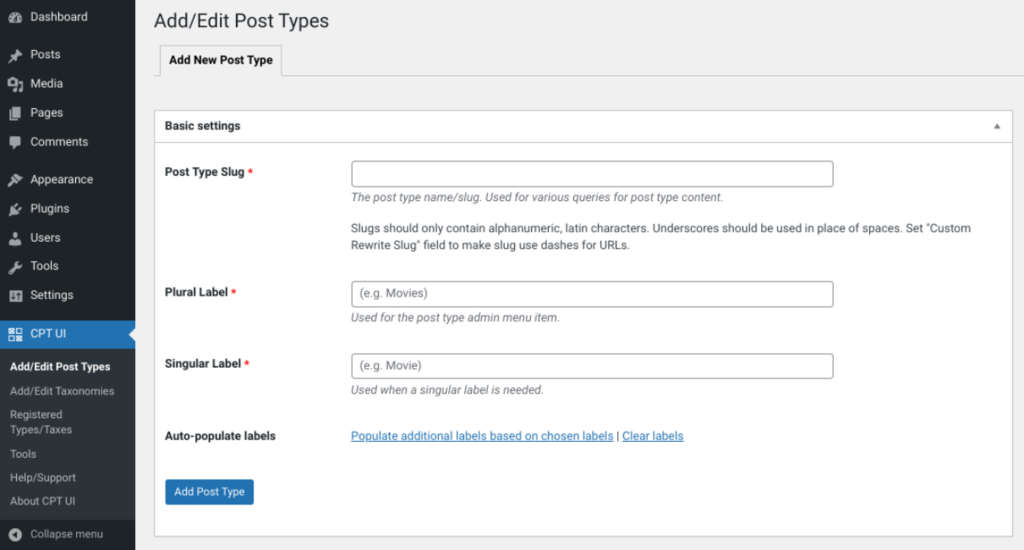
Under the Show in REST API section, set it to True and enter “Books” as the REST API base slug. Under Supports, select the Author and Custom fields checkboxes. Click on Save Post Type when you’re done.
Next, we can create custom fields for the custom post type. Navigate to Custom Fields > Add New, and enter an appropriate title, such as “Book Info”. You can click on Add Field, then complete the field label, name, and type.
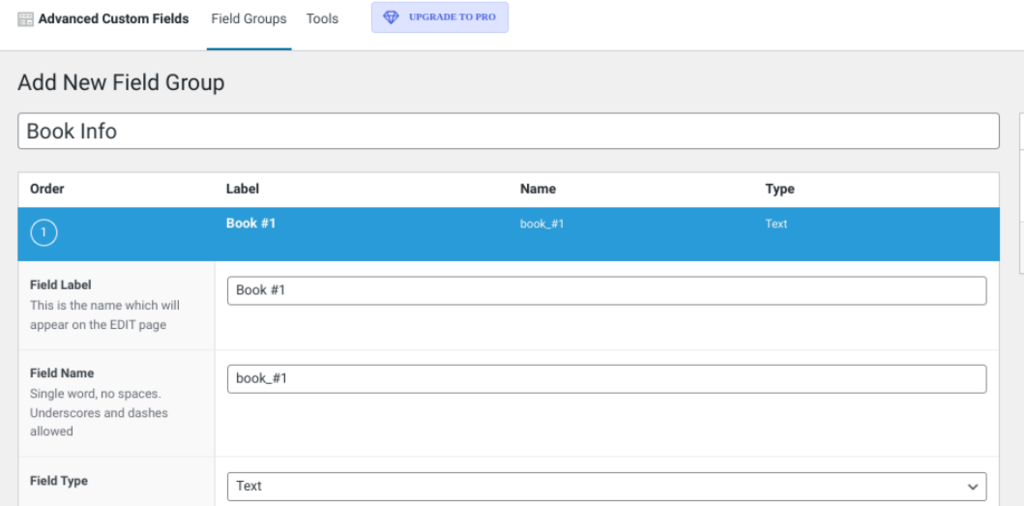
Under Location, you can set the post type to equal the book custom post type. When you’re done, select Publish to activate the custom field.
Next, go to My Books > Add New and enter its title, summary, and featured image. You can repeat this process to create as many as you’d wish.
Now, from your terminal, enter the following command, running each one before moving on to the next:
npx create-react-app frontend
cd frontend
npm i axios
npm start
Next, within the src directory, you can create a folder called components, followed by a file called books.js. When you’re done, enter the following:
import React, { Component } from 'react';
import axios from 'axios';
export class Books extends Component {
   state = {
       books: [],
       isLoaded: false
   }
 componentDidMount () {
   axios.get('http://localhost:3000/wp-json/wp/v2/books')
       .then(res => this.setState({
           books: res.data,
           isLoaded: true
       }))
       .catch(err => console.log(err))
   }
   render() {
      console.log(this.state);
       return (
           <div>

           </div>
       )
   }
}
export default Books;
In the App.js file, enter the following:
import React from 'react';
import './App.css';
import Books from './components/Books';
function App() {
 return (
   <div className="App">
    <Books>
   </div>
 );
}
export default App;
Now, in your terminal, you can run the npm start command. This will launch the React app. You can view the “Book” data console when you open it in a browser. You can display each title by mapping through each book.
In Book.js, enter the following:
render() {
      const {books, isLoaded} = this.state;
       return (
           <div>
              {books.map(book => <h4>{book.title.rendered}</h4>)}
           </div>
       )
   }
Note that you can also separate the collection of books into a single book component. You can do this by creating a file within src/components. You can also add custom CSS to style the custom post type (app.css).
How to Create a React WordPress Theme (2 Methods)
Perhaps you’re wondering how to create a WordPress theme using React. There are a handful of options, so let’s look at two popular methods:
1. Create a React WordPress Theme Using WP Scripts
In typical React apps, you need to import React at the top of the files. However, as of WordPress 5.0, the CMS ships with React and ReactDOM libraries and exports them into wp.element, a global window object.
If you’ve used React before, you’ve likely used Create React App to run your development server. However, this isn’t necessary with WordPress.
The WordPress team created a wp-scripts package based on the react-scripts used with Create React App. WP Scripts includes the commands by default.
To load React in your theme, navigate to your functions.php file of your theme, and add the following code snippet:
// Enqueue Theme JS w React Dependency
add_action( 'wp_enqueue_scripts', 'my_enqueue_theme_js' );
function my_enqueue_theme_js() {
  wp_enqueue_script(
    'my-theme-frontend',
    get_stylesheet_directory_uri() . '/build/index.js',
    ['wp-element'],
    time(), // Change this to null for production
    true
  );
}
This will add the wp-element as a dependency of your JavaScript file. Next, we need to set up a package.json file. From the root of your WordPress theme, run the following command:
npm init
Once that’s done, run the following:
npm install @wordpress/scripts --save-dev
WP Scripts will be downloaded to your node_modules, so they’re available to use in your command line. To map the WP Scripts to NPM scripts, you can browse to your package.json file, load the “scripts” settings, and replace them with this example:
{
  "name": "myreacttheme",
  "version": "1.0.0",
  "description": "My WordPress theme with React",
  "main": "src/index.js",
  "dependencies": {},
  "devDependencies": {
    "@wordpress/scripts": "^5.1.0"
  },
  "scripts": {
    "build": "wp-scripts build",
    "check-engines": "wp-scripts check-engines",
    "check-licenses": "wp-scripts check-licenses",
    "lint:css": "wp-scripts lint-style",
    "lint:js": "wp-scripts lint-js",
    "lint:pkg-json": "wp-scripts lint-pkg-json",
    "start": "wp-scripts start",
    "test:e2e": "wp-scripts test-e2e",
    "test:unit": "wp-scripts test-unit-js"
  },
  "author": "",
  "license": "1 GNU V2+, MIT"
}
Next, you can run the following:
npm start
This will look for files imported from src/index.js and build them to build/index.js whenever a file is changed.
2. Create a React WordPress Theme Using a Create-React-WPTheme
Another option is to use create-react-wptheme by devloco. This package is similar to create-react-app. However, it uses WordPress instead of webpack as the development server. You’ll also have access to all the core functions, hooks, actions, filters, etc.
To set it up, you can start a terminal (or git bash) in your local WordPress installation, then type the following command:
npx create-react-wptheme barebones
“Barebones” is the name of the theme. You can change it to whatever you want to call your theme.
You’ll see a message informing you that the installation created a root folder and a “react-src” directory within it. This directory is important because it will contain your uncompiled code.
Next, we need to add the styles.css, index.php, and other necessary files to validate it. In the terminal, enter the following command:
cd barebones/react-src
npm run wpstart
Now, when you navigate to wp-admin > themes, you should see your new theme. Click on the Activate button, then return to the terminal and run the following:
npm run wpstart
This should automatically open a new browser tab. Note that the files located in the root folder (anything outside of react-src) should not be edited. They contain the compiled version of the code required for WordPress and React.
To create a new theme, you can use the following:
npx create-react-wptheme my_react_theme
You can change the “my_react_theme” as you want. Next, you can enter the following command:
cd my_react_theme/react-src
npm run start
Remember to replace it with the same name you used in the previous step. This will set up the theme to be viewed in the admin area.
After you’re done developing your theme, you’ll need to use the build command to move it to production. To do this, open your command prompt, navigate to the react-src folder of your theme, and run the following:
npm run build
This will optimize your files located within a folder. Then you can deploy it on your server.
How to Add React to a Custom Page Template
If you’re wondering how to create a WordPress child theme using React, the process is relatively similar. You can add React to a custom page template.
Let’s start with a standard theme structure:
/build
/src
/-- index.js
functions.php
package.json
page-react.php
style.css
Next, you’ll add the following code to your theme’s functions.php file:
<?php
add_action( 'wp_enqueue_scripts', 'my_theme_enqueue_styles' );
function my_theme_enqueue_styles() {

  $parent_style = 'twentytwenty-style';

  wp_enqueue_style( $parent_style, get_template_directory_uri() . '/style.css' );

  wp_enqueue_style( 'child-style',
    get_stylesheet_directory_uri() . '/style.css',
    [ $parent_style ],
    time() //For production use wp_get_theme()->get('Version')
  );

  wp_enqueue_script(
    'my-theme-frontend',
    get_stylesheet_directory_uri() . '/build/index.js',
    ['wp-element'],
    time() //For production use wp_get_theme()->get('Version')
  );

}
You’ll also need to add code to your style.css file. Within it, copy and paste the following:
/*
 Theme Name:   Twenty Twenty Child
 Description:  Twenty Twenty Child Theme
 Author:       Your Name
 Author URI:   https://yourwebsite.com
 Template:     twentytwenty
 Version:      0.9.0
 License:      GNU General Public License v2 or later
 License URI:  http://www.gnu.org/licenses/gpl-2.0.html
 Text Domain:  twentytwentychild
*/
Next, you can create a basic custom page template page-react.php with this example:
<? php
/**
 * Template Name: React Template
 */
get_header();
?>

<main id="site-content" role="main">
	<article class="post-2 page type-page status-publish hentry">
		<?php get_template_part( 'template-parts/entry-header' ); ?>
		<div class="post-inner thin">
			<div class="entry-content">

				<div id="react-app"></div><!-- #react-app -->

			</div><!-- .entry-content -->
		</div><!-- .post-inner -->
	</article><!-- .post -->
</main><!-- #site-content -->

<?php get_template_part( 'template-parts/footer-menus-widgets' ); ?>
<?php get_footer(); ?>
You can now create a new page in WordPress and then select React Template as the page template.
How to Use React in Your App
If you want to use React in an existing app, you can add its content delivery network (CDN) directly to your HTML file. To get started, navigate to the HTML page where you want to add React to get started.
Insert a blank <div> tag. This will create a container where you can render a component. For this example, let’s say we’re trying to create a button.
Next, insert three <script> tags on the page before the closing </body> tag. The first two will be used to load React, and the third will load your component code.
Now, in the same folder as your HTML page, create a new file and name it button.js (or whatever is relevant to the element you’re adding). Within that file, copy and paste the following code:
'use strict';
const e = React.createElement;
class Button extends React.Component {
  constructor(props) {
    super(props);
    this.state = { clicked: false };
  }
  render() {
    if (this.state.clicked) {
      return 'You pressed this button.';
    }
    return e(
      'button',
      { onClick: () => this.setState({ clicked: true }) },
      'Press Me'
    );
  }
}
This will build a button component that displays a message once it’s clicked. To use the button in your HTML page, you can add the following code snippet to the bottom of the button.js file:
const domContainer = document.querySelector('#button_container');
ReactDOM.render(e(Button), domContainer);
This calls back to the <div> container you added to your HTML page. Then it renders the React button component.
You can also use React to create a blank React app from scratch. The best way to do so is to use the Create React App solution we discussed earlier. It can be helpful for single-page applications.
To get started, you can run this command in your terminal:
npx create-react-app my-app
Note that you can change “my-app” to whatever you want to name it. To run it, you can browse to the app folder by running the cd my-app command, followed by npm start.
The app will then run in development mode. You can view it in your browser at http://localhost:3000.
Conclusion
Developing WordPress React projects can be a simple, straightforward process, even if you’re a beginner. However, it’s important to learn how the JavaScript framework works with the CMS and its REST API to do so successfully.
Fortunately, with a basic understanding of JavaScript, HTML, and CSS, you can learn to React in no time. As we discussed in this post, you can use it to create single-page applications and themes and custom page templates.
We hope this guide has helped you better understand React and its capabilities for web development.

Will Morris is a staff writer at WordCandy. When he's not writing about WordPress, he likes to gig his stand-up comedy routine on the local circuit.

Comments
July 09 2023
Hey great article I learned a ton. Just for other readers in the future, note the use of dangerouslySetInnerHTML: dangerouslySetInnerHTML={{__html: post.title.rendered}} This is dangerous, IMO. Some security needs to be implemented. I'm not trying to knock the author, I realize it's just a tutorial. All the same, if I was going to put dangerouslySetInnerHTML in a tutorial, I'd call it out for what it is.
July 14 2023
Hello, thank you for great insights, I've added a warning label explaining risks of using dangerouslySetInnerHTML.