Ping an IP: How to Do It on Windows, macOS, and Linux
Checking network latency and server availability is important, and one way to do it is to ping an IP address. However, there are specific commands to use the feature, and you need a tool to perform it.
Fortunately, most operating systems have the tool built-in. For example, Windows users can use Command Prompt, while Linux and macOS users can utilize Terminal. Though they are different tools, the key steps and the information delivered will still be the same.
This article will explore how the ping command works and how to run it on Windows, macOS, and Linux. In addition, we will also explain how to read the ping results.

What Is the Ping Command and How Does It Work?
Ping (Packet Inter-Network Groper) is a computer network utility that allows users to verify and test the existence of a particular IP address and whether it can handle requests. It monitors network latency, device availability, and packet loss within a network.
When you run a ping test, it sends a data packet to the target host and transmits it over the network’s switch and router. Usually, it submits four to five pings at once to ensure the test is accurate.
A ping test works similarly to sonar technology. Upon receiving a data packet, the device with the specified address returns an echo reply or pong, confirming that it is online.
Ping measures the duration of response or approximate round-trip-times (RTT) – the time between the request being sent to a reply received, measured in milliseconds.
It also includes the number of bytes received, the time it takes to receive a response, and time-to-live (TTL), which measures how long a data packet should exist inside a network before being discarded by the router.
The ping test results provide helpful information to check or troubleshoot network problems. For example, if the test is successful but takes a long time to receive a response, it may indicate network congestion or speed and routing issues.
How to Ping an IP Address or a Domain Name
Generally, you can ping IP addresses as well as domain names. However, the process will depend on your operating system since different tools may differ.
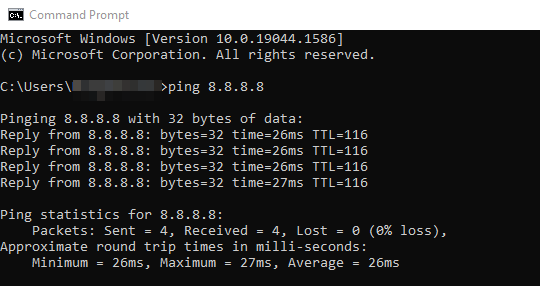
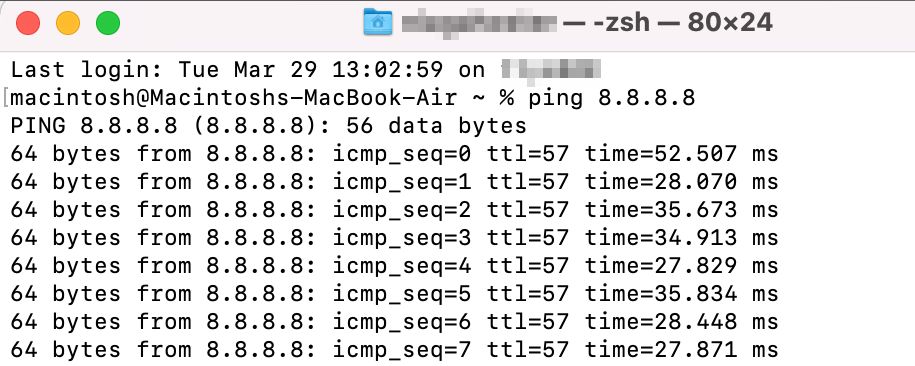
This section will use Google’s public IP address 8.8.8.8 for the ping test.
Running Ping Using Command Prompt (Windows)
Here’s how to run the ping command on Windows 10:
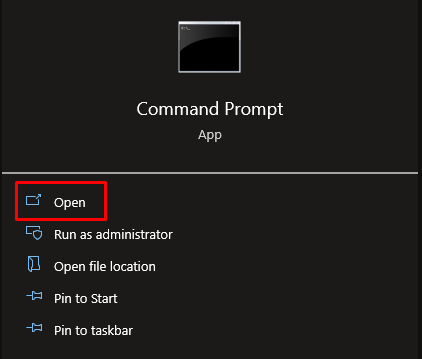
- Open the search bar or press the Windows key + R simultaneously and type in “cmd”.
- Click Open to access the Command Prompt window.
- Run the command by typing “ping” along with the IP address or domain name you want to check. In this example, we’re entering ping 8.8.8.8.

- Press Enter – the request will be sent four times.

- The ping statistics will be presented at the end of the fourth reply.

- To stop the ping command from running, use the Ctrl + C shortcut.
Running Ping Using Terminal (Linux and macOS)
If you use Ubuntu or a similar Linux distro, follow these steps to run the ping command on Terminal:
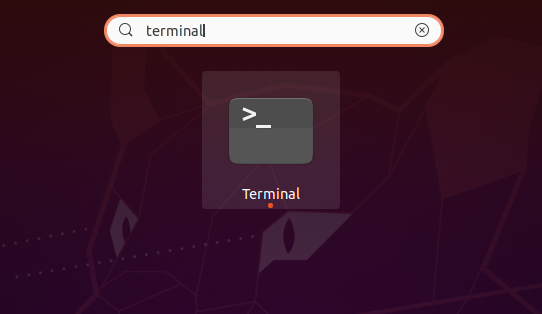
- Click Show Applications at the bottom left of your screen.
- Type “terminal” in the search bar.
- Type in “ping” and hit Enter.
- Hit Ctrl + C to close the connection, and the statistics will appear.

Here’s how to do it on macOS:
- Click the Launchpad icon on the Dock.
- Type “terminal” in the search field.

- Input “ping” and press Enter to start.
- The ping statistics will appear once the connection is closed by pressing the Ctrl + C shortcut.

When running the ping command, there are some tips you can follow:
- To initiate a continuous ping command, add -t after the IP address. For example:
ping 8.8.8.8 -t
- To specify the number of packets or requests you want to perform, add -c before or after the IP address. For example:
ping -c 7 yourdomain.com
Suggested Reading
Not sure how to specify the number of packets? Take a look at our guide on how to use the Linux ping command.
Reading the Ping Results
After running the ping command, the following line will contain the server’s hostname and the number of bytes being sent to it.
The following few lines indicate the echo replies from the server. Usually, each consists of three parts – bytes, time, and TTL. In most cases, the ping request is sent four times. After that, the ping statistics will follow.
The Packets line shows how many packets were sent, received, and lost. Any lost packets indicate a connection problem on the network.
The last line of the ping statistics features the approximate RTT that describes the connection speed in milliseconds. The higher the average time, the slower the connection to the server is.
Here’s what a successful ping test looks like on Command Prompt:

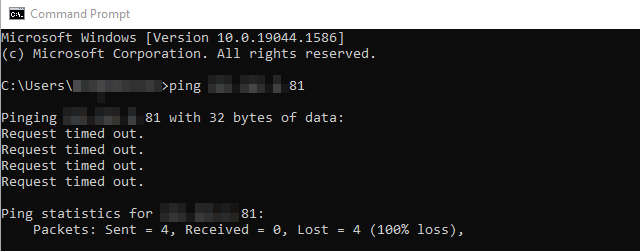
However, if the ping results show a request timeout, that means the destination IP address or domain name didn’t respond, and the pong reply wasn’t received.
This may be caused by various issues, such as the host or domain name not existing, the local network adapter not working, the DNS is still propagated, or the server experiencing downtime or a null route.
In some cases, if an IP address can be pinged from one device but can’t be pinged using another, it may indicate the IP being blocked.
Here’s what an unsuccessful ping test will look like:
Conclusion
Pinging helps gather information and discover any connectivity issues early. When you ping an IP address or a domain name, a data packet is sent to the target host and transmitted over the network.
This is done to verify and test the existence of the IP address or domain name and whether it can handle requests. If the ping is successful, the target host will respond with echo replies. However, an error message like “Request timed out” may appear if it doesn’t.
While most operating systems have this utility, each uses a different command-line interface to access it. No matter the tool, the results will be the same.
We hope this article has helped you figure out how to use the ping command and understand its results. If you have any questions or suggestions, please leave them in the comments section below.

Noviantika is a web development enthusiast with customer obsession at heart. Linux commands and web hosting are like music to her ears. When she's not writing, Noviantika likes to snuggle with her cats and brew some coffee.
