How to Use the Linux Ping Command in 2024: Main Usage Ways and Tips
The Linux ping command is a tool for diagnosing connectivity issues, monitoring network performance, and checking server availability. It is pre-installed in most distributions and accessible via Terminal or an SSH client.
The ping command works by sending Internet Control Message Protocol (ICMP) packets to a specified address. If the target server returns an ICMP echo reply, it is connected to the network.
This tutorial will explain the Linux ping utility, including its syntax, options, and common use cases. You will also learn to read ping command results to troubleshoot connectivity issues in your virtual private server (VPS).

What Is the Ping Command in Linux?
The Linux ping command, or packet internet groper, is a utility for diagnosing network issues in a server or network. It works by sending the target device a data packet and waiting for the response. Network administrators can modify the ping behavior using various options. For instance, you can set the number of packets sent and change the intervals.
Ping Command Syntax and Options
ping is commonly pre-installed on most Linux operating systems. To check if your system has it, query the installed ping version using this command:
ping -V
If ping is installed, you will see the version number. Otherwise, Terminal will return the command not found error.

Depending on your machine’s operating system, the installation steps may differ. For example, we will run this Linux command to install ping on our Ubuntu 20.04 test system:
sudo apt-get update && install iputils-ping
Once installed, run the ping command with the following syntax. It should be the same for all distributions:
ping option destination
Replace destination with the target system’s exact IP address, hostname, or URL. You can also add an option to specify the command’s behavior. Here are some of the most popular options:
| Options | Usage |
| -c | sets how many packets to send |
| -a | plays a sound when the destination responds |
| -i | changes the interval to send packets |
| -v | enables verbose output |
| -V | checks the ping version |
| -q | summarizes all the ping results in one output |
| -f | floods the destination host with a large number of packets for stress tests |
| -4 and -6 | specify the destination IP address protocol as IPv4 or IPv6, respectively |
| -s | modifies the maximum transmission unit |
| -D | starts each ping result with a UNIX timestamp |
| -W or -w | sets a timeout for each packet or session, respectively |
Pro Tip
Combine multiple ping command options for more specific testing.
How to Use the Linux Ping Command
This section will explore the Linux ping command’s use cases, syntax, and output. To run these commands in a remote machine, connect using an SSH client like PuTTY or Terminal. For Hostinger users, use the integrated Browser Terminal.
1. Check Connectivity
The most basic ping command lets you check a server’s internet connection. For example, run the following to check if your system is connected to the internet and can reach Google’s host server:
ping google.com

Use this command to check whether your VPS is running and responding to the client’s connection. Use its hostname or IP address as the destination:
ping 185.185.185.185
If Terminal returns the ICMP echo message response, your system is active and connected to the internet.
Otherwise, the VPS or the client machine may be encountering issues. To check whether your current system is experiencing a network connection problem, ping its hostname:
ping localhost
If the ping command returns an echo response, the problem lies on the remote system.
2. Specify the ECHO_REQUEST Number
By default, ping sends unlimited packets until the user terminates the process. To send a specific number of packets, use the -c option:
ping -c * destination
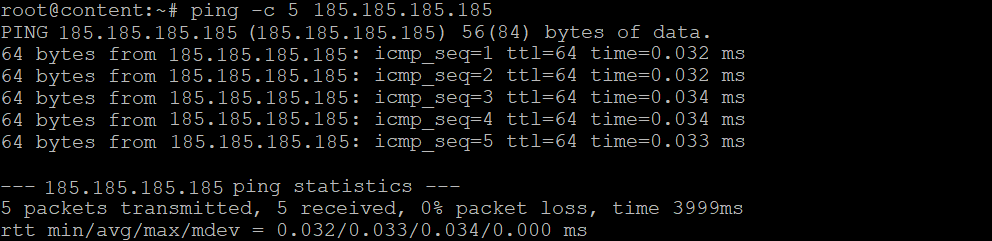
Replace * with the limit number for your packets. For example, this ping command will send five packets to the specified IP address:
ping -c 5 185.185.185.185
3. Audible Ping
The -a option will play a sound when the ping command receives a response from the target device. Since keeping Terminal open until it receives a response is inconvenient, this option is useful for network troubleshooting.
The syntax and output are similar to the basic ping command:
ping -a destination

4. Set Intervals
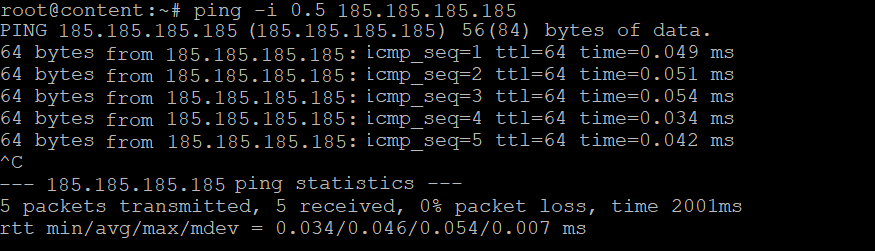
The ping command will send a packet every second. However, you may need to change it for a specific task. For instance, a shorter time interval is useful during troubleshooting since you will get more data samples.
To change the ping interval’s default value, use the -i option and specify the number of seconds. To set it faster than a second, use a decimal. Here’s an example:
ping -i 0.5 185.185.185.185
5. Receive Only the Linux Ping Command Summary
Continuous ping monitoring can be tedious due to Terminal’s long output. To simplify the results, use the -q option. The command will summarize all the ping statistics in a single output, simplifying analysis:
ping -q destination
If you don’t specify the number of packets, the summary will appear after you terminate the process.

6. Flood the Network with the Linux Ping Command
The ping command lets you rapidly send packets in large quantities using the -f option. It helps simulate your server performance during a traffic spike or distributed denial-of-service (DDoS) attack. Here’s the command syntax:
ping -f destination
Like the -q option, the ping flood command will only show the summary of the packet responses. For example, the following output shows we sent over 200 ping packets in two seconds.

7. Specify the Internet Protocol
Due to internet development, the IPv4 IP addresses are running out, and IPv6 is becoming more common. The ping command’s default setting uses IPv4, but you can use either internet protocol.
Add the -4 option to use the IPv4 address and -6 to send an IPv6 ping. Here is how the ping commands look:
ping -4 destination
ping -6 destination
You can still ping a hostname or domain name with these options. In this case, the output will show that the destination is resolved to the corresponding IP address.

8. Change the Size of the Ping Packet
By default, the ping command sends a packet with 56(84) bytes of data. 56 represents your packet size in bytes. Meanwhile, 84 specifies the total ping byte size, including all headers, which add 28 bytes.
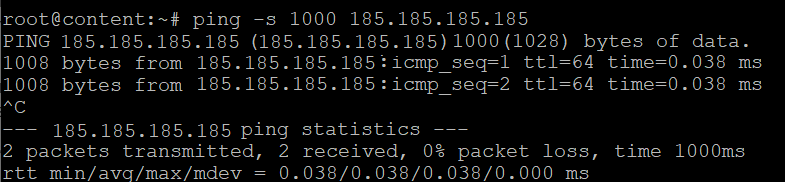
You can change the default size to check whether your network link throttles when receiving a larger packet. To do so, use the -s option:
ping -s 1234 destination
Replace 1234 with your actual ping packet size in bytes. Remember that the size in your command doesn’t include the header. So, if you write 1000, the total size of your packet will be 1028 bytes.
Important! Due to the protocol limitations, the maximum packet size is 65,535 bytes, including the header.
9. Add a Timestamp
To simplify network performance monitoring, the ping command lets you add a timestamp to the packet response. To do so, add the -D option using the following command syntax:
ping -D destination
The output will begin with a timestamp in a UNIX format similar to the following:

The timestamp shows the second, minute, hour, day, month, and year of each response. To convert it into a human-readable format, use an online tool like Epoch Converter.
10. Timeout Ping
The ping command has two timeout options, -W and -w. The -W option determines the time each ping will wait until the specified host sends a response. If it exceeds the time, the request is timed out.
Meanwhile, the –w option sets the time limit before the ping command exits. Terminal will automatically terminate the process once it reaches the specified time. Here are the syntaxes for the ping commands:
ping -W * destination
ping -w * destination
Replace * with the timeout duration in seconds. For example, use the following to ping your remote host for five seconds:
ping -w 5 185.185.185.185

Interpreting Ping Results
The ping response gives you various information about your network connectivity. The output may differ depending on your option and network condition, but the structure remains as follows:
64 bytes from (185.185.185.185): icmp_seq=1 ttl=64 time=0.1 ms
Here’s how to interpret the above ping output:
- 64 bytes – the packet size in ICMP protocol data bytes. It adds 8 bytes to your packet size for the ICMP header.
- from (185.185.185.185): – the destination address that responds to your ping. If you use a hostname or domain, it will show the resolved IP address.
- Icmp_seq – the packet’s ICMP sequence number. The number will increase by a single digit for subsequent echo requests.
- ttl (time to live) – this metric indicates how many times the packet can move between routers before it expires.
- time=0.1 ms – the total round-trip time (RTT) for a packet, including the delay.
At the end of the output is the ping statistics line, which summarizes all the packets. These data are useful for latency and packet loss analysis. In other words, you can use it to identify potential issues that slow down your network.

Tips for Effective Ping Command Usage
In this section, we will explore ping best practices to help you effectively use the tool for network diagnostics and monitoring.
Use Ping to Diagnose Internal and External Network Issues
If you have multiple systems in a network, determining where the problem lies can be difficult. The ping command lets you target different destinations to easily pinpoint which system is experiencing an issue.
Moreover, you can ping your current system to diagnose the local network interface. By looping packets, you can determine whether its networking stack is working properly.
Compare Ping Results to Establish Baselines for Network Performance
To identify network issues, you must understand how it typically performs. Keep in mind that every network behaves differently due to factors like load, topology, and distance.
Running the ping command multiple times lets you determine the performance benchmark for network baseline analysis.
If your ping result deviates from the baseline, it indicates potential issues. Moreover, you can use it to assess your server performance after implementing changes.
Be Cautious of Firewall Settings That Might Block ICMP Requests
Some Linux distributions’ firewalls may block ICMP requests by default, preventing you from receiving or sending ping packets.
To check for a firewall and ICMP requests conflict, list your iptables rules using the following command:
sudo iptables -L
Look for a rule containing ICMP with the DROP or REJECT value. To allow ping requests, remove the rules from iptables using the following command syntax:
sudo iptables -D rules
Use Ping in Combination With Other Diagnostic Tools for Comprehensive Analysis
While suitable for basic analysis, the ping command may be insufficient for diagnosing all network issues. Try pairing it with other Linux networking tools for a more in-depth analysis.
For example, combine traceroute and ping to track a packet route from the client system to the destination. For testing network performance, use Iperf to measure the maximum connection speed and bandwidth.
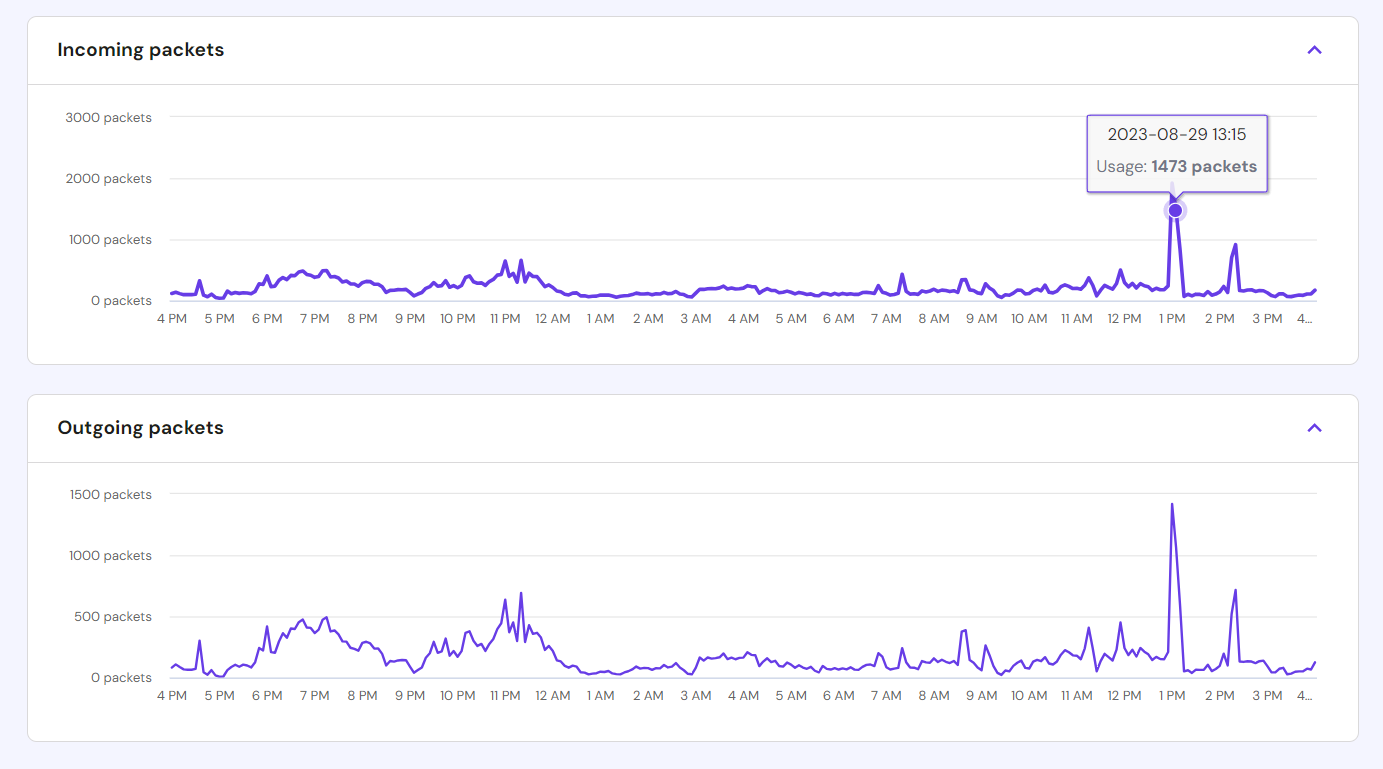
Hostinger VPS users can use hPanel’s Server Usage feature to easily monitor packet transmission and network usage with a user-friendly graph.

Conclusion
The Linux ping command is a tool for testing connectivity and system availability. It is pre-installed in most Linux distributions and accessible via Terminal or an SSH client. It involves sending ICMP packets to a destination machine using its hostname, domain, or IP address.
Users can add various options to modify the command for different testing scenarios. For example, use -c to set the number of sent packets, -i to change the time interval, and -q to summarize the ping results in one output.
The ping output gives you information about the packet’s destination, size, time to live, and response time. In addition to a remote system, you can ping your local computer to diagnose internal network problems.
Your system firewall may cause ping not to work properly. When pinging, ensure your system firewall doesn’t block the ICMP packets.
For more accurate diagnostics, run the command multiple times and pair it with other tools like traceroute.

Aris is a Content Writer specializing in Linux and WordPress development. He has a passion for networking, front-end web development, and server administration. By combining his IT and writing experience, Aris creates content that helps people easily understand complex technical topics to start their online journey. Follow him on LinkedIn.
