How to Clone a Website
Cloning your live website to a new location is essential during maintenance to avoid misconfigurations that might cause errors or downtimes. It is also a way to create a backup for migration or restore points in case of cyber attacks.
The steps to create a clone website might differ depending on the builder platform. In addition, there are various methods to do so, suitable for different users and scenarios.
To help you understand the steps, this tutorial will explain how to duplicate a site built with Hostinger Website Builder, WordPress, and other platforms. We will also explain the benefits and best practices in cloning a site.
Download website launch checklist
How to Duplicate a Hostinger Website Builder Website
Hostinger Website Builder (HWB) users can easily duplicate their site content and configurations within a few clicks via hPanel. Here are the steps:
- Log in to hPanel and navigate to Websites on the top menu.
- Find the website you want to clone. Click the three dots icon → Duplicate website.
- Select a plan to host the cloned website from the drop-down menu. Click Select plan.
- Return to the Websites menu, and you will see the duplicate as a new entry.

The Hostinger Website Builder duplication feature will automatically generate a temporary domain name for the cloned site. Preview it by clicking Edit Website → Publish and check if the tool copied all pages and content correctly.
If you want to change the cloned HWB website’s domain, follow these steps:
- Navigate to the Websites menu in hPanel.
- Click on the three dots icon on the clone site and select Change domain.
- Check the box to confirm you understand that all data in the target domain will be wiped. Hit Change.
- Choose the preferred domain from the drop-down list and click Change again.
Wait until the DNS propagation process is complete, which may take up to 24 hours. After the website goes live, you can’t edit or change the domain.
Note that duplicating website content in HWB doesn’t include your online store products and settings. Also, If you integrate it with other platforms, remove the API key or other credentials from the clone to avoid conflicts.
Unlike HWB, some website builder platforms don’t allow users to modify or migrate files manually. You must ask customer support for assistance, and the cloning process will usually take longer.

How to Clone a WordPress Website
In this section, we will explore three ways to clone a WordPress site, starting from the simplest to the most complex. We will also explain each method’s advantages and who it is best suited for.
1. Clone a Website Using hPanel Copy Website Feature
Hostinger users can easily clone websites and databases in just a few clicks via hPanel. Before proceeding, you must have another active domain at Hostinger to host the clone.
This copy website feature is only available in our managed WordPress hosting plans. Also, it won’t copy email accounts, file transfer protocol (FTP) accounts, and SSH keys associated with the domain, so you must move them manually.
Warning! Website duplication in hPanel will overwrite existing data in the target domain. Before you start copying, ensure it is empty or purchase a new one.
After completing all the prerequisites, follow these steps:
- Navigate to hPanel → Websites. Select Manage on the one you want to copy.

- Go to the sidebar and search for Copy website.
- Select the destination domain from the drop-down menu.
- Click on the Start copying button.
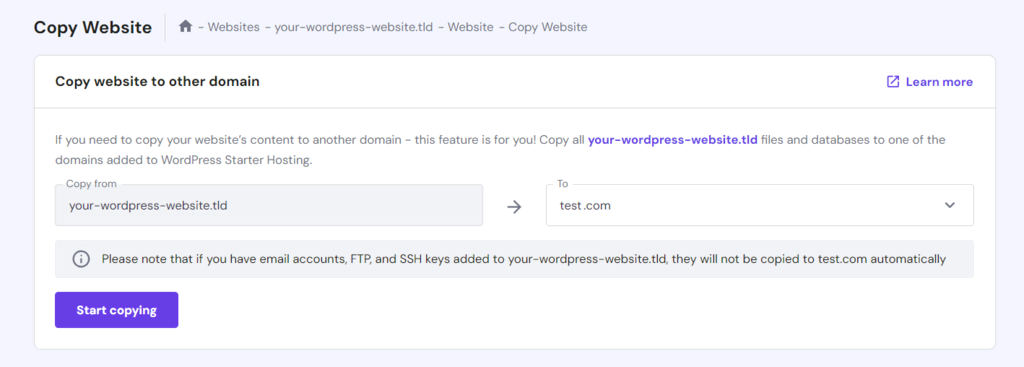
- Check the confirmation box and select Start copying anyway to begin the process.
That’s it! If you access the destination domain, you should see the functional copy of the live site.
Note that this method copies the entire website. If you want to preserve only the layout or web design, read our article to learn more about how to duplicate pages or posts in WordPress.
2. Clone a Website by Installing a Cloning Plugin
For non-Hostinger users, the easiest method to clone a site is using a WordPress plugin like Duplicator. Similar to hPanel’s copying feature, it is safer than the manual process since you don’t need to work with the core files, avoiding misconfigurations.
Unlike hPanel, however, it doesn’t copy the original database, meaning you must create a new one and migrate the data. You will also need to set up a local WordPress hosting environment or use a spare domain for the copied site files.
The steps slightly differ depending on the new location of your cloned site – we will explain both.
1. Download a Duplicator Package
To clone a website using Duplicator, download and install the WordPress plugin first. Then, create and download the archived website files. Here are the steps:
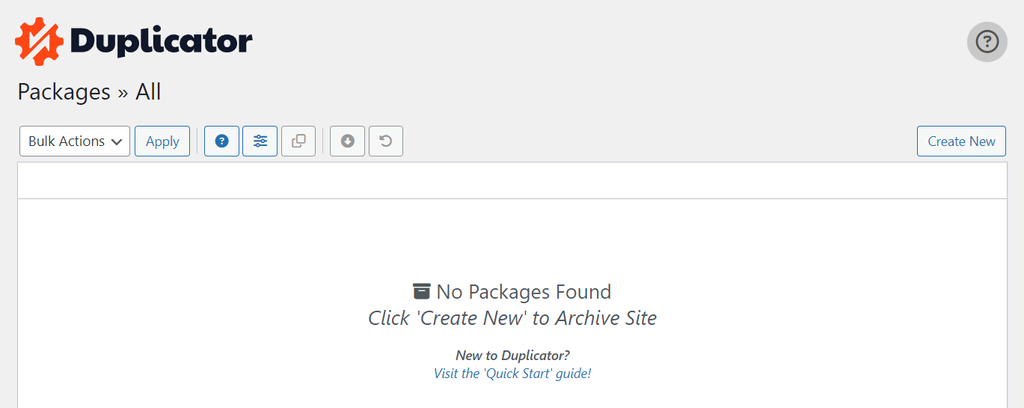
- Navigate to the sidebar → Duplicator → Packages → Create New.
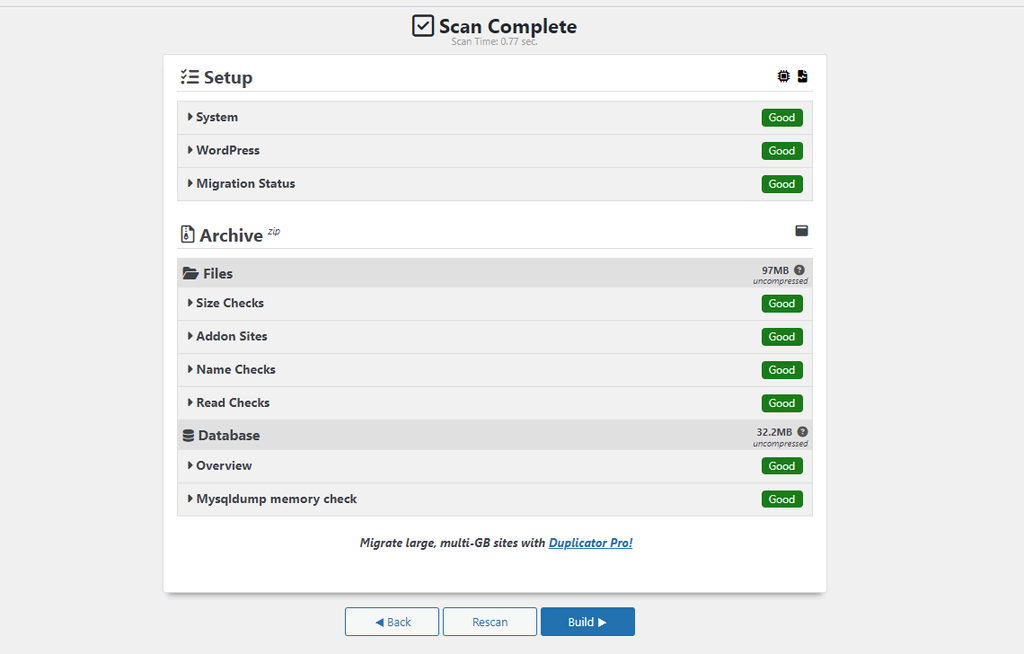
- Enter the name and adjust the settings. We will use the default configuration. Click Next.
- Wait until Duplicator finishes scanning your live website. If it doesn’t show any issue, click Build. Otherwise, follow the instructions to fix the problems.
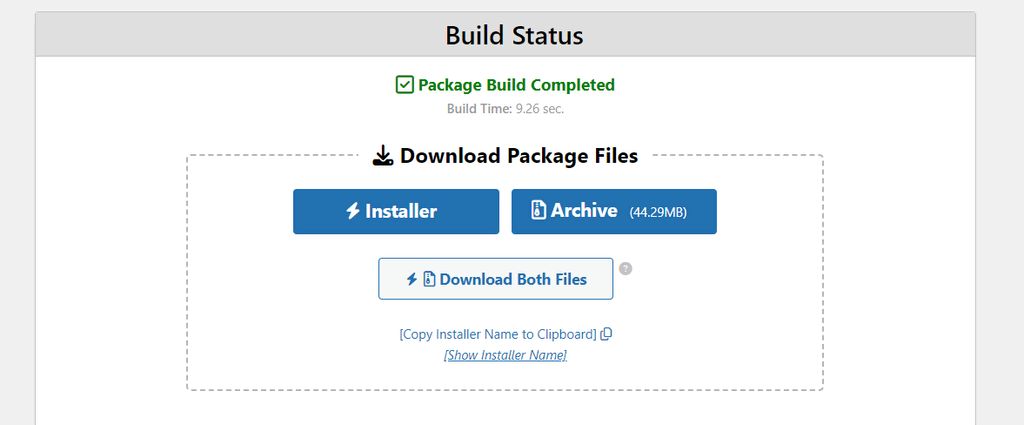
- Click Download Both Files to download the cloned website ZIP file and the Duplicator installer.
2. Upload the Cloned Files
After downloading the files, upload them to the new location. If you use a domain at Hostinger, log in to hPanel and go to Hosting on the top menu.
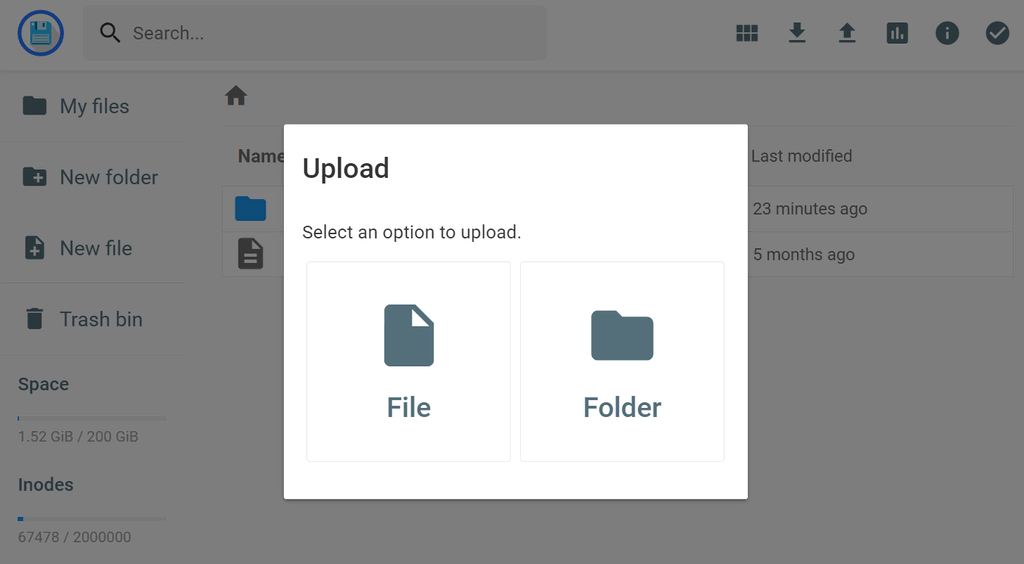
Click Manage on the destination plan and select File Manager. Navigate to public_html and click the Upload button. Select File and choose the archive files from the explorer.
The steps might differ depending on your web hosting provider. If your host doesn’t provide such a feature, upload the files using an FTP client like FileZilla. However, you must create a new FTP account to enable data transfer to the new website.
For local hosting environments, create a new folder within the root directory. Since the location differs depending on your web stack, check the relevant documentation before proceeding.
For example, MAMP’s root directory is in /Applications/MAMP/htdocs/ while WAMP’s is C:\wamp\www\.
Once you find the root path, open it and create a new folder. Copy and paste the Duplicator installer and the ZIP file into the location.
3. Create a Database
Copying the files only migrates the web design, pages, and content to the new environment. You will need to move the database to the new location to make the cloned website functional.
Important! For simple static websites, you don’t need to migrate the database. They usually only have a CSS and HTML file without any server-side scripting language.
If your domain is hosted on Hostinger, you can do so via hPanel using these steps:
- Log in to hPanel and navigate to Websites on the top menu.
- Click Manage on your newly cloned website.
- From the sidebar, head to Databases → Management.
- Enter the new database’s name, username, and password. Click Create.
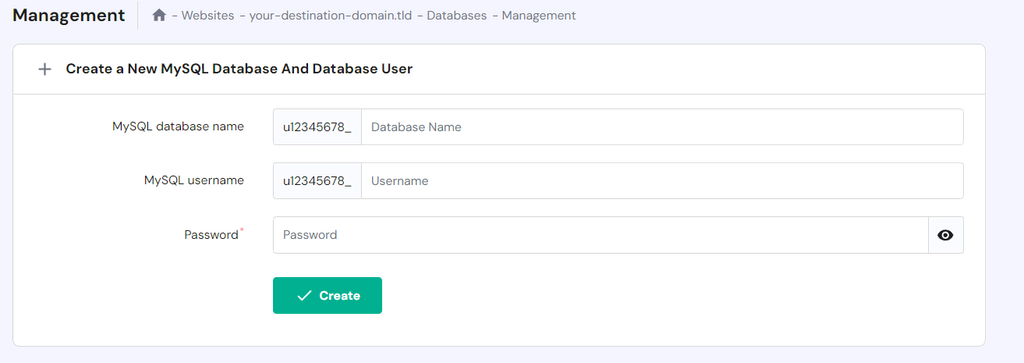
Once the process is complete, scroll down to the database list, and you should see the newly created one. To manage the user permissions and passwords, click the three dots icon.
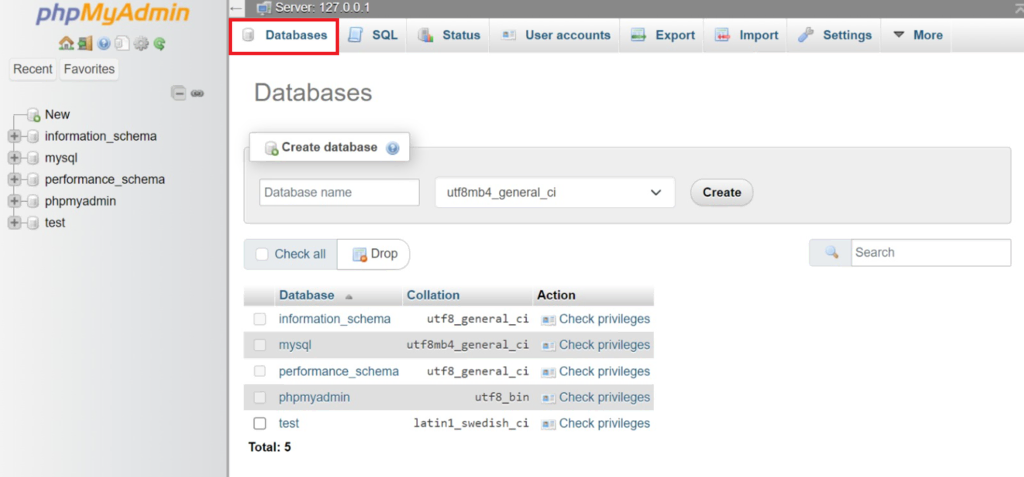
If you use a local hosting environment, access the phpMyAdmin panel by entering http://localhost/phpmyadmin/ or http://localhost:8080/phpmyadmin into your web browser. Ensure the software stack you’re using for your local server is running.
In the phpMyAdmin panel, click the Databases tab. Enter your new database’s name and click Create to confirm.
4. Run the Duplicator Installer
After configuring the database, run the Duplicator installer script to unpack the new site. To do so, enter the following address into your web browser:
https://example.com/installer.php
Replace example.com with your actual domain name. If you use a local hosting environment, use the localhost address like so:
localhost/installer.php
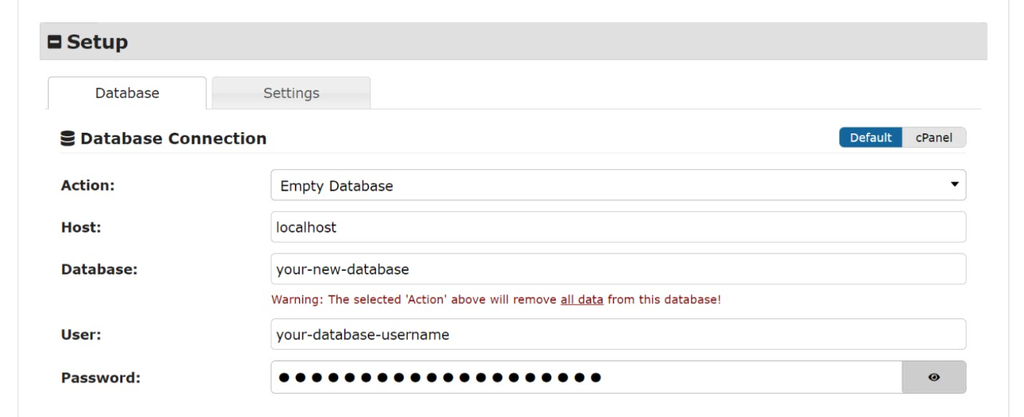
The Duplicator installer wizard will show up. To extract the WordPress website, follow these steps:
- Navigate to the Setup section. Enter your database information, like its hostname, name, username, and password.
- Scroll down and expand the Validate section. Click Validate to check if your system is ready for installation.
- If Duplicator doesn’t show errors, check the Terms and Conditions box and click Next. Otherwise, follow the provided solutions to troubleshoot the issues.
- Review the site and database settings. Click Ok to start the installation process.
If the installation and extraction process is incomplete, Duplicator will show an error message. Follow the instructions before proceeding to the next step.
Otherwise, it will display the Good status, meaning the new WordPress website is ready and working correctly. To access it, click Admin Login.
3. Clone a Website Manually
If you are not a Hostinger user and prefer not to use a plugin, clone a website manually by migrating the files into a new location. We only recommend this method if you are experienced with WordPress development or if the previous methods don’t work.
Warning! Create a complete backup of your WordPress website before cloning to simplify restoration process in case of misconfigurations.
1. Compress Your WordPress Files
To manually clone a website, compress and download the WordPress installation files. The methods might differ depending on your web host’s features.
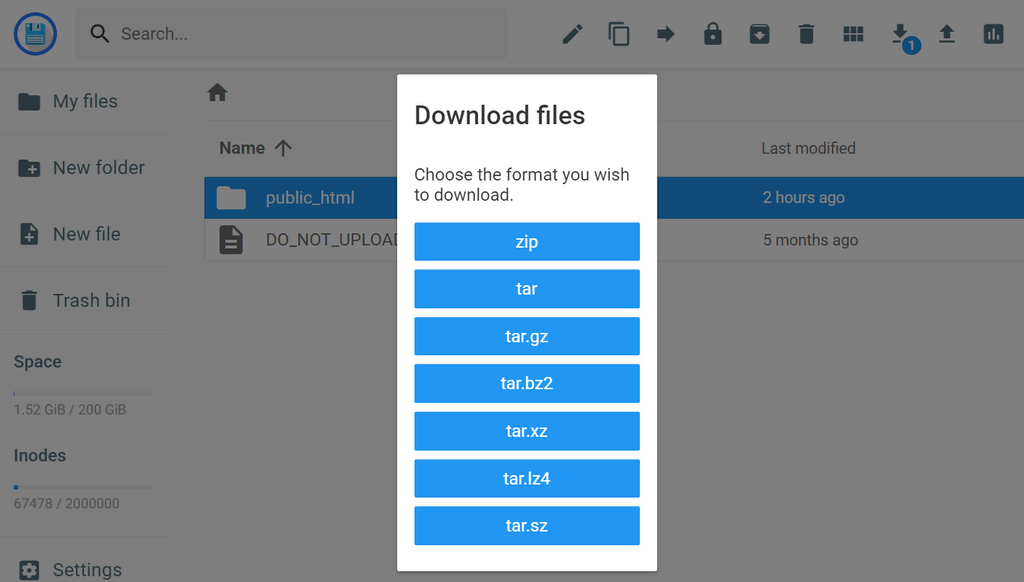
For Hostinger users, access the File Manager of the website you want to clone and go to the root directory. Click the public_html folder and select the Download button. Pick ZIP as the extension.
If your web hosting provider doesn’t have a file explorer feature, download public_html using FileZilla. However, the folder will have a bigger size since this method doesn’t let you compress the files.
You can also download the folder as a ZIP using commands, but the steps are more involved. To do so, connect to the server using an SSH client like PuTTY and run these commands in the root folder:
zip -r -public_html.zip public_html
scp username@185.185.185.185:path/root_folder/public_html.zip /path/to/target_folder
Replace the username, IP address, target path, and destination folder with the actual values.
2. Upload and Extract Your WordPress Files
Next, move and extract the archived WordPress installation files to the new location. If you want to host the website with Hostinger, click Manage on the target domain and select File Manager via hPanel.
Navigate to the root folder and click the Upload button on the top menu. Select public_html.zip from your local computer. Once uploaded, right-click on it and select Extract.
Similarly, use FileZilla to upload the ZIP file if your web host doesn’t offer an explorer feature. When using this FTP tool, unpack the archive before copying it to the new site.
Alternatively, run the Linux SCP command on your local machine’s Terminal to upload the archive file. Replace the path, hostname, and IP address with the actual values:
sudo scp /path/to/local_machine/public_html.zip
username@185.185.185.185:path/root_folder/
Then, connect to the host server via SSH and navigate to the root folder. Run the following command in the remote system’s Terminal to extract the file:
sudo unzip path/root_folder/public_html.zip
3. Migrate the Database
After cloning the website files, open the phpMyAdmin panel to export and migrate your database to the new location. Since the steps to access it vary depending on the web host, ask your hosting provider for assistance.
At Hostinger, you can access phpMyAdmin by going to the website management menu on hPanel and navigating to the sidebar → Database → phpMyAdmin. Then, click Enter phpMyAdmin on the database you want to clone.

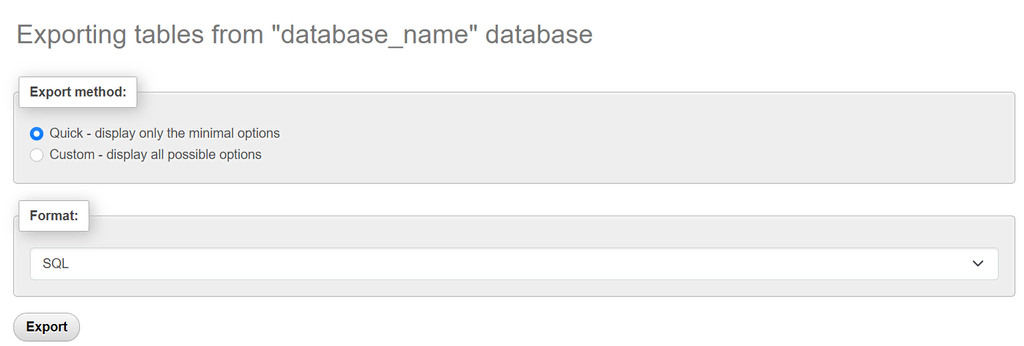
In the phpMyAdmin panel, click the Export tab. Choose SQL as the Format and your preferred method, which is Quick in our case. Click Export to download the database.
Now, log in to the new website’s phpMyAdmin panel. Like the previous method, click the Databases tab and enter the name of your new database. Hit Create to confirm.
Once created, go to the Import tab and click Choose File on the Browse your computer option. Select the SQL file and click Go to import the data.
4. Update the wp-config.php File
After setting up the website and database, connect them by modifying the wp-config.php file. Hostinger users can directly do so via File Manager.
Open the new website’s File Manager and navigate to the /app folder within the WordPress root directory. Right-click on the wp-config.php file and select Edit.

Update the following information based on your new database credentials:
- DB_NAME – database name
- DB_USER – username for the database user
- DB_PASSWORD – database password
If you are migrating to another hosting platform, also change the DB_HOST parameter. Since the value varies depending on the web host, contact your provider for this information.
Moreover, if you are duplicating an existing website to another domain or subdomain, add the following lines at the bottom to ensure it connects with the new address:
define( 'WP_HOME', 'https://newdomain.tld' );
define( 'WP_SITEURL', 'https://newdomain.tld' );
Once finished, click the disk icon on the top right corner to save the changes. Your cloned website should now be accessible and work properly.
How to Copy Other Types of Websites
In the previous sections, we have explained the methods of cloning a website built with WordPress or Hostinger Website Builder. However, they might not work if you use other platforms or content management systems (CMSs).
For other types of websites, you can use the manual method. While the steps might differ, the general procedure is similar:
- Set up a new domain or create a local hosting environment.
- Open your existing website’s directory using an FTP client and download all the files.
- Upload all the website files to the new hosting plan or local environment.
- Access phpMyAdmin and download the database as an SQL file.
- Navigate to your new website’s database manager panel and import the file.
- Connect the new database by modifying your server-side code, like database.php for Laravel.
You can also try various website cloning tools like HTTrack, although they typically don’t work for complex dynamic sites. Regardless, ensure they are from reputable developers and compatible with your web development platform.
Also, remember to check your web development platform’s documentation and contact your hosting provider if you come across issues, ensuring a smooth migration process.
What to Do After Cloning Your Website
After you clone a website, check whether all the features work as intended. During development, this step helps ensure new updates and changes function properly when pushed to the live environment.
An accurate and working cloned version of your live website also simplifies the restoration process since it doesn’t need adjustments.
Here are some common tasks to do after launch:
- Check all website features, including forms, navigation buttons, and other interactive elements.
- Ensure links are valid and point to the right web pages or other websites.
- Verify that content like images and videos from external sources load properly from the correct URL.
- De-index the clone domain to prevent it from cannibalizing the original website and harming search engine optimization (SEO).
- Update the tracking ID or API keys to prevent conflict with the existing website.
- Regularly sync changes on the cloned and live website to maintain structural integrity and consistency.
- Apply robust security practices, like installing secure sockets layer (SSL) certificates, in the cloned website to avoid exposing potential vulnerabilities.
- Monitor uptime and downtime in the clone site to check for misconfigurations or conflicts with the live environment.
In addition, set up WordPress continuous integration/continuous deployment (CI/CD) if you are using the CMS. It automates code integration to ensure the cloned website always synchronizes with the live site.
We recommend reading our website launch checklist to learn more about each task and easily track your testing progress.
Why Should You Consider Cloning Your Website
Developers usually clone a website for testing changes like applying WordPress themes, setting up new features, and implementing web page optimization strategies. It allows them to quickly create an accurate staging environment without affecting the live site.
Need A Simpler Staging Solution?
Hostinger’s managed WordPress hosting plans come with a staging tool. Instead of cloning a website, users can create a dedicated testing environment using this feature, saving time and money since you don’t need another domain.
This is crucial since such major modifications might cause conflicts or errors, affecting the entire website functionality. Conversely, minor tasks, like updating a plugin and adding new products, don’t require site cloning.
Another use case is simplifying migration. Cloning preserves the web design, content, page structure, and settings to ensure a seamless process with minimal downtime. It also saves time since you don’t need to create a new site from scratch.
Developers also clone a website as a restoration point for recovering the WordPress installation after a cyber attack. While some hosting and builder platform providers like Hostinger regularly back up your site, a dedicated copy offers an additional safety layer.

Conclusion
Developers commonly replicate a website for testing, backup, or migration. Depending on the builder platform, the steps to clone a website will differ. For example, Hostinger Website Builder lets users copy a website to a temporary domain via hPanel.
For WordPress users, Hostinger’s copy website feature allows for simultaneous settings, database, and web page duplication. Alternatively, utilize a plugin like Duplicator to automatically migrate your website files. However, this requires manual database setup.
You can also manually clone a website by downloading the files and database. Then, upload them to a new hosting environment. This method should work on different platforms, except site builders that don’t allow user modifications.
After copying your site, ensure to conduct post-launch cheks. Verify that any forms, links, and buttons are working properly. If the clone is accessible online, de-index it to avoid SEO cannibalization and update tracking IDs to prevent overlaps.

Will Morris is a staff writer at WordCandy. When he's not writing about WordPress, he likes to gig his stand-up comedy routine on the local circuit.

Aris is a Content Writer specializing in Linux and WordPress development. He has a passion for networking, front-end web development, and server administration. By combining his IT and writing experience, Aris creates content that helps people easily understand complex technical topics to start their online journey. Follow him on LinkedIn.

Comments
February 27 2024
Can I clone any website using these methods?
March 05 2024
Certainly! With these methods, you can clone any website you'd like ?
April 06 2024
I would like to clone my existing website and use ot with a new URL. I already own the url. What would be the cost to do this? Andre Gaston
April 24 2024
Hi Andre! Cloning an existing website and using it with a new URL on Hostinger doesn't come with an additional cost. To use it with a new URL, you will need to publish the website and then assign a domain to it. If you need to clone your website to a new domain within your Hostinger account, you would need to ensure that the new domain is added to your hosting account.
June 18 2024
If I take a package with your hosting and free domain. Can you clone a website which later we can edit the text and image and logo as we like and when we like? I do not have access to the website I would like to clone. But have permission.
June 27 2024
Hi Adam! If you take a package with our hosting that includes a free domain, you can clone a website and later edit the text, images, and logo as you like. However, for a personalized response tailored to your specific service and needs, please reach out to our Customer Success Team. This will allow us to check your service details and provide further assistance accordingly ;)