What Is a CSS Class and How to Use It to Style HTML Elements
A cascading style sheet (CSS) class is a selector that lets you define the same styling for multiple hypertext markup language (HTML) elements simultaneously. It simplifies web customization since you don’t need to write the code individually.
In addition to making the code cleaner and more concise, this attribute helps maintain styling consistency on different elements. Due to its benefits, learning CSS classes is crucial for aspiring web developers.
With that in mind, this article will explain how to use CSS classes to style HTML elements. You will also learn several tips to help you master the selector for more efficient web development.
Download Complete CSS Cheat Sheet
What Is a CSS Class?
CSS class is an attribute that lets you select multiple HTML elements and define their styling simultaneously. It helps maintain visual consistency and simplify web development.
For instance, instead of writing CSS code to change the text color for each heading element, developers can group them into a class and apply one styling to all of them.
How to Use a CSS Class to Style an Element
To help you understand how to use a CSS class, this section will explain the six steps to utilize this attribute to modify specific elements in your HTML file.
1. Open Your HTML Document
Before using a CSS class, open and check the structure of your HTML document. This step helps you determine which element to modify to simplify grouping.
The steps to locate the file differ depending on whether you are in a local development area or the live hosting environment.
In a local environment, open your code editor and select the document via the file explorer window. For example, Visual Studio Code (VSCode) users can do so by navigating to File → Open File.
If you are in a live hosting area, open your website’s files using a file transfer protocol (FTP) client like FileZilla and download the document. Then, open it locally using a text editor.
However, it is rather inefficient since you must reupload the file whenever you define a new CSS styling to check its appearance on the front end. If your web host doesn’t offer a built-in editor in the hosting control panel, we recommend setting up a local host.
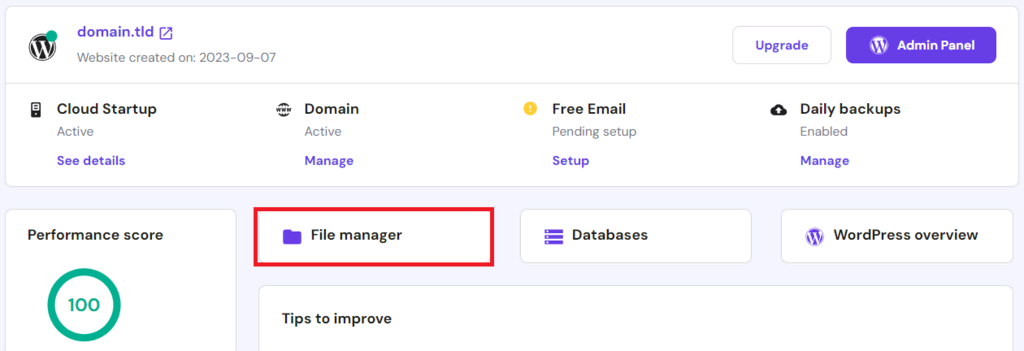
Alternatively, Hostinger web hosting users can directly open their website’s HTML content via a web browser.

To do so, navigate to hPanel → Websites → Manage → File Manager. Locate and double-click the file to open the code editor.
2. Identify the Element to Style
Let’s check elements in your HTML document to identify ones you can categorize into the same CSS class and apply the same style rules. While you can select them depending on your needs, there are several important aspects to consider.
Ideally, elements that belong to a common CSS class should have similar content or an identical purpose. For example, you might want to group <h2></h2> tags since they share the same function for defining the second heading.
You can also apply the same CSS class to elements enclosed in the same semantic element tags. For instance, heading content is usually contained within <header></header>.
In addition to headings, you can modify additional elements like paragraphs using the <p></p> tags and divisions with <div></div>.
Before assigning a CSS class and applying styles, we recommend previewing your web page content to identify the elements’ overall structure. This helps you determine the classes you need to avoid creating too many.
Pro Tip
To check your site code structure in more detail on the front end, use your web browser’s inspect element tool. You can access it by right-clicking on your screen and selecting Inspect.
If the file is in the live hosting environment, you can do so by visiting your site. For the local development area, host the file in a local host using a web stack or use your code editor’s preview feature.
3. Assign a CSS Class to the Element
After deciding on the elements, we can start assigning the CSS classes. To do so, add the class attribute after the opening tag like so:
<element class="your-class-name">content</element>
For example, you want to assign the main-paragraph CSS class ID to each paragraph element in your HTML. Here’s how all tags will look like:
<p class="main-paragraph">paragraph's content</p>
If you apply a CSS class to a semantic element, all the nested elements within it will belong to the same group. Consider this code example:
<header class="main-heading">
   <h1>The main heading</h1>
      <p>paragraph's content</p>
</header>
You can use the main-heading class to apply styling to the <h></h> and <p></p> elements. Note that you still need to specify the nested content in the CSS selector individually. We’ll discuss this further in the following section.
The steps to add CSS classes in the local development environment and live hosting area are the same. After assigning them, press Ctrl + S on your code editor or press the disk icon on the top right corner if you are using Hostinger’s File Manager editor.
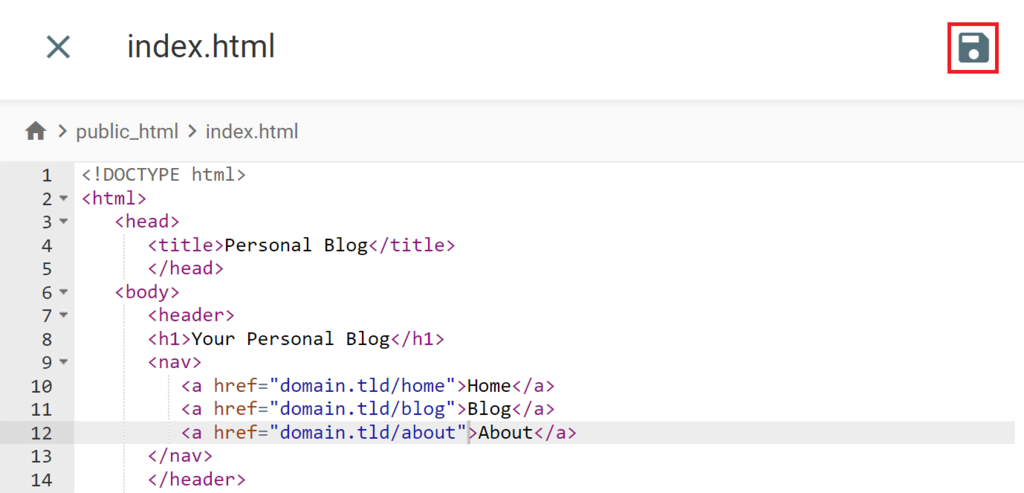
Currently, you won’t see changes on the front end since we haven’t applied any CSS style to the elements.
4. Switch to Your CSS File
After assigning classes to the elements, we can start applying the styling. There are two methods to do so – using the <style></style> tags within your HTML document or adding the code in a separate CSS stylesheet.
If you only use the HTML document, specify the styling after your class to make the code easier to read. Here’s an example:
<body>
   /* the element you want to style */
   <p class="main-paragraph">the paragraph's content</p>
   <style>
      /* class selector and CSS rules go here */
   </style>
</body>
This method is more convenient since you don’t need to switch between files to modify the CSS class selectors and the elements. However, development and maintenance might be complicated in the long term since the code will be too complex.
For that reason, we recommend making a dedicated stylesheet in the same folder as the HTML document to organize your code. In a local development environment, you can do so via your system’s file explorer or using your code editor’s feature.
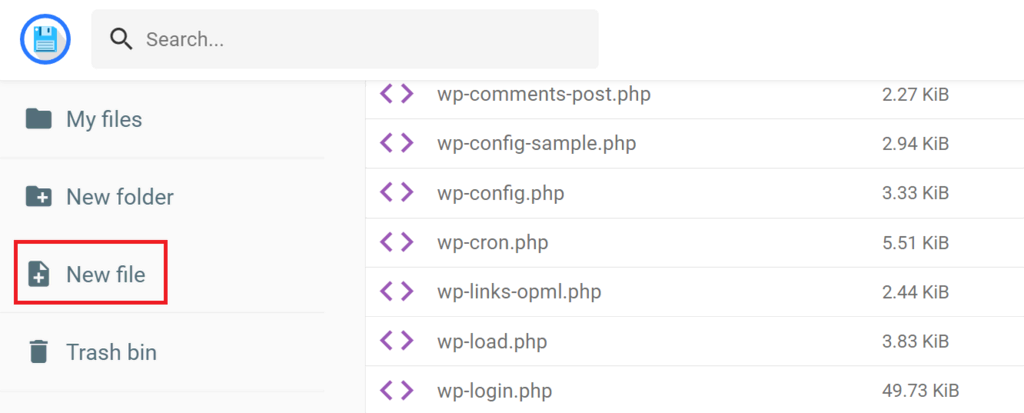
In VSCode, navigate to File → New File. Meanwhile, click the New file button on the sidebar if you use Hostinger’s File Manager. You can use any name, but ensure it ends with the .css extension.
Then, open your HTML code and add the following on top of the file to connect the stylesheet. Replace stylesheet.css with your actual file name:
<head>
   <link rel="stylesheet" href="stylesheet.css">
</head>
This enables your HTML to retrieve and apply styling code in the stylesheet automatically.
5. Define the CSS Class
After assigning CSS classes and creating the stylesheet, add the design rule for them. Here’s what the code syntax looks like:
.your-class {
  /* rule goes here */
}
Start the code with a CSS class selector that comprises a period symbol (.) followed by the name. Then, specify the CSS properties to apply within the declaration block, enclosed in curly brackets.
Each property occupies a single line and ends with a semicolon. For instance, the following CSS will change the text color and weight within the main-paragraph CSS class:
.main-paragraph {
   font-weight: bold;
   color: green;
}
There are various other CSS properties that define different types of styling. For example, you can change the background color using background-color and set a specific cursor design when hovering over an element using cursor.
Important! Remember to enclose the CSS class selectors and rules within the tags if you add them directly under the elements and don’t use a dedicated stylesheet.
For nested CSS classes, specify their names after the parents. In this example code, we will apply styling to class1, which is a part of the my-header class:
.my-header .class1 {
  /* rule  goes here */
}
The same syntax applies to nested elements. For example, the following CSS code will apply to the h1 within the my-header class:
.my-header h1 {
  /* rule goes here */
}
Note that the snippet will select the specified element or class nested on any level. For direct descendants, add the greater than (>) symbol after the parent class names.
You can also select multiple CSS classes or elements by listing them separated by a comma. For example, we will apply the styling to h1 and p, which are both direct descendants of my-header:
.my-header > h1,
.my-header > p {
  /* rule goes here */
}
After adding CSS rules, save your file and preview your web page to see if it displays correctly on the front end. We recommend checking the design whenever you add new CSS styling.
6. Apply the Class to Other Elements (Optional)
Once you are satisfied with the design and ensure the styling displays properly, return to your HTML code to apply classes to additional elements.
Since you have defined the class and styling, selecting an additional element at the end helps maintain design consistency. This will give you a rough idea of the final website structure to decide which content should have the same appearance.
It also helps minimize new classes since you can repurpose existing ones. Remember to maintain element type consistency when reusing them to ensure cohesive code structure and design.
For example, if you want to style a <div></div> semantic element, assign it to an existing div class. You shouldn’t use it for other content since assigning a new class in the future can be confusing and cause design inconsistencies.
Tips to Master Classes in CSS
There are several crucial web design best practices to consider when using CSS classes to help simplify code organization, ensure design consistency, and improve maintenance efficiency.
Name All Classes Properly
Your CSS class name must provide information about attributes added to the element for easier identification. In addition to simplifying maintenance, it helps you quickly determine which one to reuse for a specific element.
For instance, if you want to add a class that will change the font size to 36, the ideal name would be font-36. Meanwhile, use bg-blue for styling that sets the background color of an element to blue.
Moreover, don’t use the same class name since your styling code will overlap, preventing the design from showing properly.
Leverage Other Selectors
In addition to the class selector, use other CSS features to assign styling to your HTML element. Some of the common methods to apply design include:
- Inline CSS – consists of the styling within the HTML element’s opening tag.
- ID selector – applies CSS styling to one element based on its ID name specified after the opening tag.
- Element or type selector – assigns CSS styles directly to specific elements using their tag name, like <heading> or <p>.
- Universal selector – groups and applies the same CSS rule to all elements in your document.
If these selectors target the same HTML element, web browsers will load them in a hierarchical structure. Based on the order, they will prioritize inline CSS, ID selector, class, and type.
Minimize Properties Within A Class
Avoid adding too many CSS properties to a class since it will limit the reusability. For example, you can’t reuse a class with font weight and text color styling to resize a paragraph’s character size.
In this case, you must add another class for that specific element, making the code too long and complicated for the long run.
To modify specific elements, we recommend adding the style attribute as an inline CSS after the opening tag instead of the class selector. It helps avoid design overriding if you need to reuse the class in the future.
Organize Classes by Grouping
When creating classes, sort them based on their utilization and characteristics. For example, put those with the same font size attribute or the target element into the same category.
We also recommend making documentation to keep track of all CSS classes and their purposes. This helps simplify reusing and maintenance, especially in the future when your code becomes more complex.
Instead of making a separate document, you can also make the documentation using comments in your HTML or CSS file. To do so in CSS, add the notes within the /* */ tags like so:
/* notes about your class characteristics or functionality /*
.my-header h1 {
  /* rule goes here */
}
Conclusion
CSS classes are attributes that let you select multiple HTML elements and apply the same styling simultaneously. This helps simplify your web development process since you can reuse existing designs instead of writing new ones from scratch.
In this article, we have explained how to use the CSS class selectors to group elements and apply styling:
- Open your site’s HTML using a code editor like VSCode or Hostinger’s File Manager.
- Identify the elements of style based on their functionalities and content similarities.
- Assign CSS class to the elements by adding the class attribute.
- Create a CSS stylesheet in the same folder and link them.
- Select the class using a period symbol followed by its name and the style properties.
- Apply additional classes to your HTML to maintain design consistency.
Ensure to use descriptive names for all classes and avoid adding too many style attributes to preserve reusability. Also, leverage other selectors and inline CSS to avoid design overriding when targeting the same element.
CSS Class FAQ
To help deepen your understanding and leverage the tool more efficiently, we will answer several questions about the CSS class.
Why Use CSS Classes?
CSS classes help simplify the web development process since you can select multiple HTML elements and apply styling simultaneously without writing the code individually. You can also reuse the classes to apply the same appearance to a new element or modify the code to revise the design in bulk.
What Are the Most Common CSS Classes?
Some of the most common CSS classes include .sidebar, which defines the design of secondary content on the side of your web page, and .menu, which sets the style for your website’s top bar. Note that you can create a CSS custom class with any name and elements.
What Is the Difference Between Class and ID in HTML?
Both class and ID in HTML are an identifier for HTML elements. However, an ID can only contain a single element, while classes can have multiple. That said, you can use a class or ID selector in the same way to apply CSS styling.

Domantas leads the content and SEO teams forward with fresh ideas and out of the box approaches. Armed with extensive SEO and marketing knowledge, he aims to spread the word of Hostinger to every corner of the world. During his free time, Domantas likes to hone his web development skills and travel to exotic places.

Aris is a Content Writer specializing in Linux and WordPress development. He has a passion for networking, front-end web development, and server administration. By combining his IT and writing experience, Aris creates content that helps people easily understand complex technical topics to start their online journey. Follow him on LinkedIn.

Comments
June 17 2019
Responsive instead of Responsible.
September 26 2019
Hey Hector, We have no idea how we missed this! Thanks, fixed!
December 14 2020
I need More explanation with example on "attribute" and "element in CSS
February 09 2021
Hi there! You can think of element as of your object - a header, for example. An attribute would be font, color, size - they define how your element looks :)
April 06 2023
Pls is there anything like .home [style=background-color:red;] Or p.home[style=background-color:red;] I tried this it isn't working This is the normal one I know .home { background-color: red; padding: 20px; }
April 07 2023
Hey there! Unfortunately only such format is valid:
.exampleone {
  background-color: transparent;
}