WordPress reCAPTCHA: What Is It and 2 Methods to Enable It

reCAPTCHA is Google’s security feature that distinguishes human users from malicious bots. The past versions used puzzles like distorted words or images to filter the traffic, while the new one runs automatically in the background.
In WordPress, reCAPTCHA typically appears on the login page to help prevent online threats like brute force attacks and spam entries. This feature is less intrusive than other security checks, ensuring a smooth user experience.
In this WordPress tutorial, we will provide detailed instructions to configure reCAPTCHA using a plugin and code. You will also learn its benefits and best practices to ensure optimal website security.
Download WordPress Security Checklist
What Is WordPress reCAPTCHA?
WordPress reCAPTCHA is a security feature that filters human and automated traffic on your website. It does so by showing a simple puzzle or running an automatic background check.
There are two ways to add reCAPTCHA to WordPress sites – using a plugin or embedding the Google API using code within your theme’s file.
Why You Should Use reCAPTCHA on WordPress
Here are several advantages of installing Google CAPTCHA on WordPress sites:
- Security. Google CAPTCHA blocks brute force attacks that might compromise your website uptime. It also helps prevent spam comments and protect contact form submissions from malicious bots.
- User experience. Unlike other security check-in features, Google CAPTCHA is more user-friendly and can run in the background, improving the user experience.
- Website integrity. Spam and bot filters help ensure your WordPress site data is reliable and legitimate to preserve integrity.
- Easy implementation. WordPress users can integrate Google CAPTCHA for free using a plugin without coding.
In addition to installing Google CAPTCHA, ensure your web host offers robust security features. For example, Hostinger’s managed WordPress hosting plans include unlimited SSL certificates, DDoS protection, and a vulnerability scanner.

How to Enable Google reCAPTCHA on a WordPress Site
In this section, we will explain two methods for adding reCAPTCHA to a WordPress site. Both approaches have the same outcome but differ in difficulty.
How to Enable Google reCAPTCHA for WordPress Using a Plugin
The easiest way to enable reCAPTCHA is by using a plugin and a Google account. This method is suitable for beginners since it doesn’t require coding.
Note that the steps will differ depending on which of the WordPress CAPTCHA plugins you select.
1. Install a WordPress reCAPTCHA Plugin
Set up a WordPress CAPTCHA plugin via your admin dashboard. There are various options, but we will use Advanced Google reCAPTCHA as it is simple and offers a free version.
Follow these steps to download and install the WordPress plugin:
- Log in to hPanel then head to Websites. Click Admin Panel on the website you want to manage.
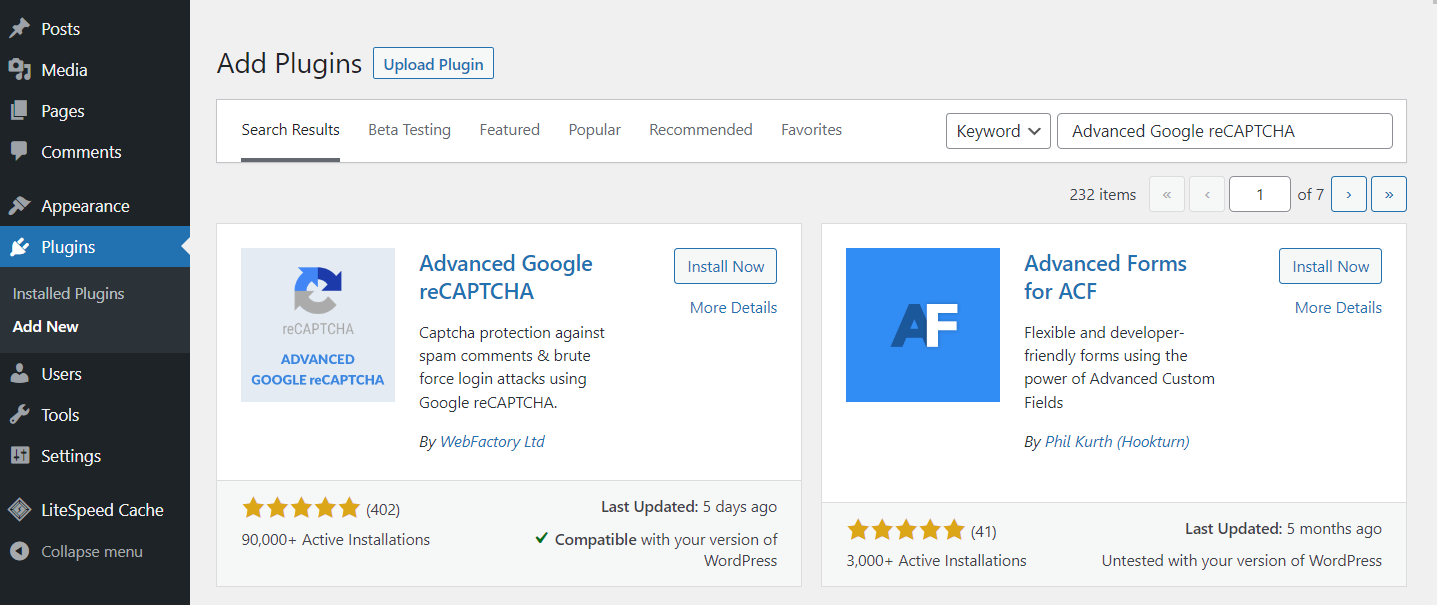
- On the WordPress dashboard, navigate to the sidebar → Plugins → Add New.
- Search Advanced Google reCAPTCHA and press Enter. Then, click Install Now on the plugin.
- After the installation process is complete, click Activate.
2. Set Up and Configure Google reCAPTCHA
Set up a Google CAPTCHA account to obtain the API key for connecting the service with your plugin. To do so, log in to your Gmail account and open the reCAPTCHA admin panel.
Enter the following information in the register form:
- Label. The name for your reCAPTCHA.
- reCAPTCHA type. The verification method to implement on your website.
- Domains. Your website domain name. It’s possible to add multiple domains.
- Owners. The reCAPTCHA administrator. It is automatically set to your current email address.
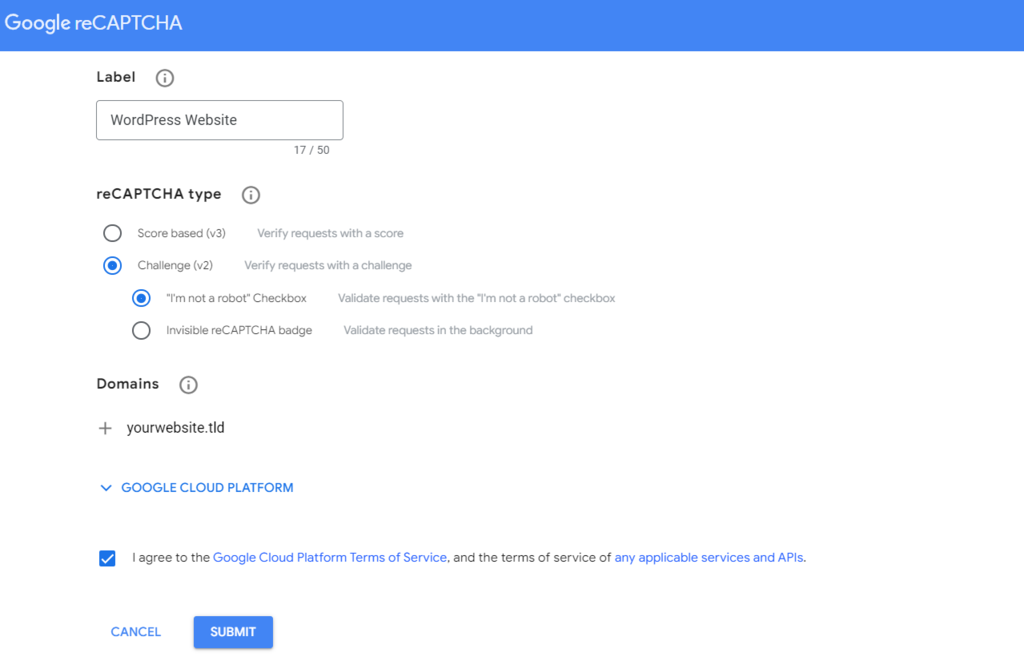
Tick the Terms of Services checkbox and click the Submit button. Google will generate the secret key and site key for the API connection. Store them in a safe location since we will use them later.
3. Configure reCAPTCHA on WordPress Dashboard
Return to your WordPress dashboard and navigate to Settings → Advanced Google reCAPTCHA on the sidebar. In the Captcha tab, select the CAPTCHA type according to the one you configured on Google.
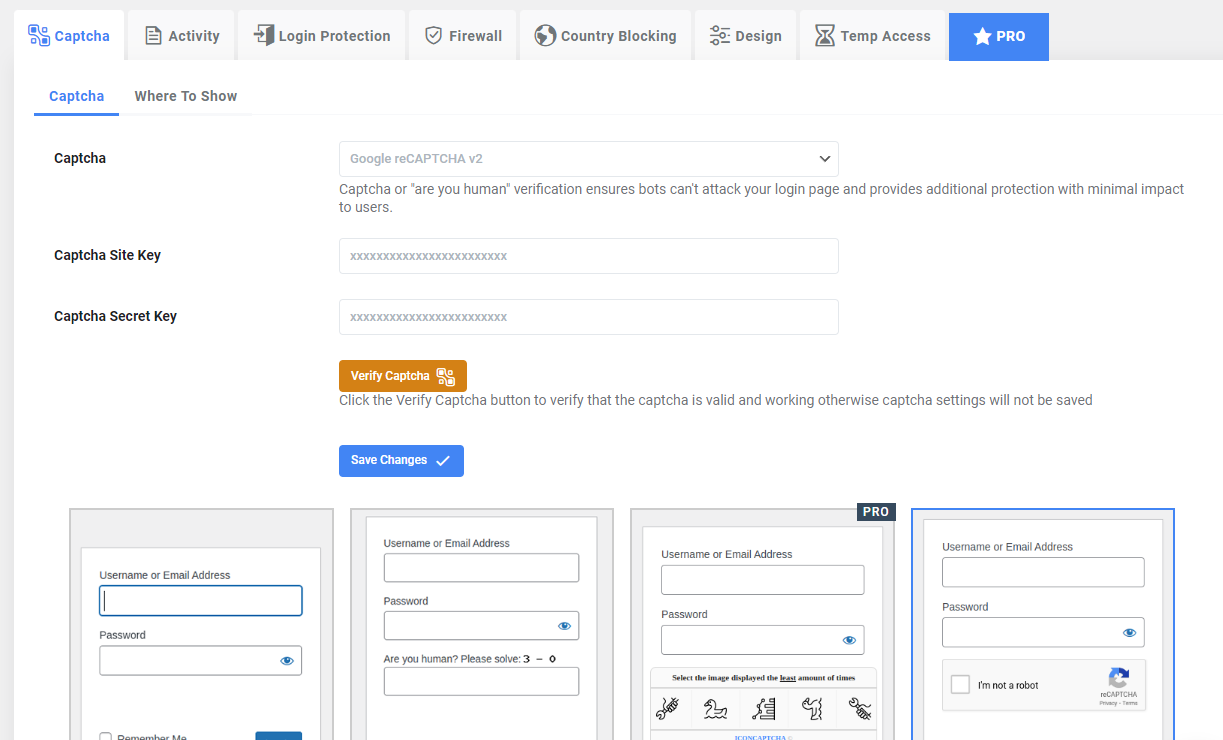
This plugin includes a feature for checking whether your credentials are valid. After you paste the Captcha Site Key and Captcha Secret Key in their fields, click Verify Captcha. Then, hit Save Changes to complete the setup process.
Go to the Where To Show tab and click the toggle to display reCAPTCHA in the selected location. This plugin includes pre-determined areas to insert Google CAPTCHA, like the login page or registration form.
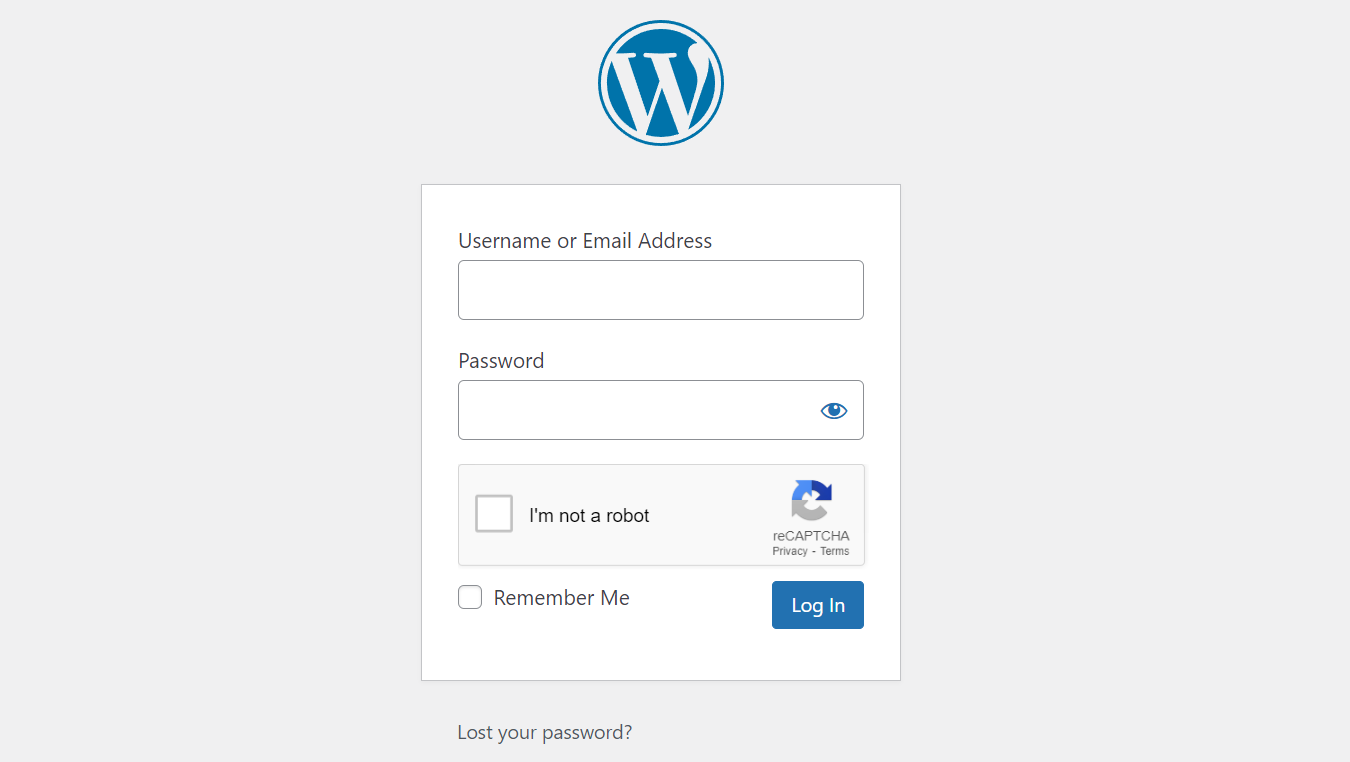
Click Save Changes, and the security check-in should show on the designated areas. Ensure that it works by navigating to the live web page and simulating a login or registration.
How to Enable Google reCAPTCHA for WordPress Manually
If you don’t want to install a plugin, enable Google CAPTCHA manually by modifying your theme’s functions.php file code. We don’t recommend this method for beginners since misconfiguration might harm your website’s usability.
Important! We recommend creating a child theme to preserve your custom code after an update.
After you create a Google CAPTCHA account and copy the API keys, open hPanel → Websites. Click Manage for the target site and select File Manager.
Navigate to /wp-content/themes/theme_name. Right-click function.php and select Edit. Enter your code at the bottom of the file and click the disk icon in the top right corner to save the changes.
The codes differ depending on where you want to display the CAPTCHA. For example, this snippet will show a security check-in on the WordPress login page:
// Call the Google reCAPTCHA verification API on the login form page
function login_style() {
    wp_register_script('login-recaptcha', 'https://www.google.com/recaptcha/api.js', false, NULL);
    wp_enqueue_script('login-recaptcha');
}
add_action('login_enqueue_scripts', 'login_style');

// Add Google CAPTCHA on login form page
function add_recaptcha_on_login_page() {
    echo '<div class="g-recaptcha brochure__form__captcha"
// Replace the placeholder with your site key
data-sitekey="INSERT_YOUR_SITE_KEY_HERE"></div>';
}
add_action('login_form','add_recaptcha_on_login_page');
Replace the placeholder with your actual site key. Modify the code if you want to display reCAPTCHA in other areas. For example, we’ll display it on the WordPress comment form of a post:
// Add CAPTCHA on a WordPress post’ comment form

function add_google_recaptcha_to_comment_form() {
    echo '<script src="https://www.google.com/recaptcha/api.js" async defer></script>';
    echo '<div class="g-recaptcha" data-sitekey="YOUR_SITE_KEY"></div>';
}

function verify_google_recaptcha_comment($commentdata) {
    $recaptcha_response = $_POST['g-recaptcha-response'];

    $response = wp_remote_post(
        'https://www.google.com/recaptcha/api/siteverify',
        array(
            'body' => array(
                'secret'   => 'YOUR_SECRET_KEY',
                'response' => $recaptcha_response,
            ),
        )
    );

    $data = json_decode(wp_remote_retrieve_body($response));

    if (!$data->success) {
        wp_die('reCAPTCHA verification failed. Please try again.');
    }

    return $commentdata;
}

add_action('comment_form', 'add_google_recaptcha_to_comment_form');
add_filter('preprocess_comment', 'verify_google_recaptcha_comment');

Note that these code snippets are for illustrative purposes. Depending on the specific WordPress setup and version, slight modifications may be necessary.
Best Practices to Implement Google reCAPTCHA in WordPress
In this section, we will explain Google reCAPTCHA’s best practices to secure your WordPress site.
Choose the Right reCAPTCHA
Google CAPTCHA uses different verification methods depending on the version. Choosing the right one is important to ensure visitors can navigate your site easily without repeatedly completing a security check.
reCAPTCHA v3 uses JavaScript API to assess traffic automatically, allowing your WordPress site to verify visitors without human interaction. Based on the score, this tool will either allow access or trigger another action. For instance, it can send alerts or start additional verification.
Its v2 has two types – an invisible badge and a checkbox. The reCAPTCHA badge works similarly to the v3 one. In addition to an automatic JavaScript API call, it can also run on a click.
Meanwhile, the reCAPTCHA checkbox prompts visitors to click a verification box for validation. Depending on the assessment, they might need to complete an additional check or proceed to the website.
To ensure an optimal user experience, we recommend using the v3 or v2 invisible badge reCAPTCHA since they are less intrusive. Visitors are less likely prompted to complete security verification tasks, allowing them to navigate your website seamlessly.
However, visitors might not be aware that your website uses their data for verification since automatic reCAPTCHA runs in the background. Provide a disclaimer or privacy statement to ensure your WordPress site complies with GDPR data protection laws.
Protect Multiple Site Areas
WordPress website owners usually add CAPTCHA to the login page to avoid brute-force attacks. However, we recommend adding it to multiple areas for optimal security.
That said, you shouldn’t place it on all pages, especially if you use a reCAPTCHA checkbox that requires user interaction. It will lead to an unpleasant experience since visitors must complete multiple security checks to navigate your website.
The best practice is to place Google CAPTCHA in areas involving critical action or a form submission. The ideal location also depends on your website type.
For example, online store owners typically add CAPTCHA in the checkout area to avoid fake orders, while blogs have one on the WordPress comment form to prevent spam entries. Other common areas include the registration and reset password form.
Test Your reCAPTCHA Implementation
Improperly implemented CAPTCHA can hinder interactions and harm your website navigation. To ensure usability, always test the security feature in a development area.
It lets you check whether your CAPTCHA works as intended without affecting the live WordPress site. There are different ways to create a WordPress development area. At Hostinger, you can easily create a staging area via hPanel with our built-in tool.
In addition, test the security feature’s compatibility on different browsers and devices, especially on mobile phones with smaller screens.
Conclusion
Google reCAPTCHA is a security feature that distinguishes between human and bot traffic. It helps safeguard your website from spam comments and online threats like brute-force attacks.
In this tutorial, we have explained how to add reCAPTCHA to WordPress using the Advanced Google reCAPTCHA plugin and code. Both have the same outcome but differ in process and complexity level.
After installing the plugin, navigate to the Google reCAPTCHA settings page to generate the API keys. Paste the credentials into the plugin settings and select where to insert the CAPTCHA on your website. Don’t forget to save the changes.
Alternatively, more technical users can enable reCAPTCHA by modifying a child theme’s functions.php file. Write the code to call the Google API using the secret keys and specify the security check’s location, like on contact forms.
Ensure you choose the right reCAPTCHA type to maintain a seamless user experience and comply with data protection laws like GDPR. In addition, place it in multiple areas involving critical actions, like the lost password form page. Also, test your CAPTCHA in a staging area to ensure usability.
WordPress reCAPTCHA FAQ
To help deepen your understanding, we will answer several common questions about WordPress reCAPTCHA.
How Does reCAPTCHA Protect WordPress Website?
Traditionally, reCAPTCHA prompts users to solve a puzzle or click a verification checkbox to distinguish them from malicious bots. The newer versions, like the reCAPTCHA badge, don’t require interactions and verify the request automatically based on users’ behavior.
How Do I Add Google reCAPTCHA to WordPress Without Plugins?
Open the Google reCAPTCHA registration page and enter the required information, like your domain. Click the Submit button to generate the site key and secret key.
Create a WordPress child theme and edit its functions.php file. Write the code to call the API using the keys and insert reCAPTCHA into your desired page.
Why Is reCAPTCHA Not Showing Up on My Website?
Make sure your browser is updated and has JavaScript enabled. Also, check whether your CAPTCHA plugin causes conflicts or incompatibility issues.
If you set up CAPTCHA manually, verify that the code is correctly written and the secret keys are accurate.

Aris is a Content Writer specializing in Linux and WordPress development. He has a passion for networking, front-end web development, and server administration. By combining his IT and writing experience, Aris creates content that helps people easily understand complex technical topics to start their online journey. Follow him on LinkedIn.