What Is a Sitemap: How to Create One and Submit to Search Engines
Imagine having a master key that helps search engines unlock every corner of your website – every page, image, and video. This master key is known as a sitemap, a vital tool that organizes your site’s content and makes it effortlessly discoverable, enhancing your search engine optimization (SEO) strategy.
Sitemaps work by providing web crawlers with a clear website structure, and search engines can then index your website more efficiently. Consequently, it’s easier for your website content to appear on results pages when users look for related keywords.
For example, say you run a business website in tech and gadgets. With a proper sitemap, your website is more likely to show up when a user searches for tech, gadget reviews, or software guides.
In this article, we will guide you through the entire process of making a sitemap and submitting it to major search engines.
Download glossary for web beginners
How Does Crawling and Indexing Work?
Search engine crawlers visit web pages, analyze their content and links, and index the information in databases based on relevance. When users search, the engine retrieves relevant pages from its index to display the results.
Types of Sitemaps
There are three types of sitemaps – visual sitemap, Extensible Markup Language (XML), and HyperText Markup Language (HTML).
The visual sitemap is primarily used during the web design process to structure the site’s pages and has no direct SEO value. However, this article will focus on XML and HTML sitemaps to help with your site’s SEO.
XML Sitemap
XML sitemaps are a technical blueprint of your website for search engines, listing all crucial URLs. It also includes the website’s last update date, change frequency, and importance level, helping search engines prioritize their indexing efforts.
An XML sitemap includes a sitemap index for larger websites with rich media content. This index file holds multiple XML sitemaps, streamlining the indexing process for better organization and efficiency.
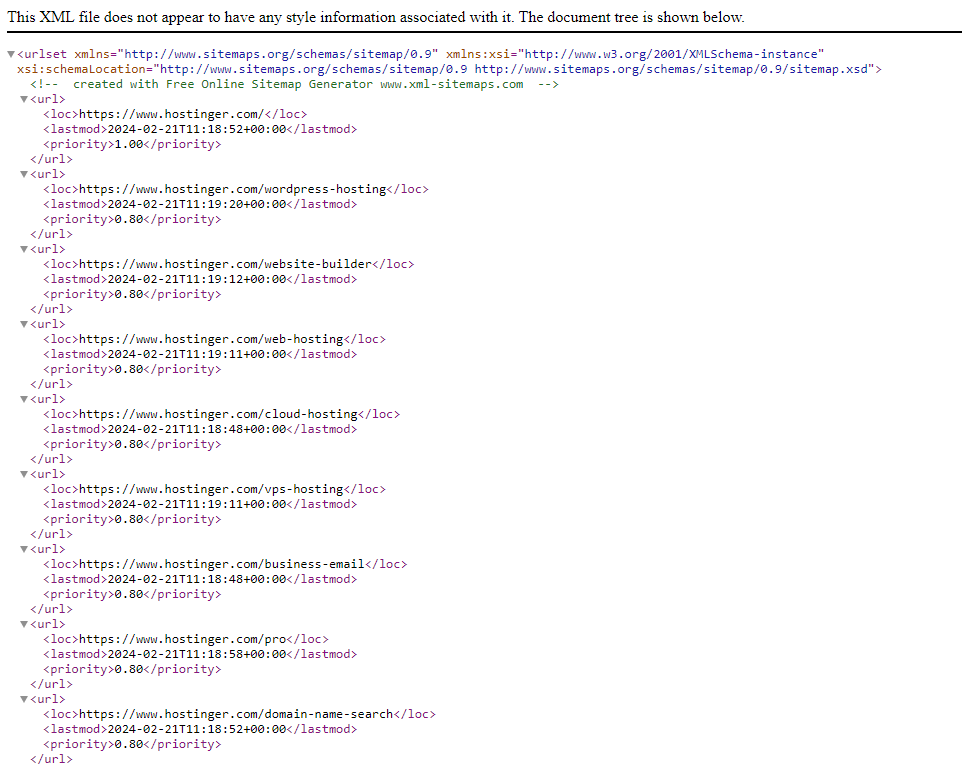
You can check your website’s XML sitemap by typing yourwebsite.com/sitemap.xml on your browser’s search bar. If you have a sitemap, take a look at the example of how it would look like:
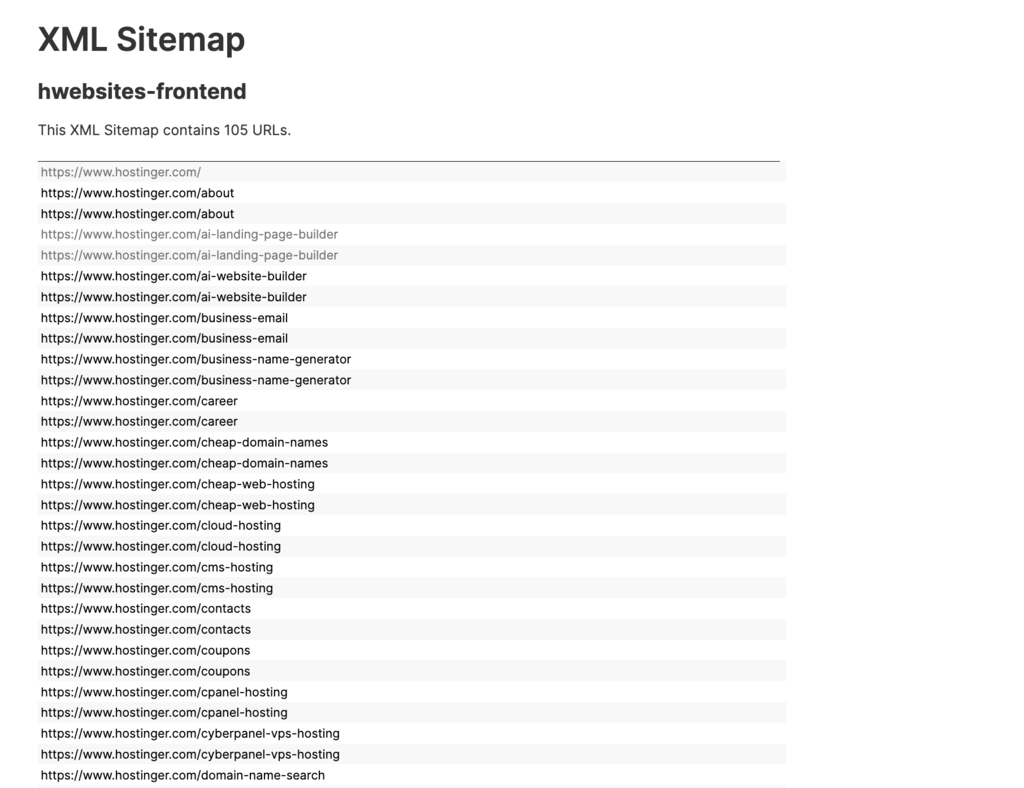
This type of sitemap helps web crawlers find and index your site’s content. Ultimately, it’s a straightforward way to boost your site’s visibility in search results.
For larger websites, having a sitemap index is helpful as it can break down the sitemap into smaller sections for easier navigation of both internal and external links.
There are also XML sitemaps for specific purposes, such as:
- Media sitemap. Helps search bots understand video and image files. A video sitemap includes the video location, title, and description, while an image sitemap consists of the image link, subject matter, and licensing information.
- News sitemap. Works best for news pages as this sitemap specifically contains Google news articles, along with their title and publication date – enhancing search results visibility.
- RSS feed sitemap. Keeps search engines updated on on-site changes, beneficial for sites with dynamic content like blog posts by using internal links to signal updates.
You can find whether your website has an XML sitemap by simply typing these URLs into your browser’s address bar:
https://www.yourwebsite.com/sitemap.xml
https://www.yourwebsite.com/sitemap_index.xml
Keep the sitemap URL for when you’re uploading your sitemap to the search engines.
HTML Sitemap
Unlike XML sitemaps, which are search engine-specific, HTML sitemaps are created for site visitors.
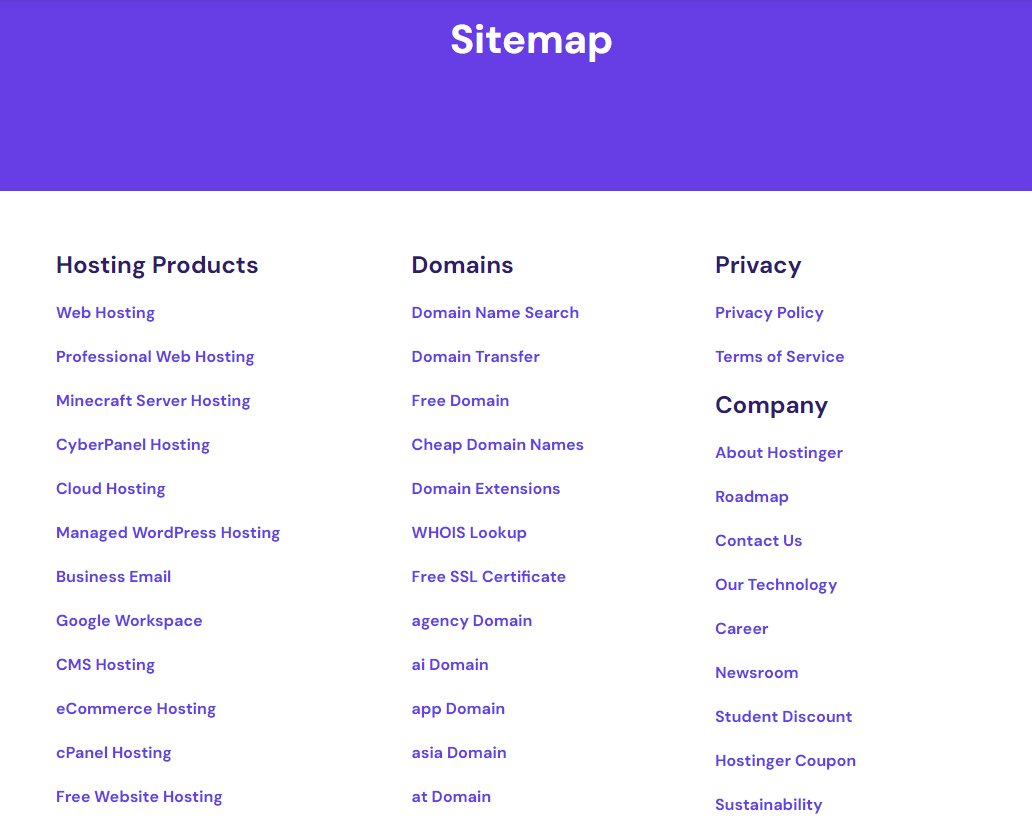
HTML sitemaps are simple web pages that show all the essential links on a website in one place. They’re like a table of contents, helping users navigate through a site and find specific pages.
These sitemaps are often linked on a website’s footer or menu for easy access. For example, refer to our HTML sitemap for a list of web hosting services, domain tools, and company info to help users search for content.
How to Create a Sitemap
Let’s get into the process of creating the visual, XML, and HTML sitemaps for your website.
1. Creating a Visual Sitemap
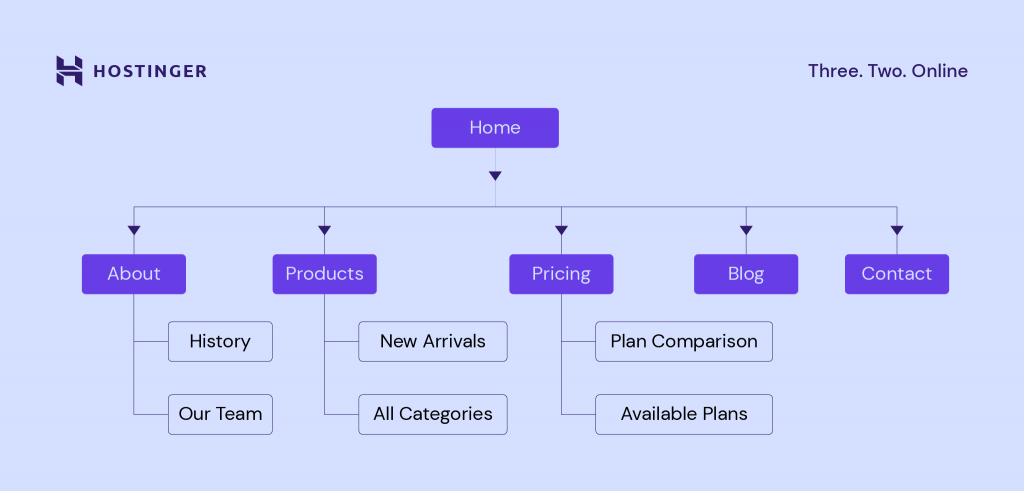
Before creating either an XML or HTML sitemap, start making a visual sitemap for your site layout and page hierarchy. Doing this will help identify all the pages that need to be included in your XML and HTML sitemaps and organize them accordingly.
When designing the visual sitemap, keep the link depth to three clicks or less for a straightforward crawling experience, potentially boosting your search rankings.
List the essential pages like About Us, Products, Pricing, and Blog. Then, list sub-categories and build the hierarchy. After creating the hierarchy, use tools like DYNO Mapper to create a visual sitemap. This helps keep the process simpler.
Below is an example of how your visual sitemap should look like:
Once you have your visual sitemap, follow the next steps to turn it into an XML and HTML sitemap.
2. Creating an XML Sitemap
There are two ways to create an XML sitemap – automatically and manually. The automatic method is excellent for faster sitemap creation, making it perfect for beginners or simple structure websites.
The manual method is better for more customization options and is recommended for larger or more complex websites.
Here’s how to create an XML sitemap automatically:
- Use an online sitemap generator. Sitemap generators like Dupli Checker or XML Sitemaps Generator will automatically create an XML sitemap. It also lets you identify broken links to help improve site quality and the crawling process.
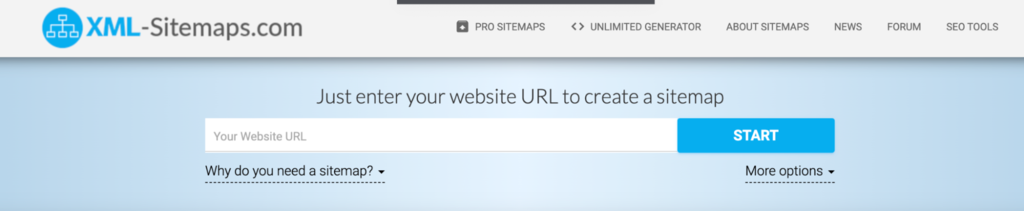
- Add your website’s URL. Copy and paste your website URL to the generator of your choice. Here, we use the XML Sitemaps Generator. Once done, it will look something like this:
- Download the XML file. Download or save the generated XML file.
- Upload the XML file to your site’s root directory. Upload the file to the root directory, which is the public_html folder. You can find the folder on your web hosting control panel or via a File Transfer Protocol (FTP) client.
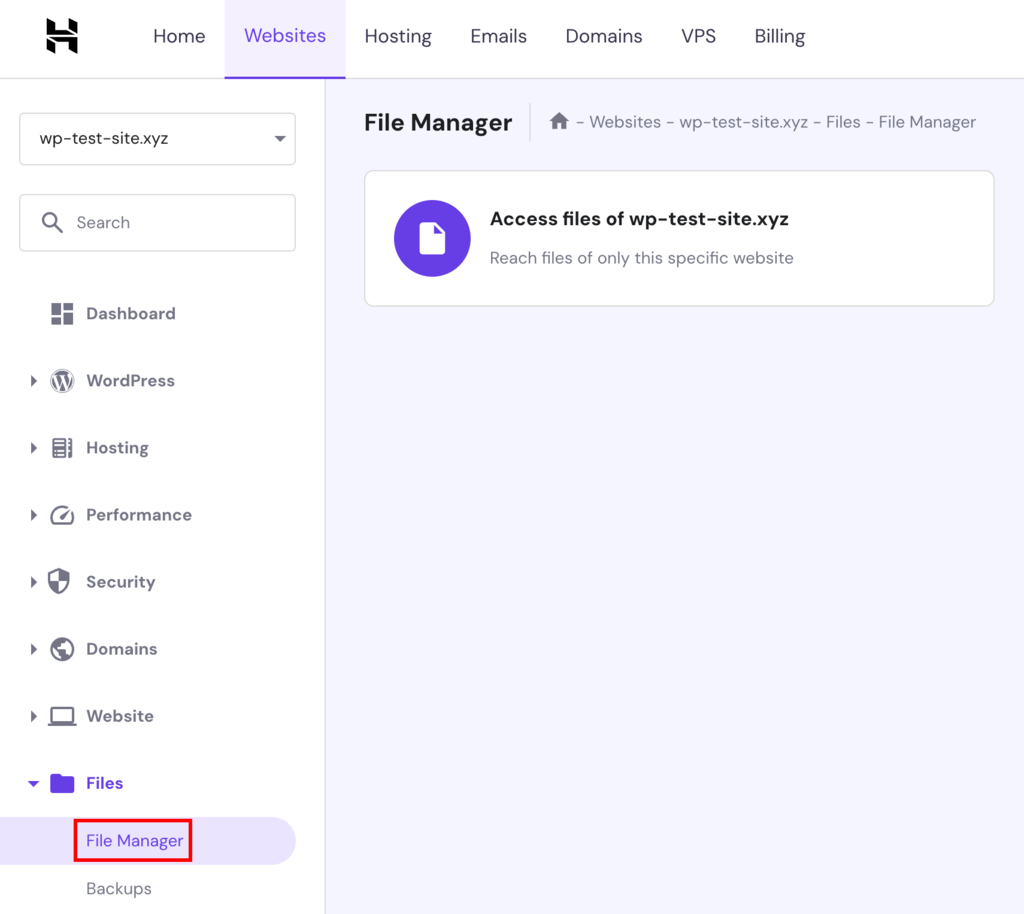
If you’re a Hostinger user, you can follow these steps to upload the XML file:
- Log in to hPanel.
- Go to Websites → Dashboard.
- Once you’re on the Dashboard, find and click Files.
- Choose File Manager. If you have multiple web hosting plans, access the files of the corresponding website.
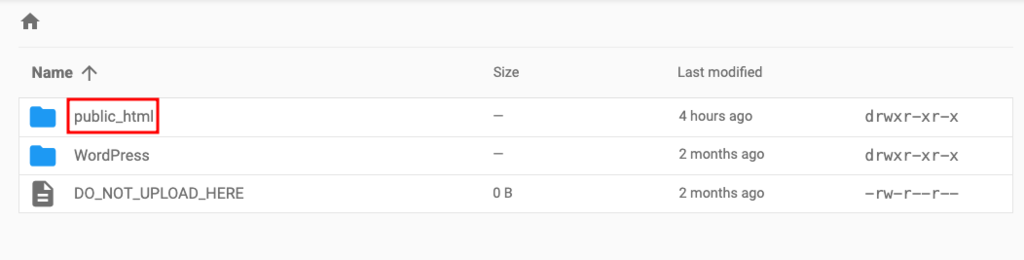
- Open the public_html folder.
- At the top navigation bar, choose the upward-facing arrow to upload a file.
- Choose File to begin transferring your XML sitemap file.
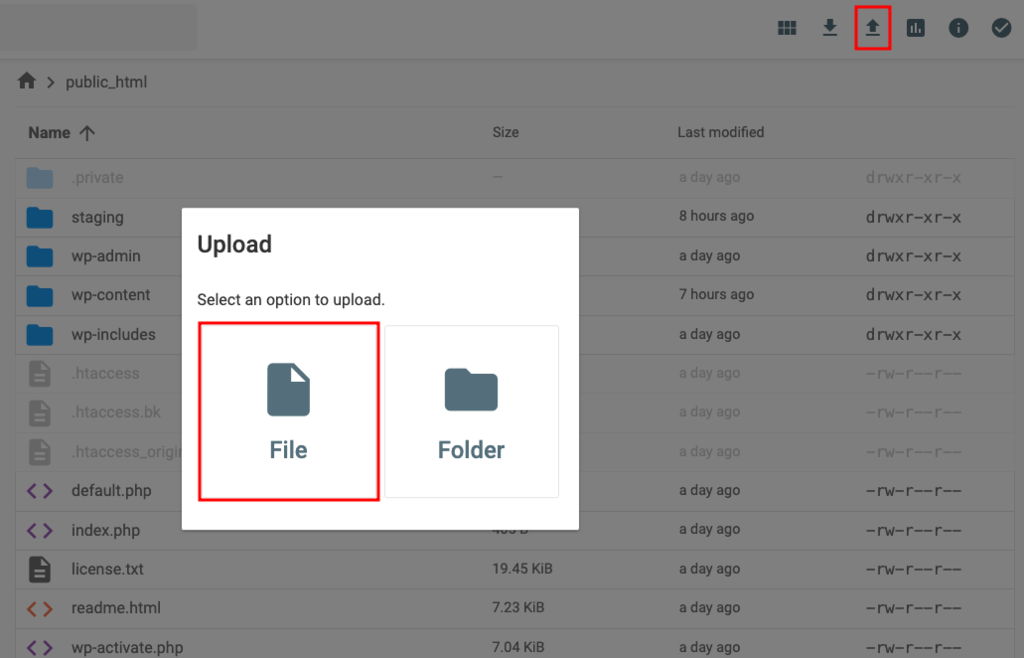
Once the uploading process has finished, you can find the sitemap file inside your public_html folder.

If you want to create a sitemap on WordPress, use the Yoast SEO plugin that will automatically build and submit it.
Alternatively, here are the steps to manually create an XML sitemap:
- Identify content. Determine all pages, images, and videos on your website that need inclusion.
- Create the XML file. Using a plain text editor like Notepad or a specialized XML editor, create a new file with a .xml extension. This will serve as your XML sitemap file.
- Add XML tags. Start by adding the necessary XML tags to define the structure of the sitemap. These include the opening <urlset> tag at the beginning of the file and the closing </urlset> tag at the end.
- Include URL entries. Within the <urlset> tags, add individual <url> entries for each page, image, or video on your website. For each URL entry, include the <loc> tag to specify the page’s URL.
- Optional tags. Optionally, add more tags in each <url> entry for extra info about the page. Use <lastmod> for the last modification date or <changefreq> to specify the update frequency.
Creating XML sitemaps manually offers more flexibility in organizing the pages on your site. For instance, you can exclude broken links or redirect pages during the creation process.
Once all process is done, here’s an example of what your sitemap will look like:
<?xml version="1.0" encoding="UTF-8"?>

<urlset xmlns="http://www.sitemaps.org/schemas/sitemap/0.9">

<!-- Homepage -->

<url>

<loc>https://www.example.com/</loc>

<lastmod>2024-02-19</lastmod>

<changefreq>daily</changefreq>

<priority>1.0</priority>

</url>

<!-- About Page -->

<url>

<loc>https://www.example.com/about</loc>

<lastmod>2024-02-15</lastmod>

<changefreq>monthly</changefreq>

<priority>0.8</priority>

</url>

<!-- Products Page -->

<url>

<loc>https://www.example.com/products</loc>

<lastmod>2024-02-18</lastmod>

<changefreq>weekly</changefreq>

<priority>0.9</priority>

</url>

<!-- Contact Page -->

<url>

<loc>https://www.example.com/contact</loc>

<lastmod>2024-02-17</lastmod>

<changefreq>monthly</changefreq>

<priority>0.7</priority>

</url>

</urlset>
Once finished, save the file using the .xml extension and upload it to the public_html folder.
Pro Tip
Whether created automatically or manually, it’s crucial to verify your XML sitemap using a sitemap validator. This ensures that popular search engines can process your sitemap accurately and efficiently, leading to better indexing of your website’s pages.
3. Creating an HTML Sitemap
To help you create an HTML sitemap, refer to the visual sitemap we’ve discussed in the first step. The visual sitemap helps organize the links in your HTML sitemap to mirror the intuitive layout presented in the visual sitemap.
There are also two ways to create an HTML sitemap: automatically and manually.
To create the sitemap automatically, you can use your website-building platform. Generally, the platform creates the sitemaps automatically or offers tools that help you create an HTML sitemap.
For example, Hostinger Website Builder generates the sitemap by default, while WordPress sites can utilize the Yoast SEO plugin for CMS.
The sitemap will be automatically generated and published when you launch the website.
Similar to XML sitemaps, manually creating an HTML sitemap requires more technical skills but offers more customization options, such as organizing for users, styling to match your site, and choosing which pages to include to fit your audience’s needs.
Here are the steps to create an HTML sitemap manually:
- List essential links. Identify key pages and content areas to include in the sitemap.
- Create an HTML page. Use a text editor or HTML editor to create a new HTML file.
- Write HTML code. Write HTML code to structure your sitemap. Begin with the <html> and <body> tags to define the document structure. Use headings (<h1>, <h2>, etc.) to organize sections and lists (<ul> and <li>) to list the links.
- Save and upload. Save the HTML file and upload it to the website’s server for visitors to access.
This is an example of how the HTML code should look like:
<!DOCTYPE html>

<html lang="en">

<head>

<meta charset="UTF-8">

<title>Sitemap</title>

</head>

<body>

<h1>Website Sitemap</h1>

<h2>Main Sections</h2>

<ul>

<li><a href="/home">Home</a></li>

<li><a href="/about">About Us</a></li>

<li><a href="/services">Services</a>

<ul>

<li><a href="/services/design">Design Services</a></li>

<li><a href="/services/consulting">Consulting Services</a></li>

</ul>

</li>

<li><a href="/blog">Blog</a></li>

<li><a href="/contact">Contact</a></li>

</ul>

<h2>Additional Resources</h2>

<ul>

<li><a href="/privacy-policy">Privacy Policy</a></li>

<li><a href="/terms">Terms and Conditions</a></li>

</ul>

</html>

</body>
In this example:
- The <h1> tag is used for the main title of the sitemap page.
- The <h2> tags are used to define the main sections of the sitemap, such as “Main Sections” and “Additional Resources”.
- The <ul> (unordered list) and <li> (list item) tags are used to list the links to various pages on your website. Nested <ul> tags are used to indicate sub-sections or categories within a main section, such as the “Services” section in this example.
- The <a href=”URL”>Link Text</a> structure is used to create clickable links to the pages.
How to Submit Your Sitemap
Submitting your sitemap to search engines helps them better understand the pages on your site. This could improve your site’s visibility in search results.
Let’s go over the steps to submit your sitemap to Google via Google Search Console (GSC):
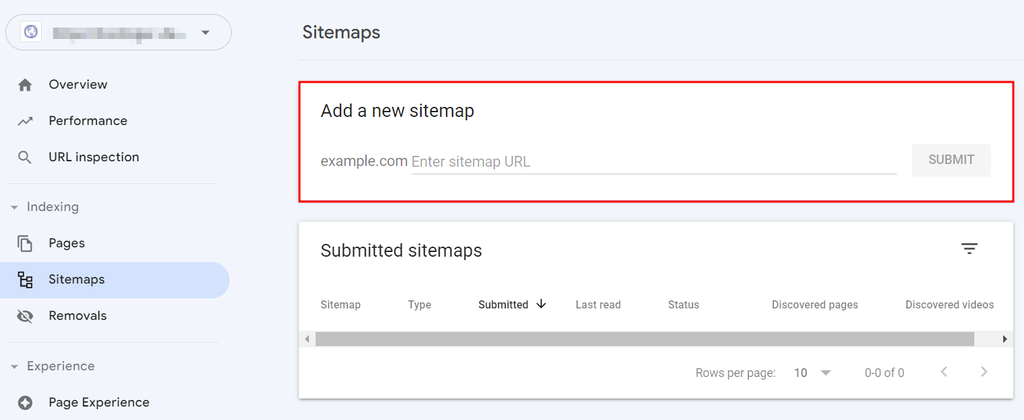
- Create a Google Search Console account if you don’t have one already.
- Once you have added your website, head to Sitemaps on the left navigation bar.
- Enter the sitemap URL on the Add a new sitemap section. Find this URL by typing https://www.yourwebsite.com/sitemap.xml on your browser’s address bar.
- Click Submit.
Once you’ve submitted the sitemap to Google, you will receive the success message.
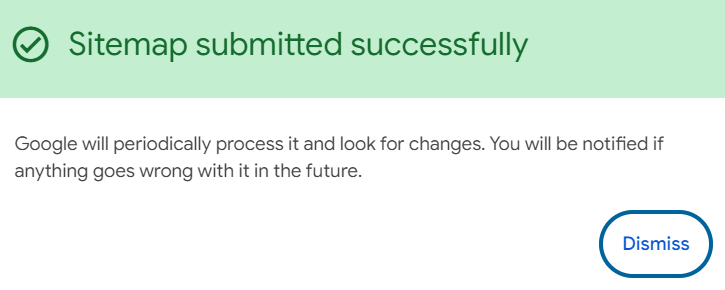
Alternatively, visit the Submitted sitemaps section and look for the “Sitemap index processed successfully” report.
Take note that Google limits XML sitemaps to 50,000 URLs and 50 MB in size. If the file contains more links or is bigger than the limit, you’ll need to create multiple sitemap files.
Suggested Reading
For more information, check out our guide on how to submit your website sitemap. The guide includes submitting your sitemap to other search engines, like Bing.
Sitemap SEO Best Practices
There are two SEO practices you can do, which are adding your sitemap to the robots.txt file and checking for sitemap errors. Doing so will help search engines crawl and index your website correctly.
Add Your Sitemap to the robots.txt File
The robots.txt file is the first place crawlers visit when accessing a website. It informs them which pages to index. By adding a sitemap to it, they can quickly discover all the site’s URLs.
Most hosting providers offer a control panel that enables you to modify the robots.txt file. If you use Hostinger, add a sitemap via hPanel:
- Access Websites → Dashboard → Files → File Manager.
- Go to public_html and locate the robots.txt file. If it isn’t available, click the New File button to create one.
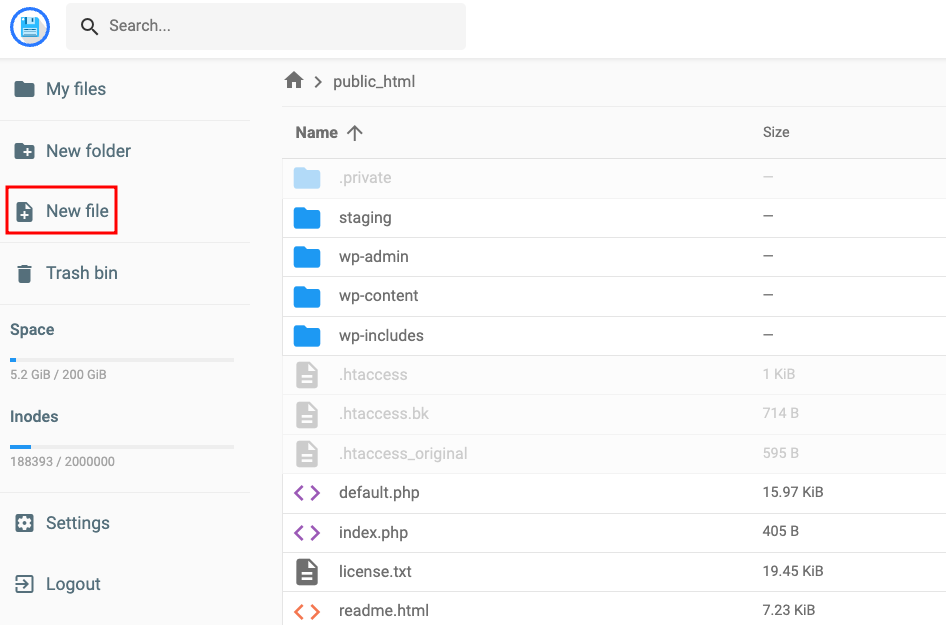
- Create a new file and name it robots.txt. It will then open the robots.txt page.
- Add your sitemap URL Click Save. Follow the example below for reference.
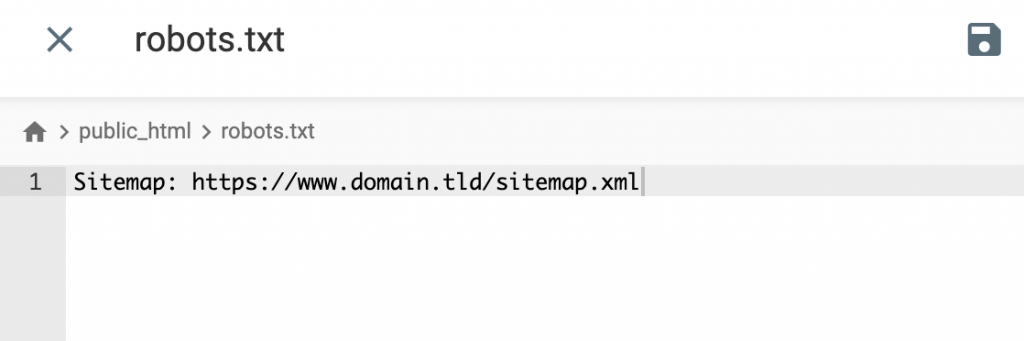
If you have multiple sitemaps, add each URL separately in a different line:
Sitemap: https://www.yourdomain.com/sitemap_1.xml

Sitemap: https://www.yourdomain.com/sitemap_2.xml
Check for Errors Using a Sitemaps Report
Use the Sitemaps report in Google Search Console to identify potential issues. Some sitemap errors that might occur are:
- URLs not accessible. Google found the sitemap’s location but failed to crawl some of its URLs. Use the URL inspection tool to check the pages’ availability.
- URLs not followed. The submitted sitemaps have too many redirects and relative links for Googlebot to follow. Remember to use direct and absolute URLs when submitting sitemaps.
- Invalid URLs of and within the sitemap. The link is not valid due to unsupported characters or incorrect format. For instance, the URL address may have ,com instead of .com or htps// instead of https://.
After that, open the Index Coverage Report to see the total number of links on your sitemap that Google has successfully crawled.
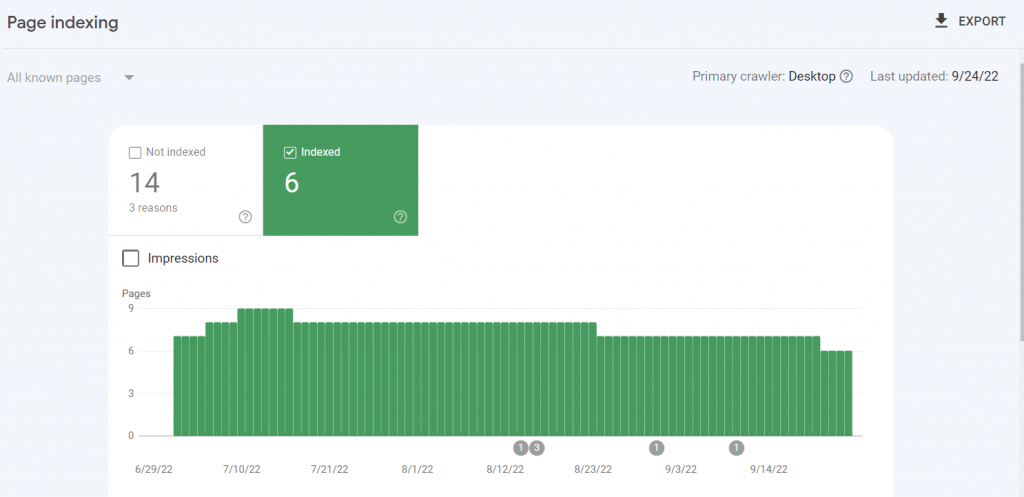
Let’s say the site has 20 pages, but when you check the report, only six of them have been indexed. This may happen because of duplicate pages, redirect URLs, or the site has exceeded its crawl budget limit.
Follow the steps below to fix errors within your sitemap:
- Log in to your Google Search Console.
- Select your website and go to the Sitemaps section.
- Check for any errors or warnings.
- Fix the errors. For URL errors, verify each URL, ensure all pages exist, and return a 200 status. Remove or fix broken URLs.
- Resubmit the sitemap.
For Hostinger users, check the sitemap and remove any unnecessary URLs via hPanel. Follow these steps to solve the problem:
- Access File Manager via hPanel.
- Go to the public_html folder and locate the sitemap.xml file.
- Right-click on it and select Edit.
- Remove the desired URL.
- Hit Save.
Inform Google about the change using the ping tool. Paste the following address in the browser using your sitemap URL:
http://www.google.com/sitemaps/ping?sitemap=http://yourdomain.com/sitemap.xml
Conclusion
Website sitemaps help visitors and crawlers to effectively navigate the pages on your site, which is crucial for user experience, SEO, and website optimization.
There are three common formats – visual sitemap, XML, and HTML. However, only the latter two sitemaps play a role in an SEO strategy.
Create a sitemap using an online generator to speed up the process. However, consider coding one from scratch if you want more customization. Remember to update your sitemap regularly as you add new pages or make changes to your existing ones.
After creating sitemaps, you need to upload them to search engines using Google Search Console or Bing Webmaster Tools. This ensures that your sitemap is indexed and regularly checked for any updates.
This article has answered questions such as what is a sitemap, what its purposes are, and how to create one. If you have more questions, check out our FAQ or leave a comment below.
What Is a Sitemap FAQ
Find answers to the most common questions about sitemaps.
How Do I Find My Sitemap URL?
The most common way to find the sitemap link is by entering your website address followed by /sitemap.xml or /sitemap_index.xml.
Is Having a Sitemap Important for SEO?
Certainly! Sitemaps assist search engine crawlers in finding your website’s pages, leading to quicker indexing and ranking. This is crucial for new websites with limited external links, as crawlers may need help locating them.
Do I Need a Sitemap?
If you have a smaller website with pages correctly linked and a clear structure, you might not need a sitemap. However, if you have a larger website with tons of pages, you need one to help crawlers better understand your site’s structure.
How Do You Check if a Website Has a Sitemap?
The easiest way to check a site’s sitemap is by using tools like SEO Site Checkup. Simply type in the domain address and click the Checkup button. The platform will display the sitemap URL if the site has one.
Do I Need to Update My Sitemap?
Update sitemaps only when you publish new content or change links. WordPress users can use plugins to automate the process of XML sitemaps. After updating the sitemap, ask Google to re-crawl it using the Ping tool.

Nurul Siregar has over 3+ years of experience in the tech industry with a passion for writing about digital marketing. Nurul enjoys reading fiction novels and making digital illustration in her free time. Follow her on LinkedIn.
