How to Insert an Image in HTML in 6 Easy Steps
When creating websites with a popular CMS like WordPress, there may be restrictions on where you can add images.
This can be aggravating because it may be necessary to insert more than just a background image on a web page. For example, one might want to include a website logo in the header and footer.
One option is to include images in the site’s theme HTML file. While inserting images on a website using HTML in WordPress does require some basic HTML knowledge, beginners can still follow along because the process is not difficult.
This article will show you how to easily insert an image in HTML into your website. We will divide the tutorial into six steps, each with detailed explanations and easy-to-follow procedures.

How to Insert an Image or a Logo in HTML
There are three ways to upload and insert images in an HTML document: via an FTP client like FileZilla, via hPanel’s file manager, and through the WordPress dashboard. For this tutorial, we will be using the second option.
We will also break down the image HTML code and explain the attributes needed to insert an image on your site. All the HTML tags and syntax mentioned below are included in our HTML Cheat Sheet as well.
1. Upload the Image File
For this step, we will be uploading an image file into a WordPress website’s public_html directory via Hostinger’s file manager. However, this tutorial can still be implemented through any control panel and type of website.
- Access your hPanel, navigate to the Files section, and click on File Manager.

- Open the public_html directory and double-click the wp-admin – images folder.

- Click on the Upload Files button at the top-right corner of the menu bar and select File.
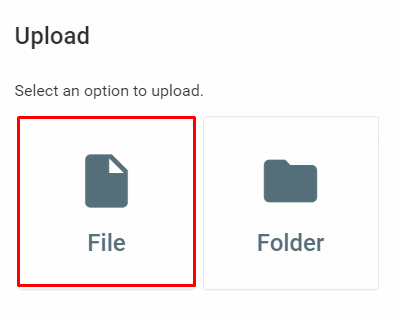
- Select the image files you want to upload. Ensure that the file names are easy to read and descriptive, as they will be the title attribute of the HTML images. Plus, remember to add dashes to separate the words. Clear image file names also help search engines understand their content, improving the site’s SEO.
- Press UPLOAD and wait until the process is finished.
Another way is to add images through the WordPress dashboard. Here’s how:
- On the WordPress dashboard, navigate to Media – Add New.
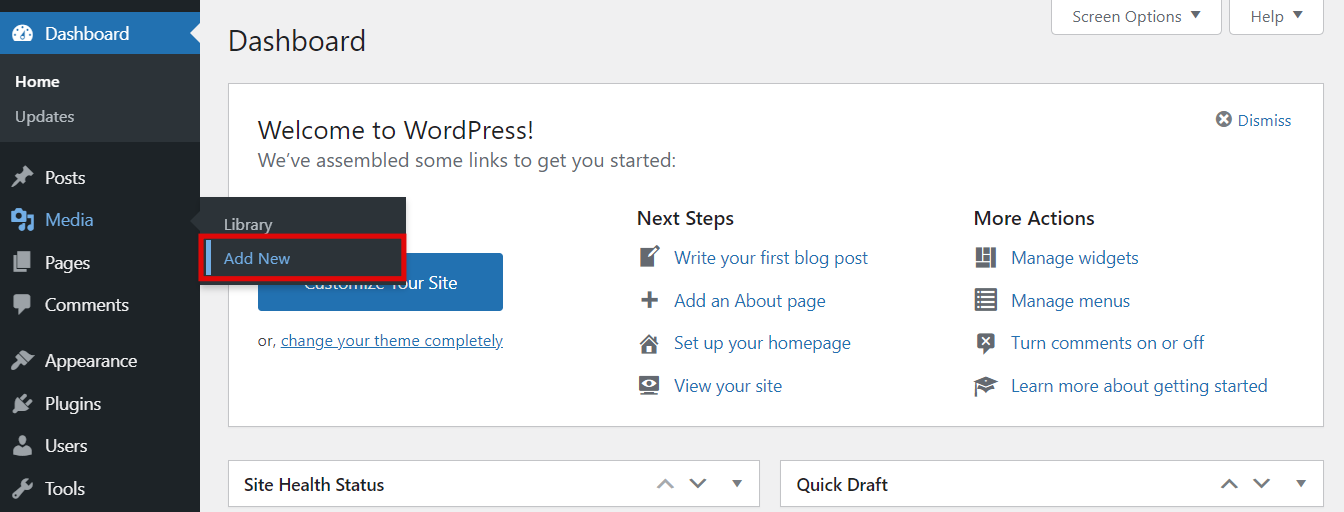
- Select the images you want to add and wait for them to finish uploading.
When it comes to the best image formats, there are two categories to choose from, raster and vector. JPEG/JPG, PNG, and GIF are some examples of raster image file formats, while vectors include PDF, SVG, and EPS.

2. Access the Theme Folder
Pro Tip
Since we’ll be editing an HTML document, download a backup of your site before making any changes. This ensures that no data is lost if, by any chance, an error occurs during the process.
For this step, first access the WordPress theme editor and the HTML file where you want to insert images:
- From the WordPress dashboard, go to Appearance – Theme Editor.
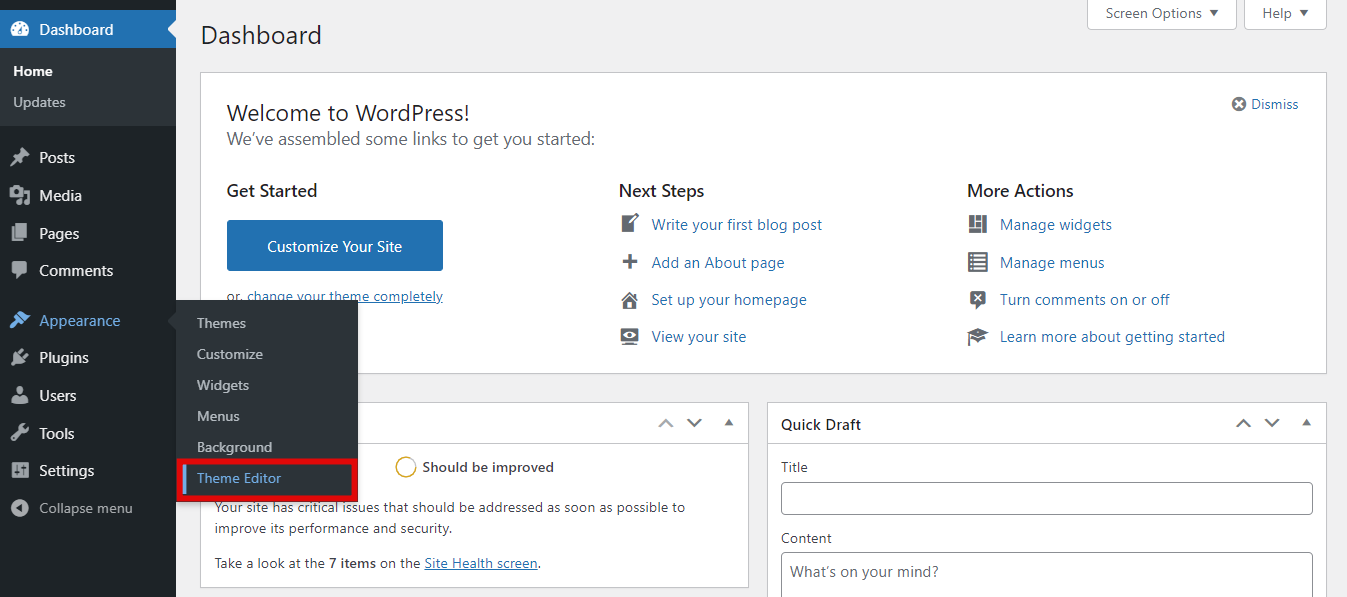
- Select the theme your site is using – for example, Twenty-Twenty.
- Scroll through the Theme Files section and click on the HTML file you want to add an image to. For example, if you want to add a logo to the header, click the header.php file.
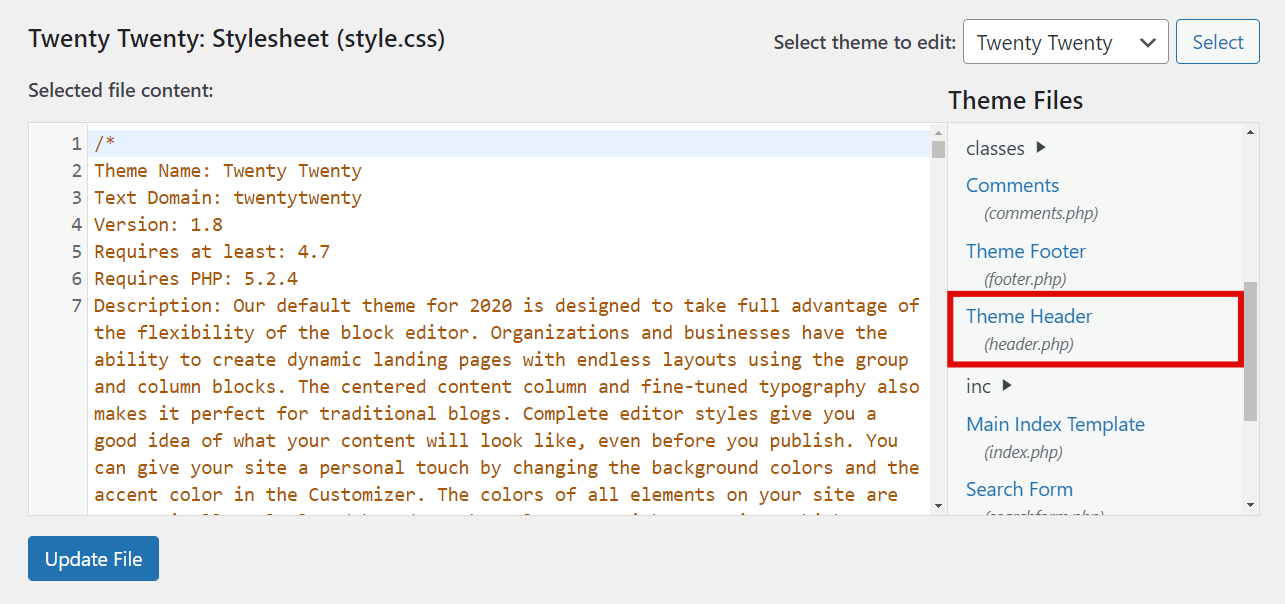
- Find the line where the body HTML tag or
<body>starts. Under the first<div>tag, insert the image tag:<img>.
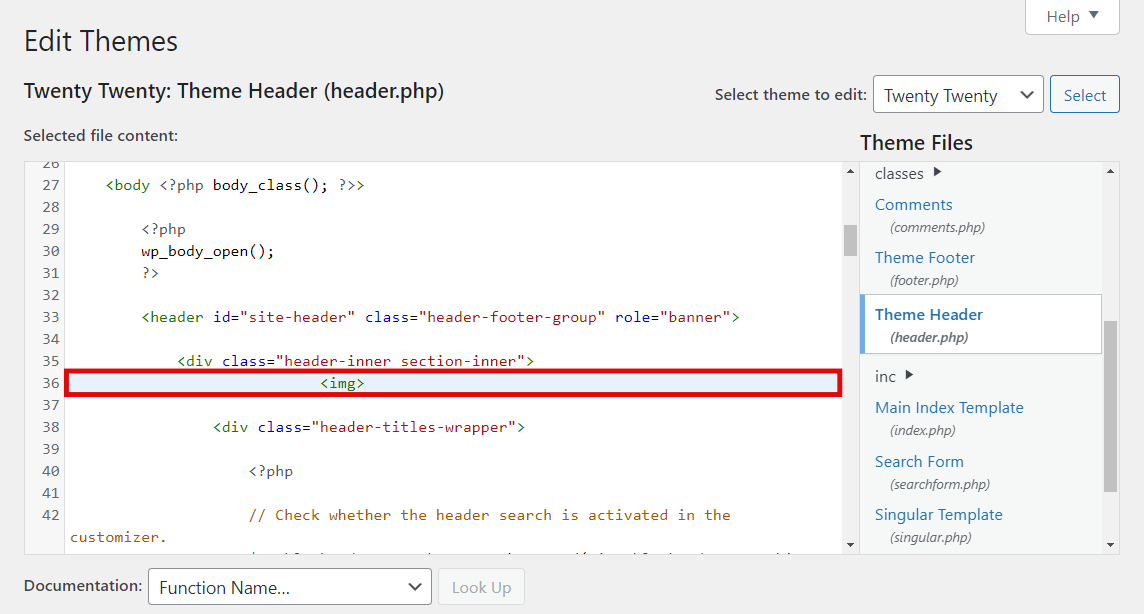
The image tag is what embeds images into HTML files. It’s an empty tag that includes HTML attributes such as img src and alt and doesn’t require a closing tag.
Now, we’ll break down the other HTML elements required after the img tag.
3. Add the img src Attribute to the Image
Short for image source, img src is a must-have HTML attribute of an image element as it determines the file path of the image in HTML. If the img src is not specified correctly, the image will not load.
There are two ways to write an img src attribute, using a relative or absolute path. In the relative path option, the image source is based on the image’s current directory or folder.
This option is used when the image is uploaded to the same directory as the HTML file you want to edit.
A relative path syntax looks like so:
img src=”images/file-name.jpg”
On the other hand, the absolute path specifies the image URL as its source. Use this path when the images are uploaded via WordPress Media or located in a different folder as the HTML file you’re editing.
An absolute path syntax has the following structure:
img src=”your website’s URL/folder-name/image-file-name.jpg”
For this tutorial, we’ll be using the absolute path. In this case, the example img src for the image we uploaded in the images folder would look like this:
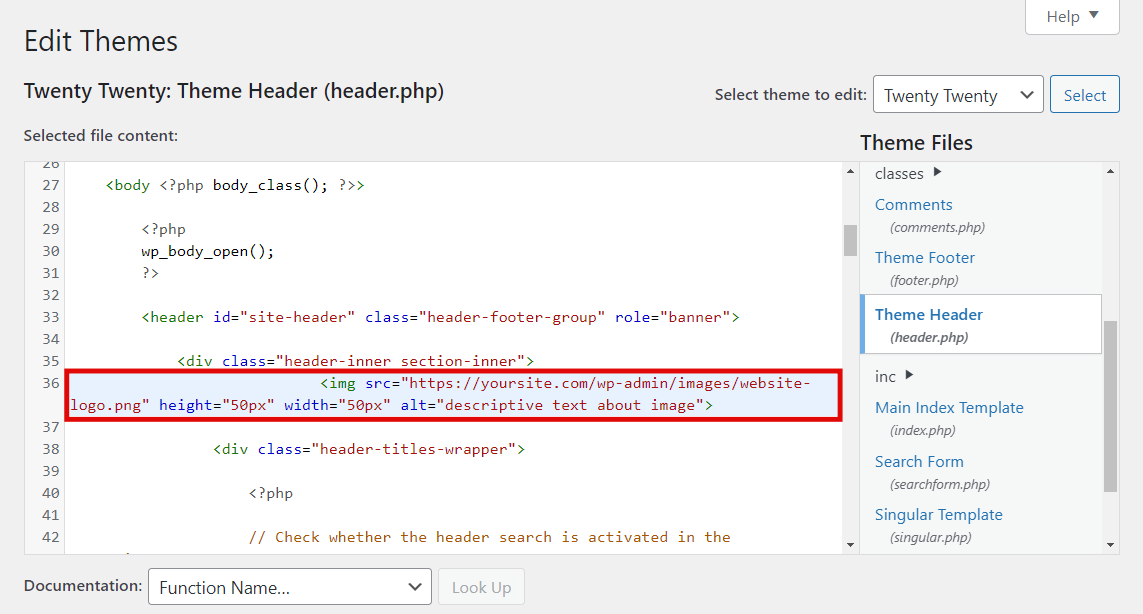
img src=”https://yoursite.com/wp-admin/images/website-logo.png”
If uploading the image through WordPress media, follow these instructions to find the image source:
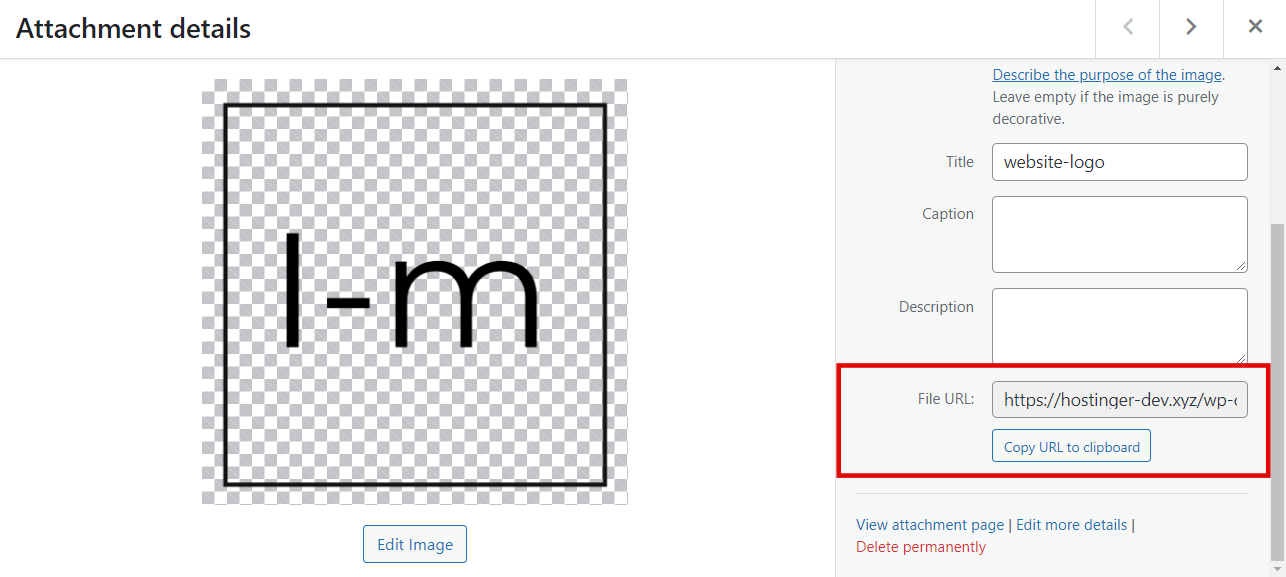
- From the WordPress dashboard, navigate to Media – Library.

- Click on the image you’re planning to add, then scroll the sidebar until you find the File URL field.
- Press the Copy URL to Clipboard button and simply paste it as the image source.
4. Set Width and Height
The width and height attributes specify the size of the image, usually in pixels. It’s essential to always set the image’s width and height. They determine how much space is needed for the image when the browser loads the web page.
If they are not set, the browser won’t be able to determine the image size and will use its original measurements. This can change the layout of the web page and cause errors when the browser loads the image.
Below is the syntax for the width attribute with an example measurement:
img width=”50px”
While the length attribute syntax looks like so:
img length=”50px”
Change 50px to the desired size, depending on where you’re planning to put the image and the design of the web page.
5. Add an Alt Attribute
The HTML alt attribute lets you add alternative text or information to the image. A descriptive text is essential when the image fails to load due to an error or slow connection. It also helps screen-readers explain the image to visually impaired visitors.
Other than that, alt text allows search engines to understand what the image is about during the crawling process. It increases the chance of the images appearing in image search results and helps your web page rank better.
Remember to be specific when describing the image and provide context to it. It’s also important to insert target keywords if possible.
An alt attribute syntax looks like this:
img alt=”insert text here”
6. Save Changes
Once you have input all the essential attributes and information into the HTML image file, the image code will look something like this:
img src="https://yoursite.com/wp-admin/images/website-logo.png" height="50px" width="50px" alt=”site’s logo”
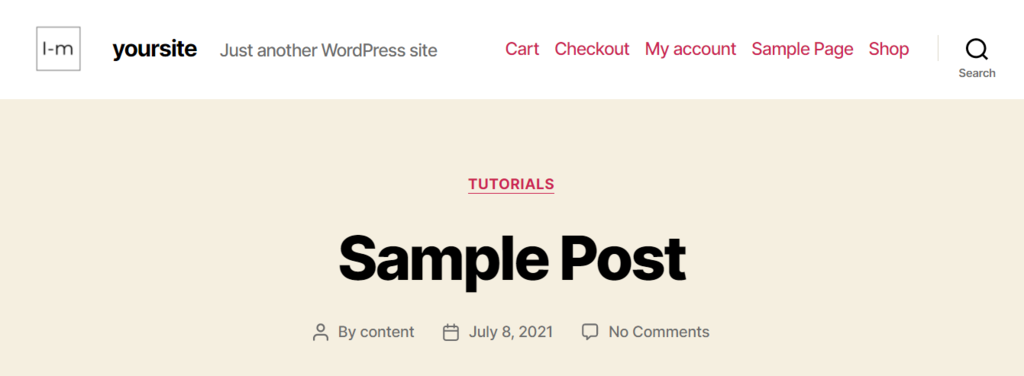
Check the code once more before clicking the Update File button to save the changes. Then, reload the website to see if the changes are successful.
Bonus Step: Add a Link to the Image
When uploading original photos and images to your website, it’s important to add custom URLs or links to them. You don’t want other websites to take and use the images without permission, credit, or backlinks.
If you haven’t implemented measures to stop people from hotlinking your images yet, it’s possible to track the embedded files through the image URL. Paste the URL on Google Image Search, and it will display a list of sites using that same image.
Simply wrap the anchor element on the image code if you want to link an image in HTML. An anchor is a text that marks the start and the end of a hypertext link. It includes the opening tag a and the closing tag /a.
An image code with an anchor tag syntax will look like so:
a href=”www.yourwebsite.com/image-name.html”img src=”file-name.jpg” height=”50px” width=”50px” alt=”about image”/a
However, if you upload images via WordPress Media, there’s no need to create a custom URL. An image URL is automatically generated when the file is uploaded.
Pro Tip
Learn how to create a logo with Hostinger AI Logo Maker.
Conclusion
When customizing a website, you might encounter some limitations when adding images to a page. Content management systems and website themes usually provide fixed options for inserting images, which might not suit everyone’s needs.
To get around that, it’s necessary to add images using HTML. In this article, you’ve learned how to insert an image in HTML by following six steps. Here’s a recap:
- Upload the image file to a folder in the site’s public_html directory via the file manager provided by the web host or WordPress Media.
- Access the HTML file where you want to insert the image, and add the img tag.
- Include the img src attribute to define the source of the image.
- Add the width and height attributes to define how the browser should display the image.
- Insert the alt attribute to describe the image.
- Save the changes.
Adding a custom image URL for the files may also be necessary. However, links are already automatically generated for WordPress media images.
Go and give the methods described in this tutorial a try and, if you have further questions, leave them in the comment section below.

Linas started as a customer success agent and is now a full-stack web developer and Technical Team Lead at Hostinger. He is passionate about presenting people with top-notch technical solutions, but as much as he enjoys coding, he secretly dreams of becoming a rock star.

Comments
August 30 2017
Thank you! This helped me a lot :)
January 07 2019
Thanks, this really helped me.
March 06 2021
The way they are giving tutorials I really like his method.