Optimizing WordPress to 100% on PageSpeed and GTmetrix With LiteSpeed Cache Plugin
Website speed optimization should be a top priority for every website owner as it directly impacts WordPress SEO. Additionally, the longer a website loads, the higher its bounce rate. This can prevent you from generating conversions and driving traffic to your site.
With the right tools and configurations, caching your website can significantly boost its performance. For this reason, we will show you how to optimize your page score using the best cache plugin from LiteSpeed Technologies.
We have tested the LiteSpeed Cache plugin and configured the settings of three different websites. This article will walk you through the configuration we applied to get the best results.
Before we dive into the settings, let’s start with a brief overview of the LiteSpeed cache plugin.
Download all in one WordPress cheat sheet
LiteSpeed Cache Video Tutorial
Tired of reading? Learn about website optimization and how to speed up your website with the LiteSpeed cache plugin tutorial.

What Is LiteSpeed?
LiteSpeed is web server software designed to accelerate a website’s performance. Built with event-driven architecture, the LiteSpeed server can handle higher traffic with fewer processes, reducing resource usage and improving page speed.
The LiteSpeed server also has a built-in Apache replacement with .htaccess support, letting users switch from Apache and use existing configurations. Additionally, it works with several popular hosting control panels, such as WHM, DirectAdmin, and Plesk.
There are two editions of the LiteSpeed web server available:
- LiteSpeed Enterprise – suitable for hosting multiple websites or a shared hosting environment. It automatically detects changes to the .htaccess file and adjusts the settings without restarting the server.
- OpenLiteSpeed – an open-source version of LiteSpeed Enterprise that has all of its essential features. It requires a restart whenever it loads a new .htaccess file. Because of that, this web server is usually used for individual websites.
When optimizing page speed and performance, LiteSpeed uses a built-in server-level cache known as LiteSpeed Cache.
LiteSpeed Cache is a product of LiteSpeed Technologies that optimizes dynamic content on web pages. It comes with advanced caching functionality and optimization features. LiteSpeed Cache is also available as a plugin on several platforms, including WordPress.
LiteSpeed Cache for WordPress (LSCWP) works by storing a copy of website content for future requests. As a result, the server has to process fewer requests and can display web pages faster.
Note that the functions that require server caching are only available in the LiteSpeed server. On the other hand, the optimization features can be used with any web server, including OpenLiteSpeed, Nginx, and Apache. These features include image optimization, CDN (Content Delivery Network) integration, and CSS/JS modification.
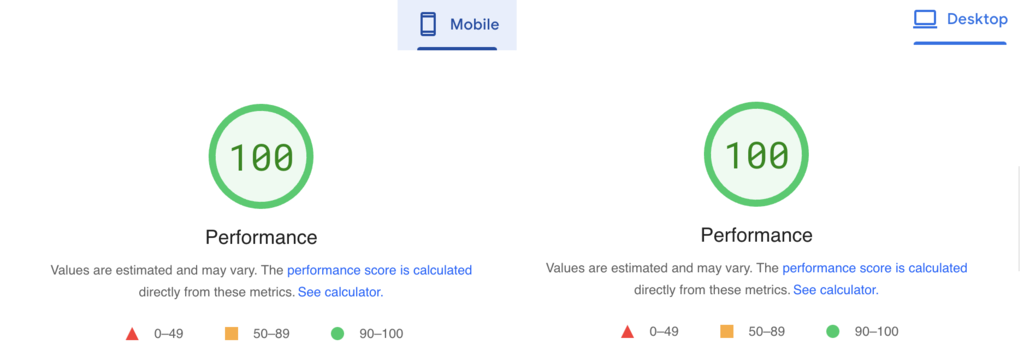
Before we proceed, let’s take a look at what scores Google PageSpeed Insights gave the mobile and desktop versions of the tested website before setting up LiteSpeed Cache:

Once LiteSpeed Cache for WordPress was configured, both versions achieved perfect scores:
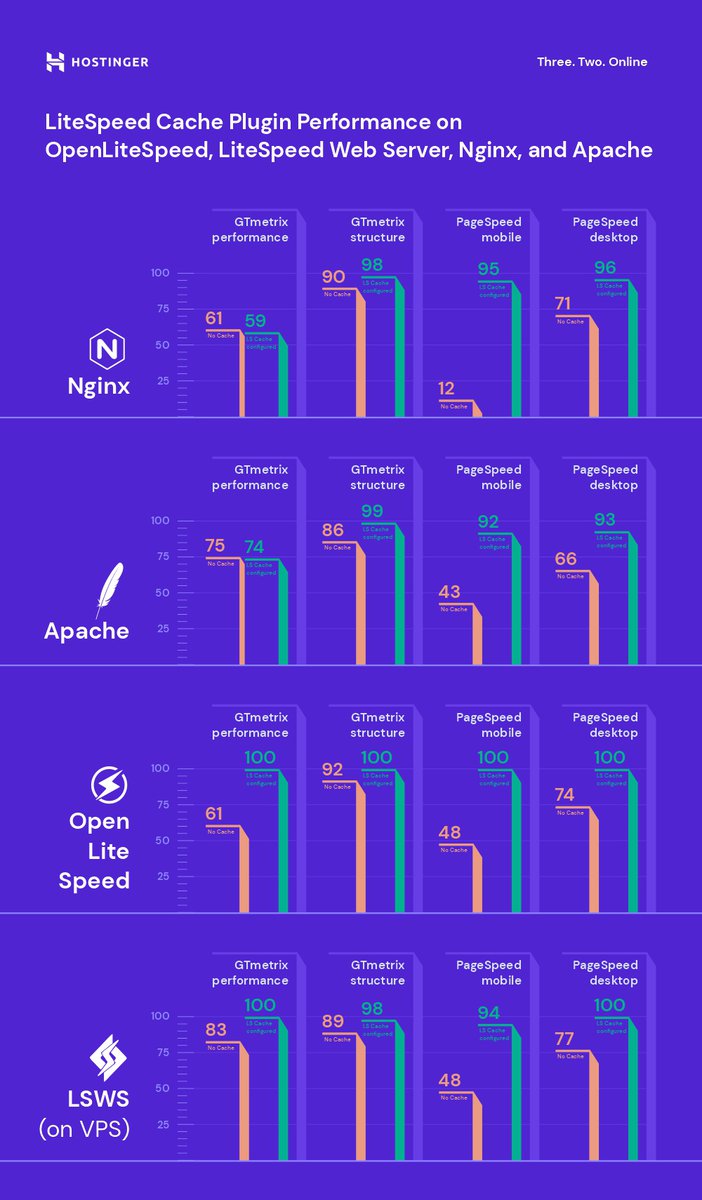
LiteSpeed Cache Plugin Performance on OpenLiteSpeed, LiteSpeed Web Server, Nginx, and Apache
Although the LSCache plugin can work outside of the LiteSpeed environment, its functionality differs depending on the web server you’re using. Hence, the outcome and process measures will also be different.
For this reason, we have conducted high and small-scale stress tests comparing LiteSpeed Web Server, Nginx, and Apache. We will show you three metrics of their performance – fully processed time, requests per second, and megabytes per second.
Important! The stress tests were done from Lithuania on servers located in the US.
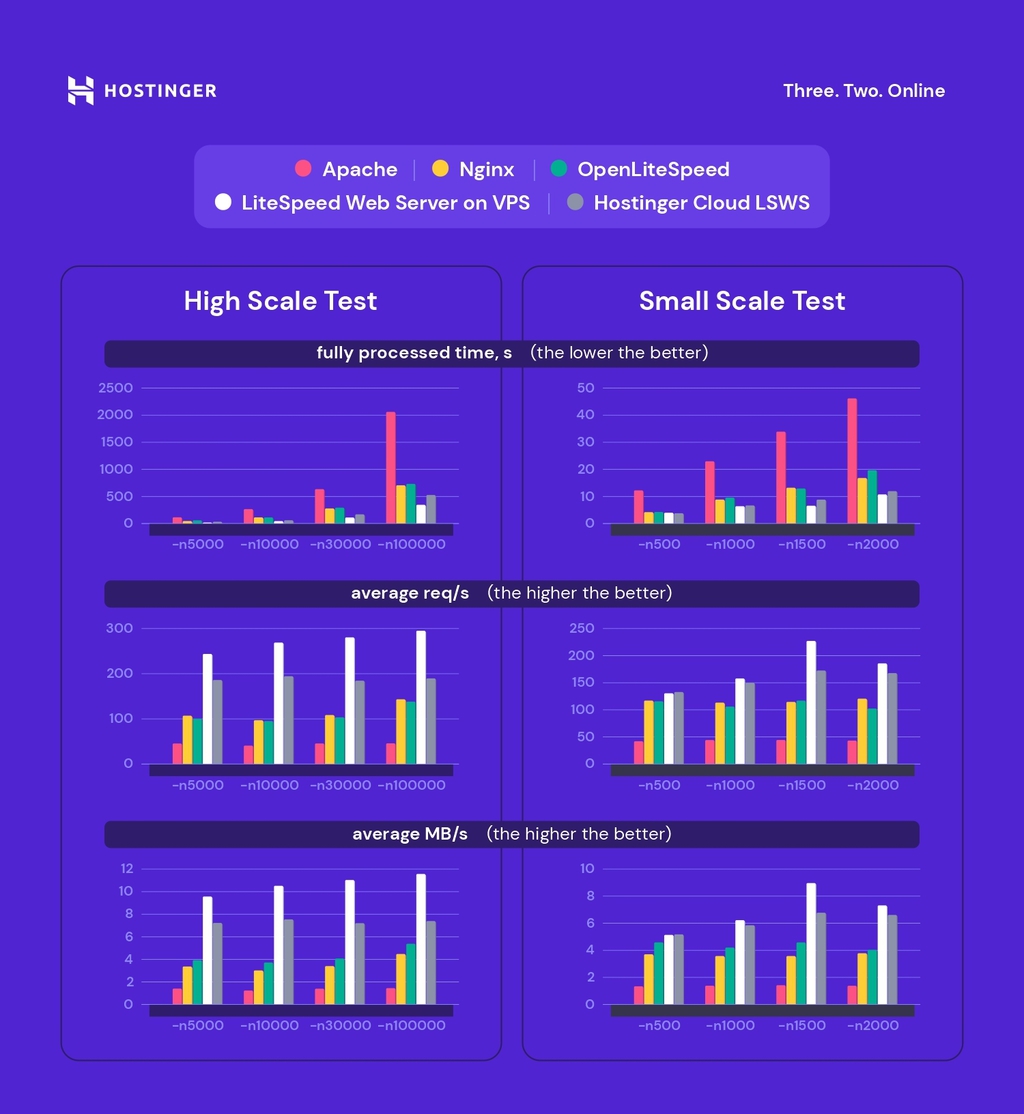
As seen above, the LiteSpeed web servers had the best score. Pairing the LiteSpeed web server with LiteSpeed Cache for WordPress will certainly give your website the most optimal performance.
Installing the LiteSpeed Cache Plugin
Fortunately, the LiteSpeed Cache plugin comes pre-installed with all Hostinger accounts. Thus, Hostinger users can go ahead and skip the plugin installation step.
However, if you’re using a different web host, follow the instructions below to install LiteSpeed Cache for WordPress.
- Log in to your WordPress admin dashboard and go to the Plugins section.
- Search for LiteSpeed Cache, click Install Now and Activate.
- Refresh the page – the LiteSpeed cache section will be on your dashboard.
Once the WordPress plugin is installed, you’ll have to configure it. Read the following section to find out the best LiteSpeed cache settings for your WordPress site.
Best Settings for the LiteSpeed Cache for WordPress Plugin
We have tested these LiteSpeed Cache settings on three websites powered by shared hosting – a simple blogging site, an eCommerce website, and an online portfolio.
Important! When testing performance on GTmetrix, do it a few times regardless of the caching plugin you’re using, as the cache might not be hit or loaded the first time. Additionally, be sure to purge the cache before testing any new setting.
Hostinger WordPress hosting clients can use LiteSpeed Optimization Profiles to optimize their website’s performance with one click. These profiles have pre-configured settings for optimizing different aspects of your website, eliminating the hassle of manual configurations.
Please note that this feature only works with the LiteSpeed Cache plugin for optimizing live WordPress websites.
Follow these steps to configure LiteSpeed Optimization Profiles for improved WordPress performance:
- Navigate to WordPress → Overview from hPanel.
- Scroll down to the Core section and make sure the LiteSpeed option is toggled on.
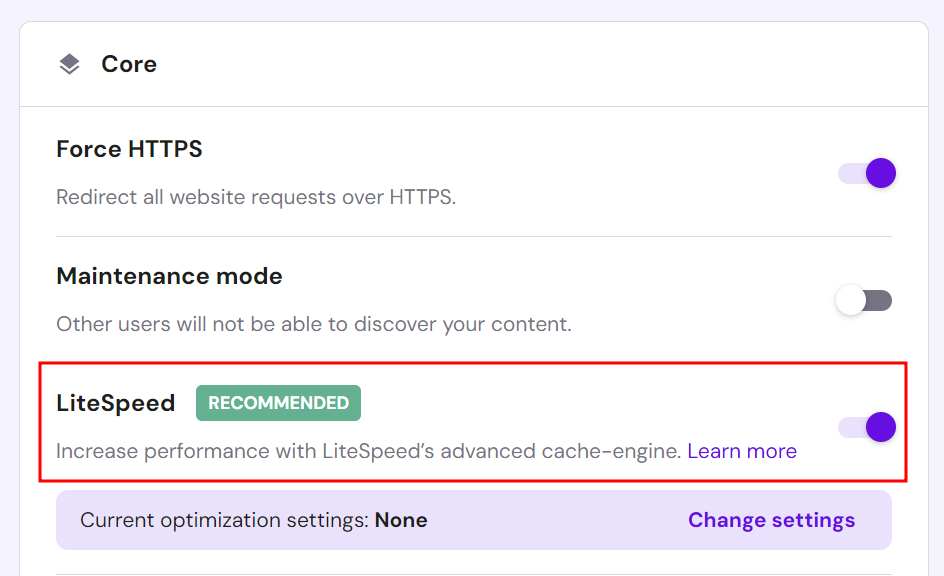
- Select Change settings → Apply settings on one of the three optimization profiles:
- Basic ‒ implements basic optimizations to improve load times and user experience.
- Advanced ‒ the recommended profile for optimizing all website types.
- Aggressive ‒ performs advanced optimizations for the best possible performance.
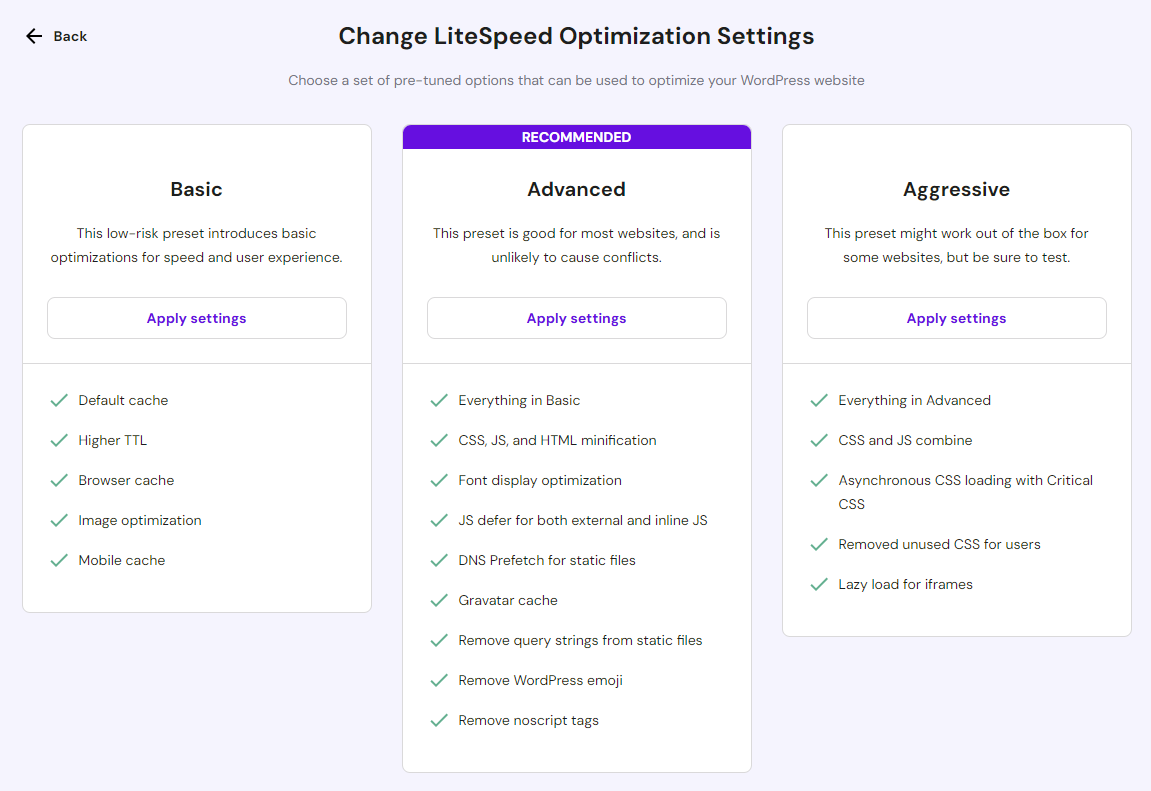
- Read the disclaimer and hit Apply to confirm.
- The Configuration change log section below the profile options tracks each switch to a new optimization preset. Click Restore to reset the LiteSpeed Cache settings to their previous state if needed.

Alternatively, check out the following tutorial to set up the LiteSpeed Cache plugin manually. Each setting will include a detailed description to help you decide whether you need to tweak it.
1. Complete the Basic Setup
Before we get into the steps of completing the basic setup, let’s compare the performance test results of the three websites.
The graph above shows a significant improvement in website performance after activating and configuring the LiteSpeed Cache plugin.
For this reason, we will walk you through the features and functionalities of the LiteSpeed Cache plugin, along with the best settings to apply – starting with the General page.
The first option on this page is Automatically upgrade. As the name suggests, switching this button to On will prompt the system to install the latest version of the LSCache plugin.

Next, there is a field to add your domain key, also known as the API key. This is important to have if you want to use QUIC.cloud features and services. Simply click on the Request Domain Key button.

We will talk more about setting up the QUIC.cloud in the following section. Now, go to the next section, and you will see Guest Mode.

This option provides an automatic cacheable landing page for a guest’s first-time request. When you enable the guest mode, the server won’t have to gain visitors’ information and instead will serve them the default cached page. As a result, the page loading time will be shorter.
Once the cached pages are served, the server will make an Ajax call to fetch the proper version of web pages the visitors requested. To enable the guest mode, simply switch it On.
To optimize the guest mode, use the Guest Optimization option.

When you enable this setting, the server will not only serve the default cached page, but it will also perform image and page optimization even if these features are disabled.
However, guest mode optimization might take up some of your WordPress website resources, so it’s best to consult your hosting provider before activating this setting.
Underneath, there is a Server IP field for your site’s IP address. Including your IP address will allow the crawler to retrieve resources directly from your server, improving your site’s performance.

Contact your hosting provider for information about your website’s IP address. Hostinger users can access the hPanel dashboard and go to Hosting -> Manage -> Details.
Further down, there is the Notifications setting. By enabling it, you will get the latest information about the LSCache plugin’s development, including promotions and new releases.

Be sure to save your changes after configuring the settings.
2. Tweak Cache Settings
The LiteSpeed Cache settings page includes features mostly applicable to the LiteSpeed web servers or the QUIC.cloud CDN. There are multiple functions in the LiteSpeed Cache settings page – this section will cover all caching features to help you choose the best approach.
- Enable Cache – ON. Switching this on will trigger the system to cache your WordPress site automatically. Although turning this function off will not affect your site’s content, all cached files will be purged. We recommend keeping the default settings for better loading times.

- Cache Logged-in Users – OFF. This setting automatically caches web pages for logged-in users. However, enabling this setting will take up server resources. It’s best to keep this option disabled unless you run a membership website.

- Cache Commenters – OFF. The output of this function depends on your comment moderation setting. If both cache commenters and cache moderation settings are enabled, users will not see their comments immediately. Conversely, if the cache commenters function is disabled, users will see their pending comments.

- Cache REST API – ON. This enables you to cache requests from the WordPress REST API calls. These calls are generally made by third-party web applications integrated with WordPress, including themes, plugins, and the block editor.

- Cache Login Page – ON. It serves cached versions of the login pages. It’s best to leave this enabled as it will make your WordPress site load faster every time a visitor lands on your page.

- Cache favicon.ico – ON. Keeping this function enabled will help avoid unnecessary PHP calls and make the server response faster. Otherwise, the system will look for the favicon.ico file and force the WordPress PHP backend to run, slowing down your WordPress website.

- Cache PHP Resources – ON. This function caches static elements, including CSS and JS files generated by WordPress themes. Keep the setting enabled to speed up performance and avoid unnecessary PHP scripts.

- Cache Mobile – ON. It allows you to serve different cache content on desktop and mobile devices. Unless you have an AMP (Accelerated Mobile Pages) version of your WordPress site, we recommend keeping this off.

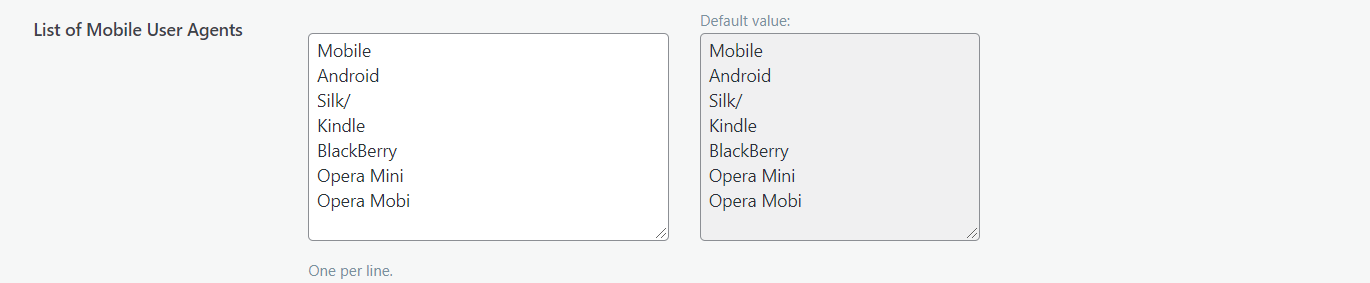
- List of Mobile User Agents. This setting is only available if you turn the cache mobile function on. You can add a list of mobile user agents in a rewrite-rule-friendly format. For example, each user agent can be written on one line.
- Private Cached URIs. Contains paths that will be privately cached. However, this function is similar to the cache logged-in users option that also handles private cached URIs. Unless you want to privately cache specific pages that are not user-related, leave the field empty.

- Force Cache URIs. The system will force-cache every path written in the provided field regardless of any non-cacheable settings. Generally, you won’t have to worry about this function since you don’t need to force the cache for most of your pages.

- Force Public Cache URIs. Forces specific content types to be cached as public regardless of their settings.

- Drop Query String. Ignores any query strings added in the field and speeds up the website loading time. The default setting already lists some of the most commonly generated strings. However, you can always add more query strings if necessary.

All in all, the LSCache plugin applies default settings suitable for most WordPress websites. That said, we recommend tweaking them according to your needs.
In addition to the LiteSpeed Cache settings page, let’s briefly overview the other available sections along with their main functionality:
- TTL (Time To Live) – this function controls how long specific content types are stored in the cache. The default settings should work fine, but you can reduce or increase the numbers as needed.
- Purge – provides all settings to remove certain content types from the cache. We recommend enabling purge on all upgrades to allow the system to clear the outdated WordPress cache whenever an update is available. If you have sufficient resources, enable server stale for better performance.
- Excludes – helps specify which content types you want to exclude from the cache. There are various fields to fill out, including site URIs and query strings. Fill out the strings accordingly, and the system will prevent them from being cached.
- ESI (Edge Side Includes) – separates specific parts of a website page into fragments. You can choose to store these parts in a public or private cache. Once enabled, the system will reassemble the pages before serving them to the browser.
- Object – reduces database load for dynamic web applications. The LiteSpeed object caching system stores database query results and retrieves the information from the cache instead of reloading it.
Pro Tip
Hostinger offers the object cache feature in selected plans. You can find it under the Core section of the hPanel dashboard. After enabling LiteSpeed, click the toggle button next to Object cache to enable the Memcached configuration.
- Browser – enabling browser caching allows the system to automatically store dynamic content of your WordPress site in the users’ browser cache. The server will process fewer browser requests and serve the pages more efficiently.
- Advanced – the settings on this tab are designated for advanced users. Here, you can enable the HTTP/HTTPS functionality to avoid conflicts with login cookies. Furthermore, an instant click function can load a web page in the background as soon as your visitors hover over it.

3. Refine Page and Image Optimization Options
The LiteSpeed Cache plugin includes website optimization tools for dynamic content on WordPress sites, including images and web pages. Taking the time to configure these settings is important as they can affect your website’s SEO.
This section will walk you through each function and setting on each optimization tab.
Image Optimization
Whenever visitors access your WordPress site, the browser requests resources and downloads your images before displaying them. Thus, the browser will take longer to load, resize, and render unoptimized images.
Fortunately, the LiteSpeed Cache plugin can optimize your images individually or in bulk by resizing them.
Warning! Do not use another optimization plugin while using the LiteSpeed Cache plugin, as it might trigger system and processing errors.
Upon entering the image optimization page, you will see the Image Optimization Summary tab. This tab monitors multiple metrics, such as the size reduction and the total amount of images pulled from your website.
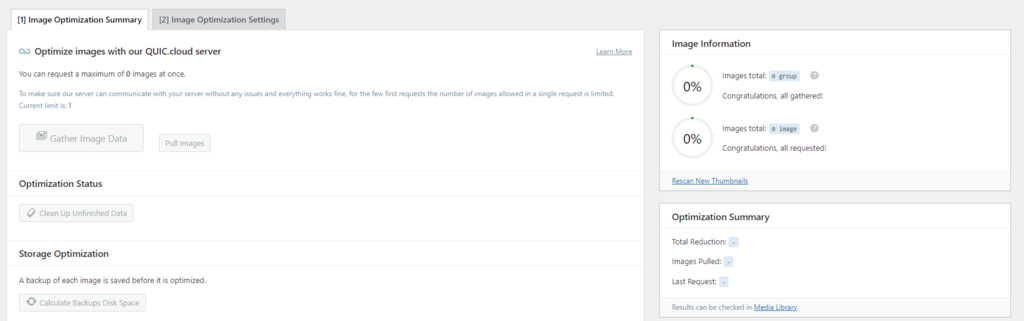
Additionally, you can utilize a few other functions, such as:
- Gather Image Data – available after uploading new pictures. Once done, the Send Optimization Request button will appear, enabling you to send the images to the LiteSpeed cloud server.
Important! This functionality is only available after you have added your domain key and activated the QUIC.Cloud CDN.
- Pull Images – pulls your optimized images from the cloud back to your WordPress site.
- Clean Up Unfinished Data – erases unfinished processes and starts them again whenever the optimization process gets stuck.
- Calculate Backups Disk Space – counts the available disk space for backup files.
- Remove Original Image Backups – deletes the backups of original images to free up disk space. We recommend downloading the backups to your local computer before opting for this function. You won’t be able to revert optimization settings after deleting all backups.
- Rescan New Thumbnails – scans newly added images on your website and sends optimization requests to the system.
- Use Original Files & Use Optimized Files – provides options to switch between the unoptimized and optimized images on your website.
- Destroy All Optimization Data – removes all data and reverts all settings to the original values.
Now, let’s continue to the next tab and apply the best optimization settings for your WordPress website. Simply click on the Image Optimization Settings, and you will see multiple functionalities to tweak:
- Auto Request Cron – ON. This function automatically sends optimization requests via WordPress cron job whenever new images are uploaded.
- Auto Pull Cron – ON. It works together with the previous function. Thus, you should enable both functions. Otherwise, you will need to send every newly uploaded image using the Pull Images button.
- Optimize Original Images – ON. You should always keep this function turned on as it optimizes .png and .jpg images and generates the backup files. Only disable it if you don’t want to optimize your images.
- Remove Original Backups – OFF. Keep in mind that this function is irreversible. Enabling it will erase all backups, preventing you from reverting any optimization settings.
- Optimize Losslessly – ON. This will optimize your images using lossless compression.
- Preserve EXIF/XMP Data – OFF. This setting is enabled by default. However, preserving EXIF/XMP data might increase the size of your optimized images. Thus, it’s better to disable this function.
- Create WebP Versions – ON. Turning this function on will generate .webp files of your images. This results in a bigger size reduction of up to 30%, speeding up your website loading times.
- Image WebP Replacement – ON. If you have enabled the previous setting, you should also turn this option on as it replaces .jpg and .png images with .webp files.
- WebP Attribute To Replace. Controls which image formats to replace with .webp. Simply enter one image attribute per line inside the box.
- WebP For Extra srcset – ON. It works to serve custom code with srcset elements as .webp versions.
- WordPress Image Quality Control. The default image quality should work fine. You can tweak the setting as you need, but remember to keep the value at less than 100.
Page Optimization
Once you have set the image optimization settings, the next step is to tweak the page optimization functions. Failure to do so will likely result in slower loading times and worse page scores.
Fortunately, when it comes to page optimization, the LiteSpeed Cache plugin provides multiple options to improve your WordPress site performance. This page contains the most important settings to optimize HTML, CSS, and JS files.
The page optimization page has several sections – we will overview each along with its functionalities.
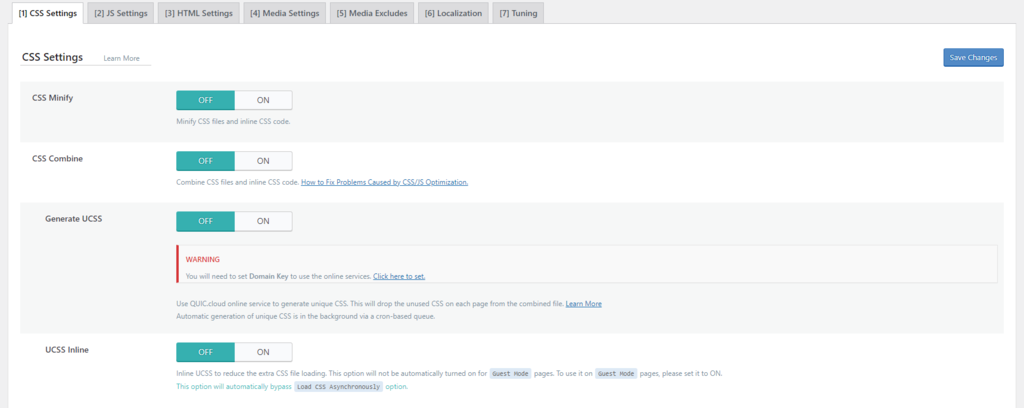
CSS Settings
- CSS Minify – ON. This setting strips away unnecessary elements, such as extra white space and new line characters from the CSS files.
- CSS Combine – OFF. Enabling this will prompt the system to combine all individual CSS files into a single CSS file. However, we recommend disabling it unless you have extra space since this function can take up resources.
- Generate UCSS – OFF. This setting works hand-in-hand with the CSS combine function. Thus, if you decide to disable the previous function, you should also keep this setting off.
- UCSS Inline – OFF. It reduces extra CSS file loading by storing the UCSS inline with the HTML. This function also works collaboratively with CSS combine, so only enable it if you have turned the previous setting on. Additionally, enabling this will bypass the Load CSS Asynchronously option.
- CSS Combine External and Inline – OFF. This option helps combine external CSS files with those found with the HTML inline elements. To avoid errors, enable this option with the CSS combine.
- Load CSS Asynchronously – OFF. Turning this option on allows your CSS and HTML elements to load at the same time. However, they might be loaded without formatting. This can result in a layout shift or a flash of unstyled content (FOUC).
- CCSS Per URL – OFF. Setting this function off will generate critical CSS for every post type instead of for individual pages. This will save the CCSS quota and disk space.
- Inline CSS Async Lib – ON. This option avoids render-blocking by inlining the asynchronous CSS library.
- Font Display Optimization. Keep the default value as modifying this setting might cause FOUC issues.
JS Settings
- JS Minify – ON. It removes unnecessary scripts for JS optimization.
- JS Combine – OFF. This compiles all individual JS files into a single file.
- JS Combine External and Inline – OFF. This function works similarly to the combined CSS external and inline options. Only enable this if you have also turned the previous function on.
- Load JS Deferred – depends. Before tweaking this option, do some testing as the results might vary. If you choose Deferred, the system will load JS right after the HTML. Meanwhile, the Delayed option will only start if the system detects user activity.
HTML Settings
- HTML Minify – ON. Erases unnecessary characters inside the HTML code.
- DNS Prefetch. Carries out DNS resolution of the listed domains before they are requested by your visitors, reducing your page loading time. This is useful for loading external links, such as AdSense or Facebook.
- DNS Prefetch Control – ON. If you add links in the previous setting, this function will automatically prefetch the listed DNS along with all URLs in your posts and pages, including CSS, JavaScript, and images.
- HTML Lazy Load Selectors. Specify which class or ID to lazy load by adding one per line in the provided field.
- Remove Query Strings – OFF. This option generally doesn’t directly affect your website’s performance, so keeping it off should be fine.
- Load Google Fonts Asynchronously – OFF. It loads Google Fonts asynchronously while leaving other CSS elements intact. However, we recommend disabling this option as most Google Fonts are already cached in your visitors’ browsers.
- Remove Google Fonts – ON. Enable this setting only if you store fonts locally and don’t want any third-party fonts to be loaded on your WordPress site.
- Remove WordPress Emoji – ON. Activating this functionality will prevent the system from loading the WordPress.org emoji and load the default ones instead.
- Remove Noscript Tags – OFF. Keeping this option on helps ensure compatibility with all browsers, including the older versions.
Media Settings
- Lazy Load Images – ON. This option allows the system to lazy load images on your website. Although doing this can speed up the loading time, it might impact the user experience.
- Basic Image Placeholder. When you enable lazy loading, a gray image placeholder will be displayed. However, you can also customize it by defining the base64 of an image and adding it to the field. Use an online tool to find out the base64 of an image.
- Responsive Placeholder – ON. This option enables your image placeholder to fit with the image’s dimensions, reducing layout reshuffle.
- Responsive Placeholder SVG. Specify an SVG file to use as your placeholder image. The system will automatically convert it to a base64 placeholder.
- Responsive Placeholder Color. The default value works fine. Alternatively, customize the color by moving the color picker.
- LQIP Cloud Generator – OFF. Enabling this will generate a low-quality image placeholder displaying a blurred version of your image as it loads. Keep this setting off if you prefer to use plain color as a placeholder.
- LQIP Quality. Defines the quality of your LQIP. The value ranges from 1 to 20, and the higher the value, the higher the resolution. However, setting it to a larger value might increase loading times.
- LQIP Minimum Dimensions. The LQIP will only appear on images with the same dimensions as specified in the settings. It won’t load on images that have smaller heights and widths.
- Generate LQIP In Background – ON. Turning this on allows the system to load LQIP in the background via a cron-based queue. Setting this off might increase your loading times.
- Lazy Load frames – ON. It works similarly to lazy loading images. This function helps lazy load frames, such as maps and videos.
- Add Missing Sizes – ON. Sets a defined width and height for your images and helps the LiteSpeed Cache plugin add the missing image dimensions automatically. This setting only works if image lazy loading is on.
- Inline Lazy Load images Library – ON. Turning this on helps improve your page score.
Media Excludes
These settings will exclude certain images from being lazy loaded. Excluding above-the-fold images, such as logos and background images, can improve user experience. This is because you will want those elements to load before the rest of the page.
To exclude media from lazy loading, simply fill out the information in the provided field accordingly. For example, exclude the images by their class and parent class name.
Localization
- Gravatar Cache – ON. This allows the system to store gravatars locally. This works best for WordPress websites that have a lot of comments with gravatars.
- Gravatar Cache Cron – ON. If you have enabled the previous option, you should also enable this one to refresh the gravatar cache via a cron job.
- Gravatar Cache TTL. Defines how long gravatars are cached for. The default value should work fine. However, you can customize this value as long as it is above 3600 seconds.
Tuning
All the settings in this section work to exclude specific elements, such as CSS, JS, and URLs, from being minified and combined.
Generally, you don’t have to tweak these settings as much unless you find an unusual file in your source code after minifying or combining CSS/JS. In such cases, you can list the files inside the provided fields accordingly.
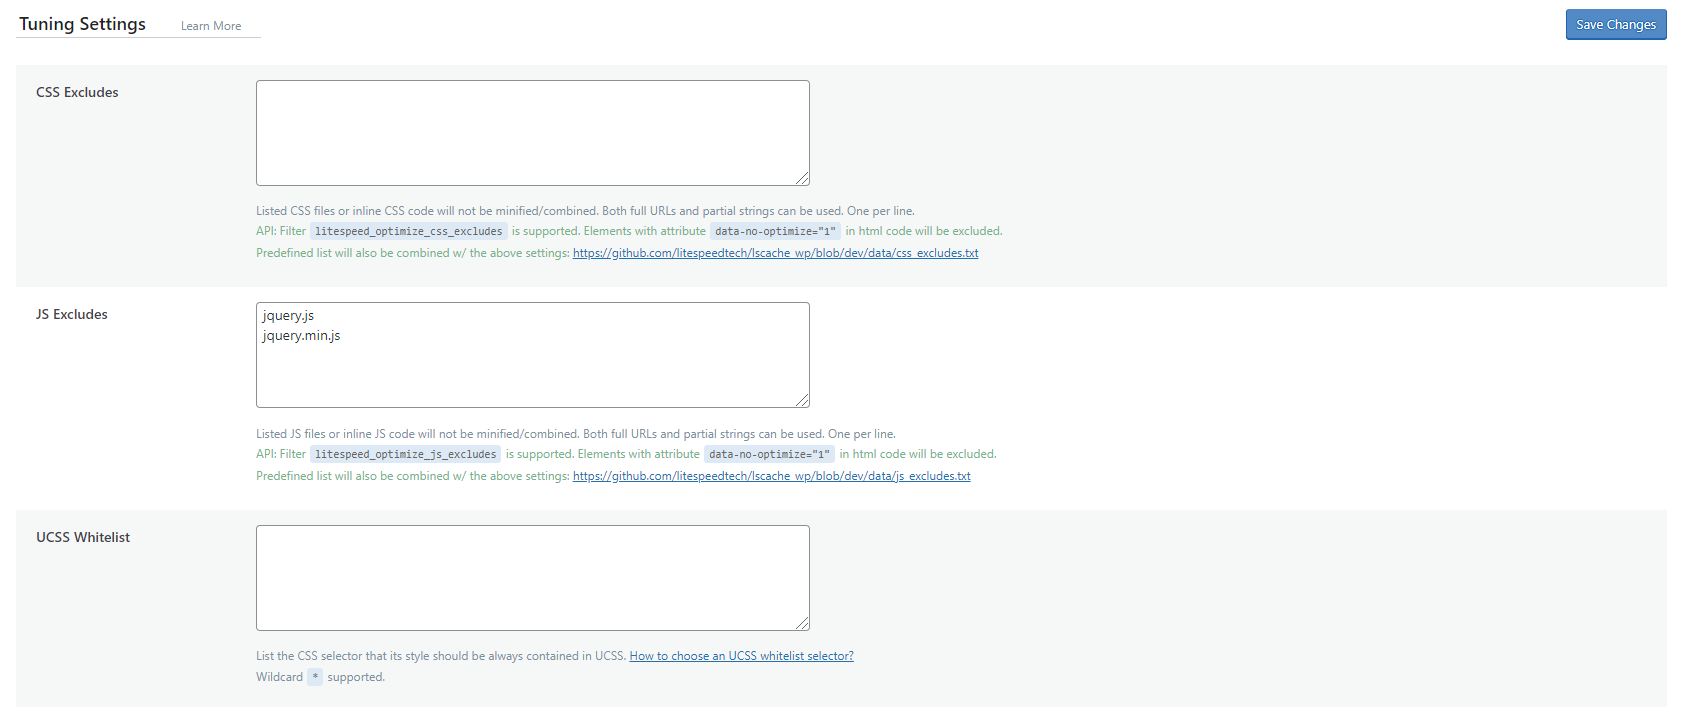
Once you have finished configuring the settings, be sure to hit Save Changes.
4. Set Up the QUIC.cloud CDN (Optional)
QUIC.cloud is a content delivery network by LiteSpeed Technologies that offers dynamic caching. This CDN uses servers all across the world to cache website content. Whenever a visitor makes a request, the server will fetch the resources from the nearest server location.
Pairing QUIC.cloud CDN with cache features from LiteSpeed Cache can greatly improve your page speed. This section will explain the steps of activating this content delivery network.
To do so, start by setting up Cloudflare for WordPress. Doing this ensures that all of your website content is cached optimally – the QUIC.cloud CDN will cache all dynamic pages, while the Cloudflare CDN will handle the static content.
Once you have Cloudflare set up on your server, the next step is to get your domain key. Go to the General page, and click on the Request Domain Key button.

Then, wait for the system to process your request.

Refresh your WordPress admin page. Once the process is complete, the system will autofill the domain key. Next, click on the Link to QUIC.cloud button.

This will take you to the registration page. Continue by filling in all the information accordingly.

If you don’t have a QUIC.cloud account already, sign up for a new one. Once done, the system will send a validation email to the registered address. Open the email and click on the attached link.
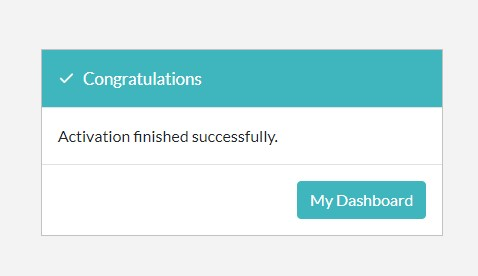
If you see the message above, you have successfully paired your WordPress website with the QUIC.cloud CDN. Now, click on the My Dashboard button to go back.
Although you have completed the registration process, you still need to properly configure your DNS settings. To do so, navigate to the CDN section and look for the QUIC.cloud option.

Switch it On to enable the QUIC.cloud CDN API functionality.
Next, configure QUIC.cloud with the Cloudflare details. Before doing so, access your Cloudflare dashboard to get the Global API Key.

Now that you have the information, simply fill in the fields accordingly.
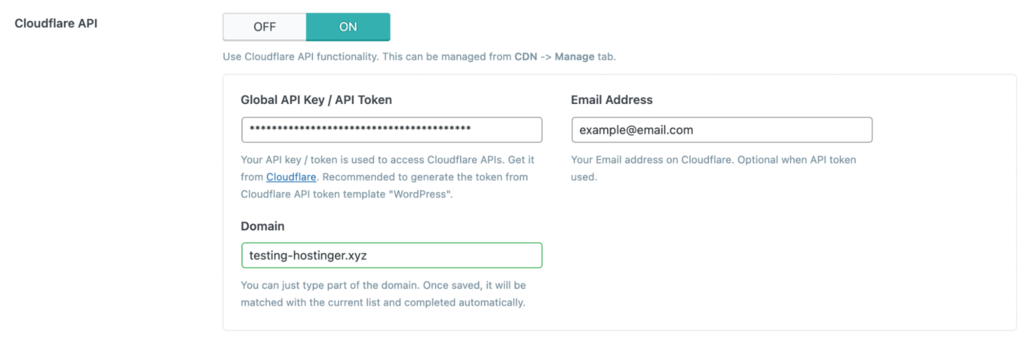
Once done, click Save Changes.
Pro Tip
If Cloudflare is connected to the LS Cache plugin, you can use the “Flush Cache” button on hPanel to purge Litespeed, Cloudflare and Sever side cache in just one click.
5. Fetch Static Content via a CDN (Optional)
Fetching static content via a CDN can lower your network latency. This is because the CDN will replicate the most requested resources across global caching servers. Whenever visitors access those resources, the closest server will deliver them.
To fetch static content from a CDN you will need to create a subdomain that delivers the resources, for example – cdn.your-website.com. This subdomain needs to be in the same folder as your primary domain.
Additionally, it is paramount to ensure the CDN subdomain is working well. Otherwise, your static resources won’t be loaded and it might break your website.
If you’re sure the subdomain is working properly, enable the Use CDN Mapping option for the newly created subdomain:

Now that we’ve finished configuring the LiteSpeed Cache plugin, let’s take a look at the following graphs:
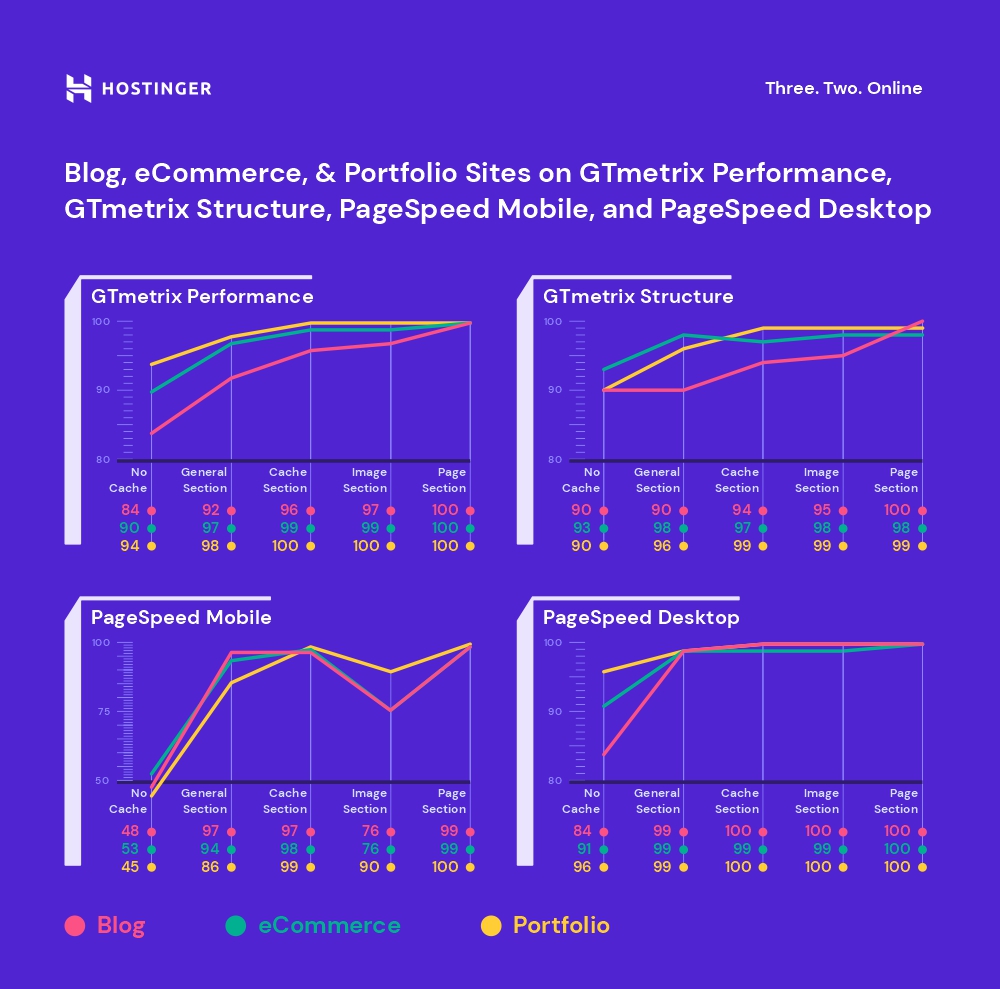
They show how the three tested websites performed before and after applying the appropriate LiteSpeed configuration settings.
Before applying image and page optimization, the portfolio website scored just 45 points in the PageSpeed mobile category. After it was optimized, the score soared to 100. Meanwhile, the same changes improved the eCommerce store’s score from 53 points to 99.
In terms of GTMetrix performance, the blogging site’s score increased from 84 to 100.
Important! All of the websites – the blog, eCommerce store, and portfolio site – demonstrated better results after turning on LSCache for WordPress and applying image and page optimization.
What Else Can LiteSpeed Do?
After you have configured all the LiteSpeed Cache for WordPress plugin settings, the system should function properly. Hence, there will be little further cache management required. However, LiteSpeed offers more functionalities to tweak as you need.
The following sections will talk about LiteSpeed’s database optimization, its crawler, and the toolbox to help you further improve your website performance,
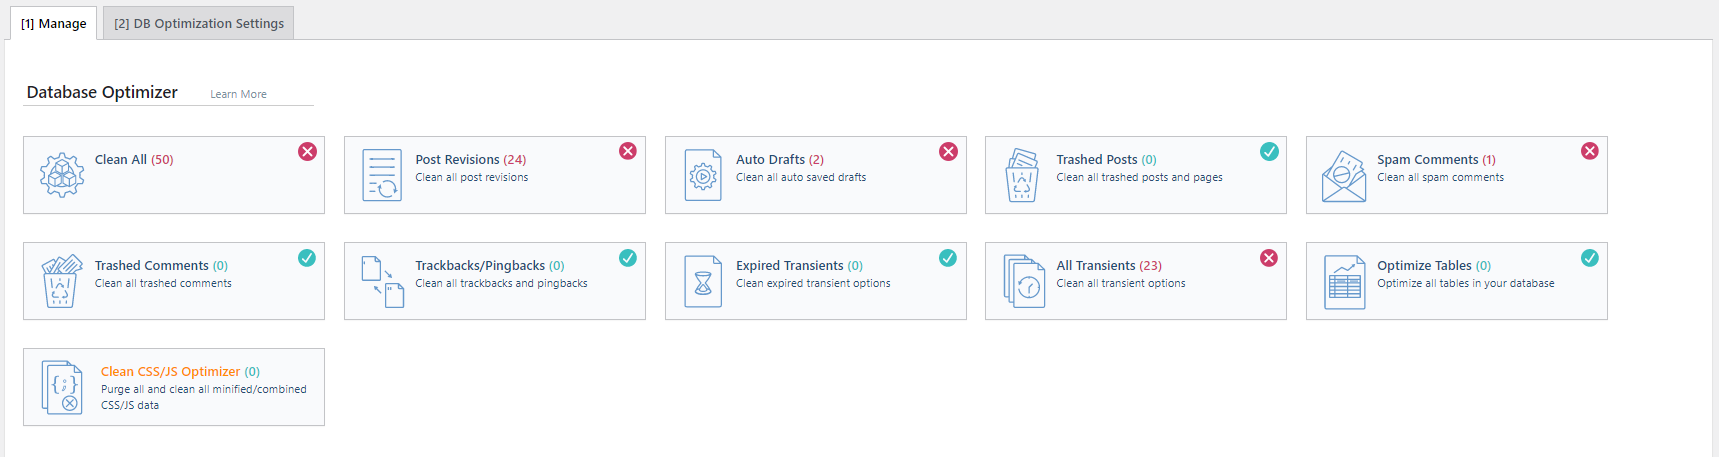
Database Optimization
The Database section offers features to help you execute various tasks in your WordPress database more conveniently. This includes clearing old post revisions and trashing pingbacks with a single click.
Moreover, DB Optimization Settings control the number of post revisions to clear and automate the process.
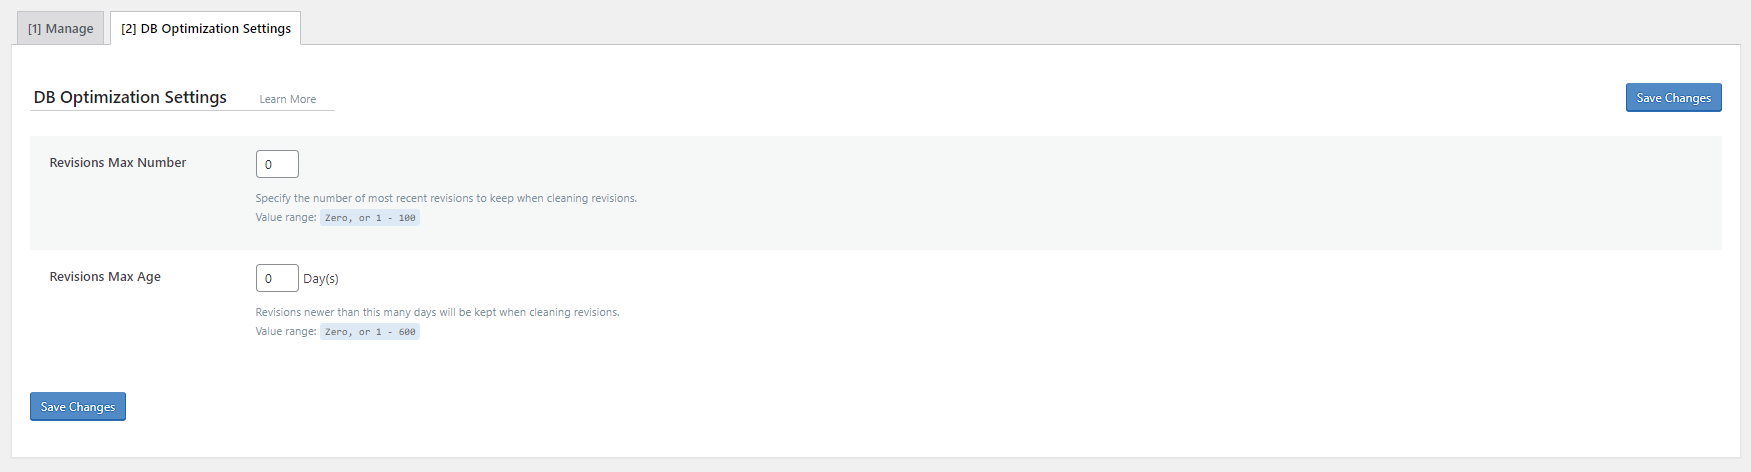
For example, if you want to save two older revisions for each post, change the Revision Max Number value to 2. Meanwhile, to keep old post revisions for a specific period, change Revisions Max Age.
Crawler
The LSCache plugin includes a crawler functionality that browses your website’s backend, searching for expired pages and refreshing them in the process. It prevents visitors from seeing any uncached page.
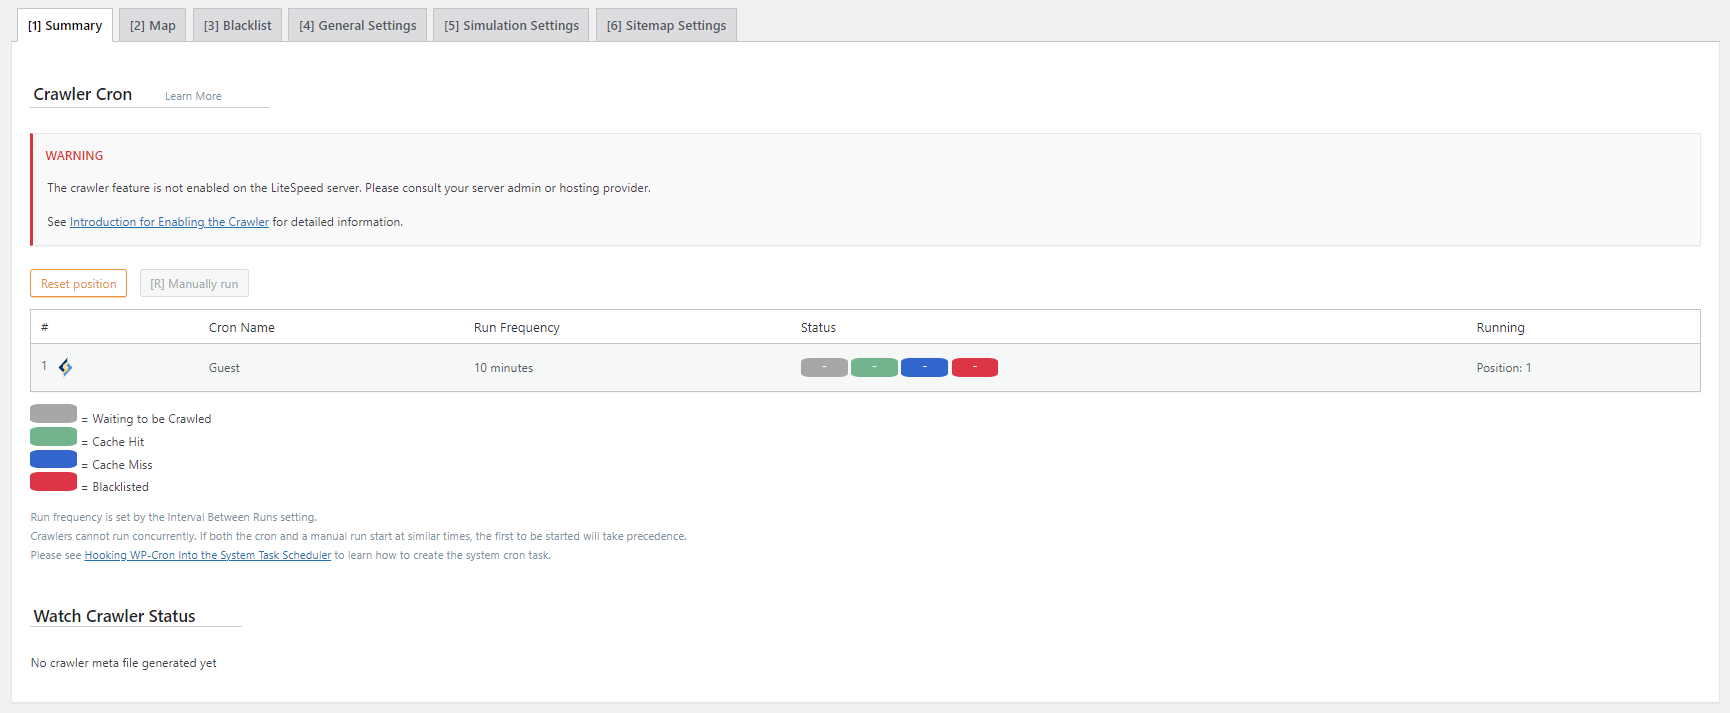
This function is disabled by default and needs to be enabled from the server-side – you will have to consult your server admin or hosting provider. This is because activating the crawler functionality without sufficient server resources might negatively impact your site’s performance.
Important! The crawler functionality is only available on Hostinger cloud hosting plans.
Toolbox
Use the LiteSpeed Cache Toolbox section to configure your cache settings manually. It provides more specific caching functions, from purging 403 error pages to editing the path to the .htaccess file.
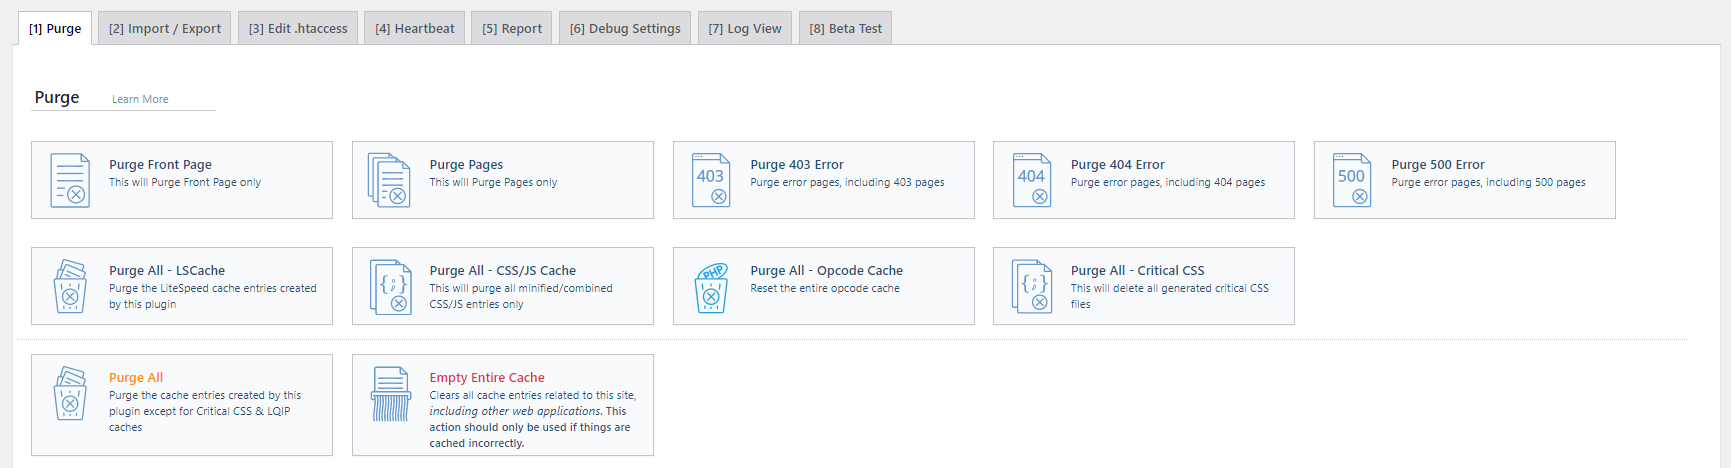
Although the Purge tab contains straightforward features, other tabs like Edit .htaccess and
Heartbeat are meant for advanced users. Thus, it’s best to leave the default values for these settings or consult your web host before making any changes.
For more details, let’s expand on the functionality of each section:
- Purge. This tab lists different content types for you to purge selectively. The functions are especially helpful for making changes to a file that is being cached. This way, only the selected files are purged, not affecting the rest of your content.
- Import/export. Includes tools to export or import various LiteSpeed configurations. These tools come in handy if you are experimenting with your site and want to restore the previous configurations later. Additionally, you can also transfer your site configuration to a local file and use it on another website.
- View .htaccess. Use available tools within this tab to directly edit your .htaccess file without having to configure an FTP or SSH client. Keep in mind that changing your .htaccess file might break your site. If you’re unsure, always consult your web host before making any changes.
- Heartbeat. WordPress Heartbeat API enables your browser to communicate with the servers using AJAX calls. This functionality allows you to manage server load. However, be careful when adjusting WordPress heartbeat intervals as it can take up a high amount of CPU power.
- Report. In case you experience problems with the LiteSpeed Cache plugin, you can send reports by pressing the Send to LiteSpeed button in this tab. The system will then send a copy of your environment report to the LiteSpeed team.
- Debug Settings. If you want to disable the LiteSpeed Cache plugin to debug your website, use the tools available in this tab accordingly.
Conclusion
Web caching is one of the most effective and efficient ways to improve a website’s performance. When implemented correctly, it can speed up its loading time and reduce server load. The simplest way to set up web caching is by installing a caching plugin.
LiteSpeed Cache is one of the best WordPress plugins with advanced caching techniques. Moreover, when paired with the LiteSpeed server, its server-level page caching can effectively improve performance.
In this article, we have explained the best settings to configure for LiteSpeed Cache for WordPress. Although applying the best settings will give you optimized performance, there is no need to tweak the default settings if you don’t feel comfortable doing it.
We hope this article has helped you configure LiteSpeed Cache for WordPress and get the most out of it. Should you have any questions, don’t hesitate to drop them in the comment section below.
LiteSpeed Cache FAQ
Should I Use LiteSpeed Cache?
LiteSpeed Cache is a wonderful choice for a cache plugin if you are looking for a plugin with extensive settings, great reviews, and fast server-level caching.
Is LiteSpeed Cache Free?
Yes, LiteSpeed Cache is free to use, but you only benefit from the caching if your website’s servers also use LiteSpeed.

Nabilla is a website hosting and development enthusiast. She loves to share her knowledge with others in order to help them grow their online presence. When she's not busy writing, Nabilla enjoys exploring nature and going on adventures. She is passionate about helping people achieve their online goals.

Vakarė is a Content Strategist with an eye for SEO and a passion for technology. She has worked with hosting and websites for nearly 5 years, and is set to educate with content that helps you grow your website in every way possible. Follow her on LinkedIn.


Comments
August 27 2020
I have installed the LiteSpeed plugin which resulted in some appearance issues. My pages designed with elementor are not loading as they should be, but it does loads well once after a refresh. Also, in some of the pages, I'm facing alignment issues. Please help! I don't have much technical knowledge about CSS and JS.
November 11 2020
Hey there Aviral. I am not able to check your website from here, but please don't hesitate to message our Customer Success team which will gladly help you out! :)
July 08 2022
Did you find a way to solve the litespeed plugin from messing elementor pages layout after an elementor update?
July 08 2022
Hey! If your website breaks after updating Elementor while LiteSpeed is Enabled, we would suggest contacting your hosting provider or a developer for further investigation on what exactly causes this issue ?
January 17 2023
Hi, I'm using Hostinger's shared plan, can I with this plan create a subdomain that provides resources to fetch static content from a CDN?
January 20 2023
Hey! Yes, you can use a subdomain to fetch static content from a CDN, the process would depend on the CDN that you're using and the type of website you have.
March 01 2023
I activated this plugin, which increases the site speed, but it reduce the AdSense presence, it starts sleeping very little, due to which the revenue decreases.
March 03 2023
Hello! It seems that this is a known issue with the LiteSpeed Cache Plugin, more information can be found here
November 25 2023
Hey, I'm using Hostinger and Litespeed Plugin. Having several questions. 1. Do I need to change image resolution myself before uploading? If this is not done by litespeed should I combine it with another plugin? 2. Is it better to convert to webp myself or not needed? Thanks in advance
November 29 2023
Hey there! No need to worry about manually resizing images before uploading with the LiteSpeed Cache plugin. Its Image Optimization feature automatically optimizes and compresses your images for faster loading. And yes, converting images to WebP format can further enhance your website's loading speed ?