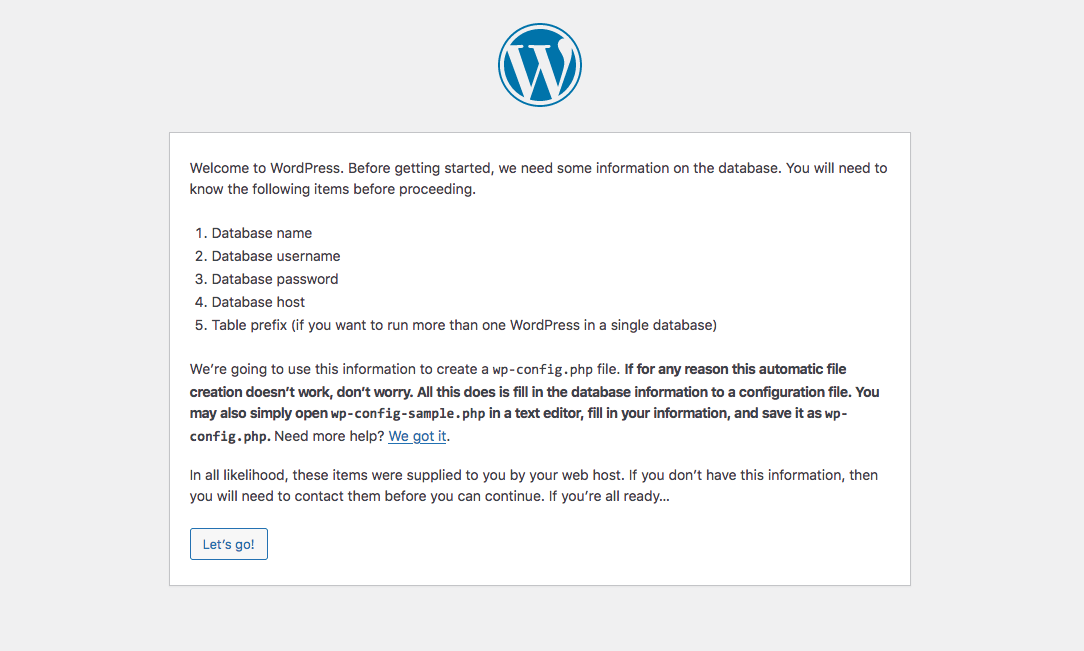
How to Install WordPress Locally (3 Methods)
Testing new themes and plugins on your live website can cause functionality issues, slow loading times, and even downtime. Without a testing site, securing and optimizing WordPress for speed becomes challenging. Therefore, knowing how to install WordPress locally is essential.
Using a version of WordPress stored on your computer, you can make any changes you like, and your visitors won’t see them. This enables you to test software, learn coding skills, and scan for performance bugs safely. It can also serve as a staging environment before going live.
In this guide, we’ll introduce you to the process of installing WordPress locally and present three different methods to accomplish it. Let’s jump right in!
Why Should You Want to Install WordPress Locally
WordPress is a flexible and user-friendly platform. It makes building a website and getting it online quick and simple. However, it can also be used to install WordPress locally.
Doing this results in an offline website that’s stored on your computer and can only be seen by you or anyone else with access to that device. At first, it may seem counterintuitive to create a private website in this way, but there are many reasons to do so.
For example, you can build a new website locally and then make it available online when it’s ready to be published. This will ensure that no search engines or human visitors will see it before it’s completed.
However, you may also choose to create a local version of your existing live website. Here are just a few of the uses for this kind of local copy:
- Test new themes or install WordPress plugins to ensure they work properly and don’t cause compatibility errors
- Try out updates, new features, and third-party tools
- Experiment with redesigning part of your site
- Conduct troubleshooting, investigate errors and experiment with solutions to make WordPress more secure
With a local testing environment, you can also learn how to code. Rather than editing your live site and potentially losing data, you can experiment with your local WordPress files in safety.
One additional benefit is that running a local WordPress site on your computer doesn’t require an internet connection. This can enable you to develop your website offline, so you don’t need to wait for slow internet speeds or have access to a reliable connection.
Creating a local WordPress site is also completely free. It can be an excellent option for beginners who want to develop their website before purchasing a hosting plan or domain. You can learn the technical aspects of running a website with a local site before accumulating any monthly costs.
Pro Tip
If you want to install WordPress on your web server, feel free to check out our complete guide about how to install WordPress.
How to Install WordPress Locally
If you want to install a local WordPress site, it’s important to find the right tool. Since WordPress won’t run directly on your computer, you’ll need web development software capable of handling this task.
Local WordPress software often includes an Apache web server, PHP, and MySQL. These platforms work together to create an environment that supports a local site. By downloading them in a package, you can avoid the hassle of installing them separately.
However, you’ll need to install compatible software for your computer. Certain web development environments are specifically designed for Windows or Mac, while others support both. Let’s take a look at three top options.
Method 1: Install WordPress Locally on Windows
For Windows users, we’d recommend downloading WampServer.
WampServer is Windows-based software that supports a local web development environment. Anyone can download this free resource to access a local website without an internet connection or a web host.
When you learn the setps to install WordPress on WAMP, you’ll be able to use Apache2, PHP, and a MySQL database to create a local site. Then you can manage it with phpMyAdmin.
1. Download WAMP
To get started, go to the WampServer website and navigate to Downloads. There you’ll see two options – 64 BITS and 32 BITS.

You’ll need to download the best version for your computer based on its OS type. If you don’t know what operating system you’re using, you can go to Control Panel -> System and Security -> System, and then look up the System Type section.
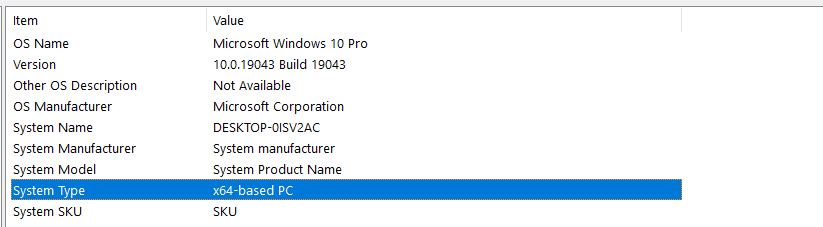
You can find out whether you have a 64-bit or 32-bit operating system there. Then, download the WampServer file that matches your setup.
2. Define Your Default Browser
After downloading the appropriate file, open the saved folder. Click on the WampServer execution file to start the process. This will open the installation wizard.
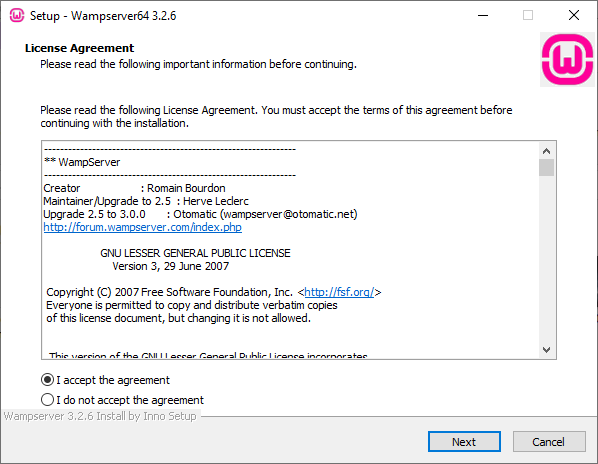
Then follow the installation instructions, which include accepting the License Agreement. You’ll also need to set a destination location to install WampServer.

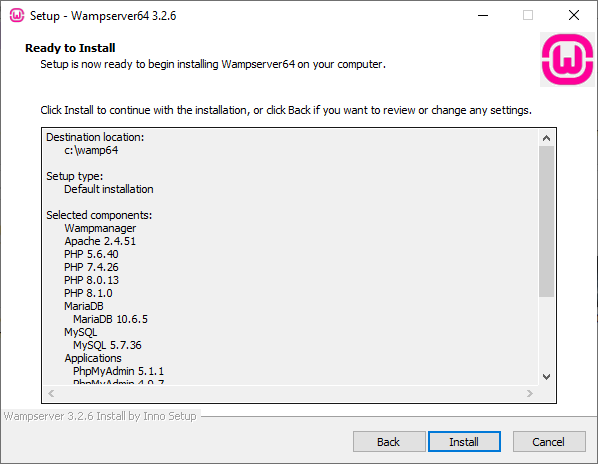
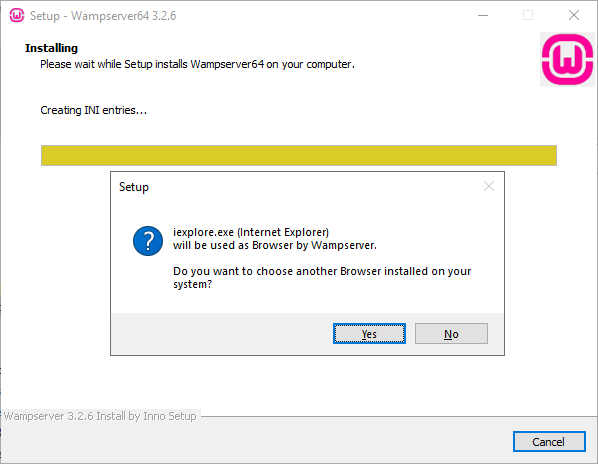
Proceed through the installation wizard until you reach a screen where you can confirm your choices. Then click on Install. This will begin extracting files and sending them to your set destination:
WampServer will ask you to confirm what default web browser you want it to use during installation. The program defaults to Internet Explorer, but you can designate whatever you prefer.
Once the installation process is complete, WampServer will show you a brief instruction screen explaining how to interact with the software. We’ll be showing you how to do that in the next step.
3. Launch phpMyAdmin and Log In
If this is your first time using WampServer, you’ll need to launch the program from the Start menu. After you do this, a new icon will appear in the taskbar.
Make sure the icon is green, which means that everything is functioning correctly. If you see a red or yellow icon, you’ll need to resolve the problem by restarting the program.
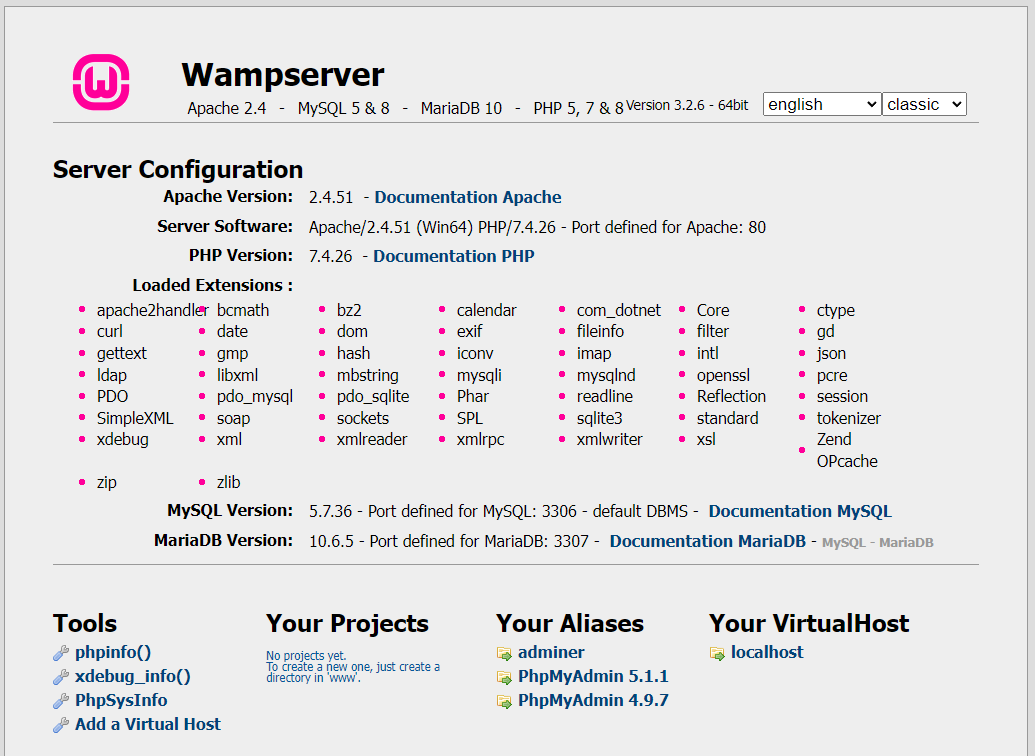
Then click on phpMyAdmin, which we will use to manage the MySQL database. You can also access the phpMyAdmin screen by opening your browser and typing in localhost. That will open the WampServer server configuration page.
On your phpMyAdmin login screen, enter “root” under the username section. Leave the password field blank.
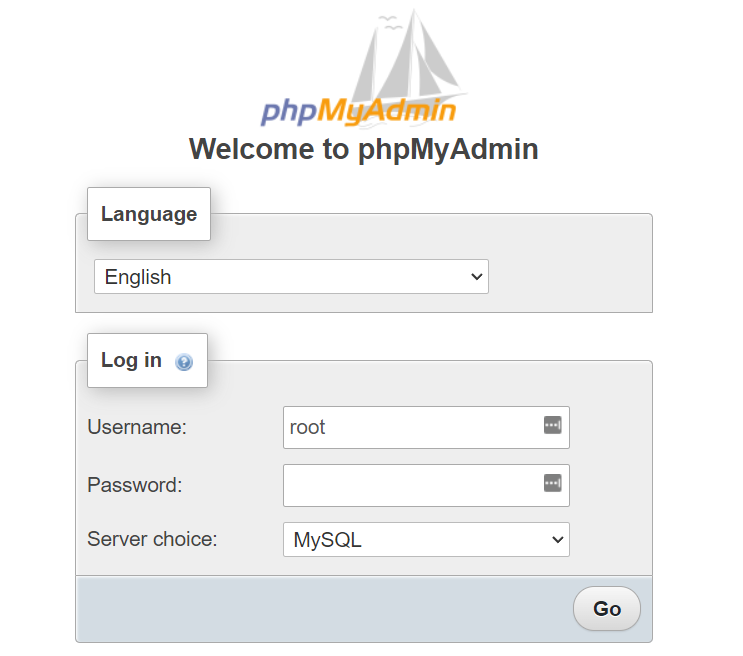
After this, click on Go to access the phpMyAdmin dashboard.
4. Create a Database and Install WordPress
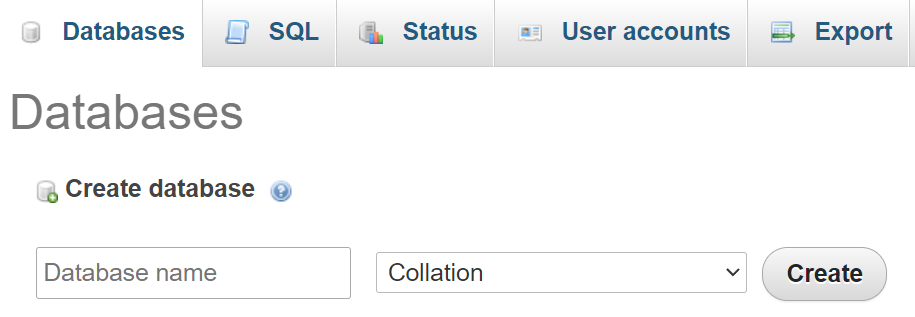
Among the tabs at the top of the page, choose Databases. To create a new database for your WordPress site, enter a name into the textbox and select Collation in the following drop-down menu.
Now you’ll need to download the platform. Go to the WordPress.org website and choose Get WordPress.
Once it downloads as a ZIP file, extract the WordPress folder and copy it. Then, locate the folder where WAMP is installed – in our case, it’s in C:\wamp\www. Paste the WordPress folder there.
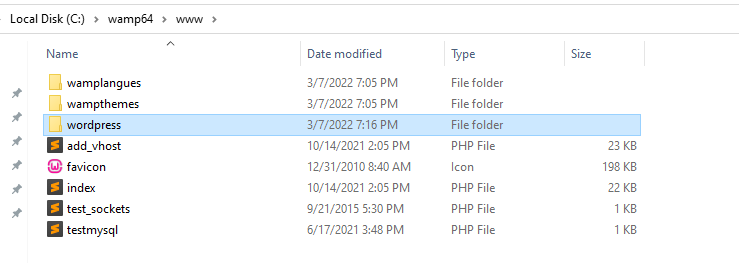
Rename the WordPress folder to anything you want. For example, you might call it “mytestingsite”. Since this will become the URL and title of your local WordPress site, make sure that it is clear and descriptive.
5. Visit Your Testing Site
To finish installing a WampServer WordPress, open your web browser and go to http://localhost/mytestingsite. Replace “mytestingsite” with the name you chose in the previous step.
To start setting up WordPress, you’ll need to choose a language. When filling out the database details, use “root” as your username and leave the password space blank.
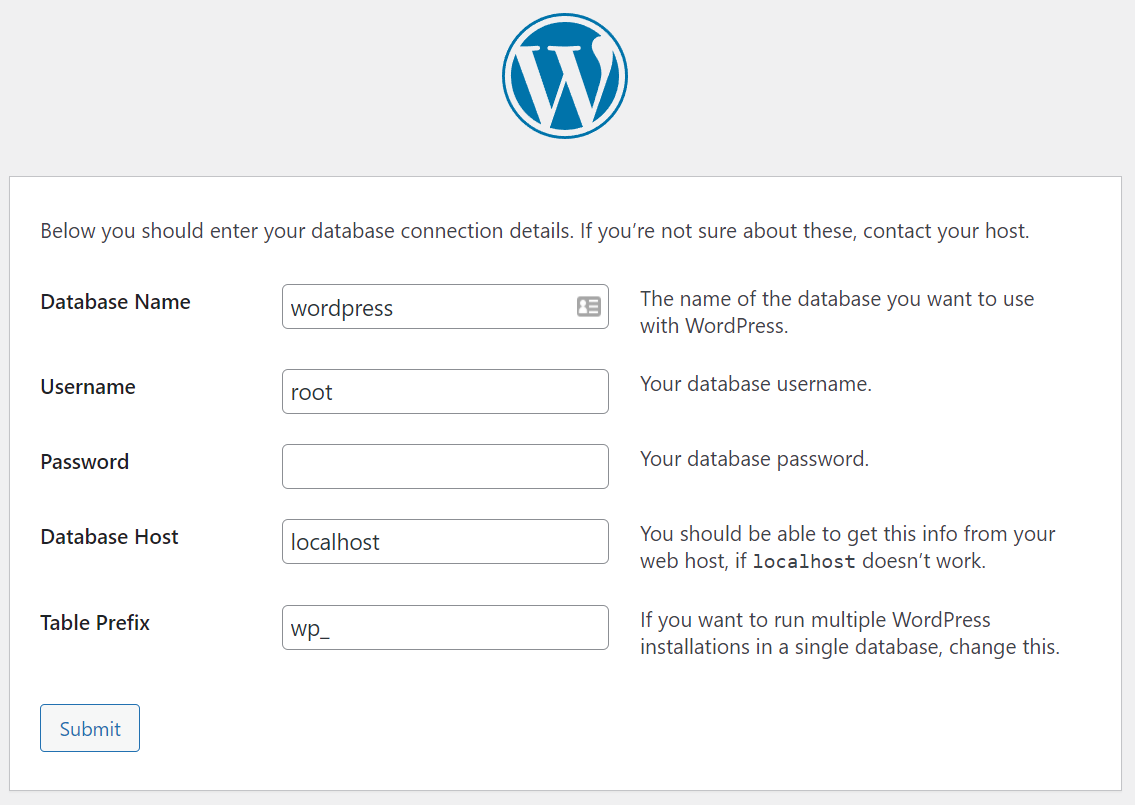
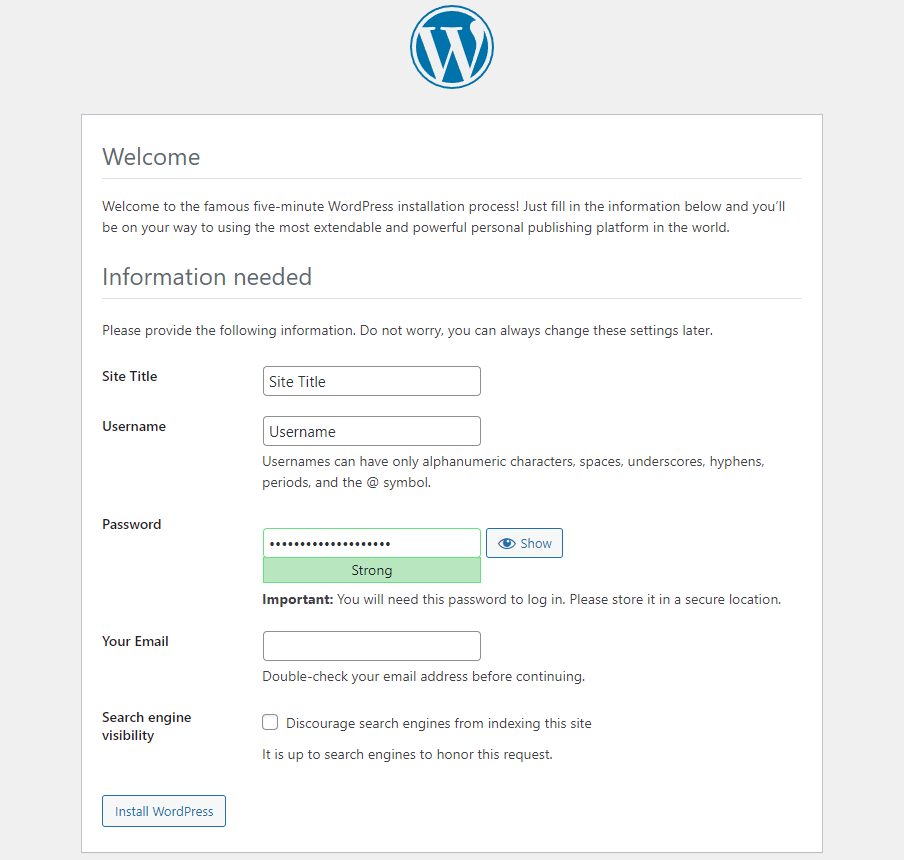
After this, WordPress will connect to your database, and you can continue to run the installation process. Enter the site’s title, username, password, and email address for your WordPress account when you see a welcome screen.
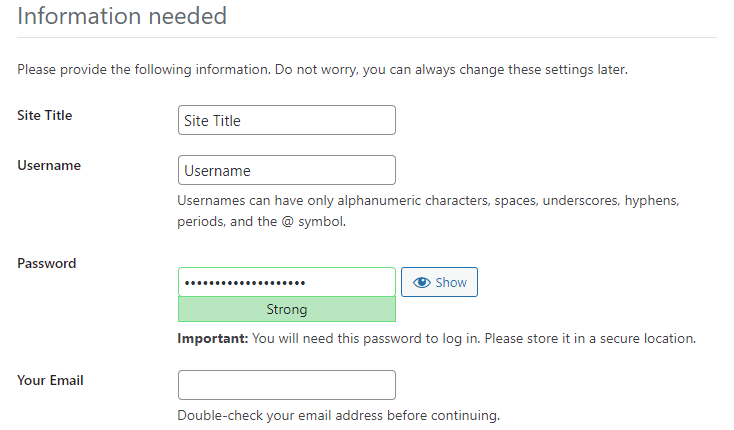
Finally, click Log in to access the WordPress dashboard of your local site. After that, you’re ready to start conducting any testing and/or troubleshooting you like.
If you encounter any functional issues that prevent you from going through these steps, you can read through the WampServer support forums for troubleshooting tips. There, you can find resolutions to many common WAMP server problems.
Expert Tip
While a local test environment gives you control over your WordPress setup, online sandboxes and test sites are gaining traction for quick testing, such as WordPress Playground. Opt for these if you want a fast solution without the technical hassle.

Method 2: Install WordPress Locally on macOS
To install WordPress for Mac locally, you’ll need compatible software. To start installing WordPress locally, we recommend using MAMP. This is one of the best tools to create a local WordPress site on macOS systems.
MAMP is a combined software package. In other words, you’ll have all the tools you need to create a local WordPress environment. It follows a similar setup process to WAMP, except that it has options to support macOS-based software.
Using MAMP PRO, you can even test your WordPress site on a mobile device. With its NAMO application, you can edit your website on different devices, such as your smartphone or tablet.
Another benefit of MAMP is that you won’t have to start a script or change any configuration files. Since MAMP does not modify any existing systems, you can simply delete the app once you’re finished using it.
1. Download and Install MAMP
First, go to the MAMP website and click on Free Download. Windows users will see an option to download MAMP for their operating system. However, Mac-based users should choose one of the macOS versions.
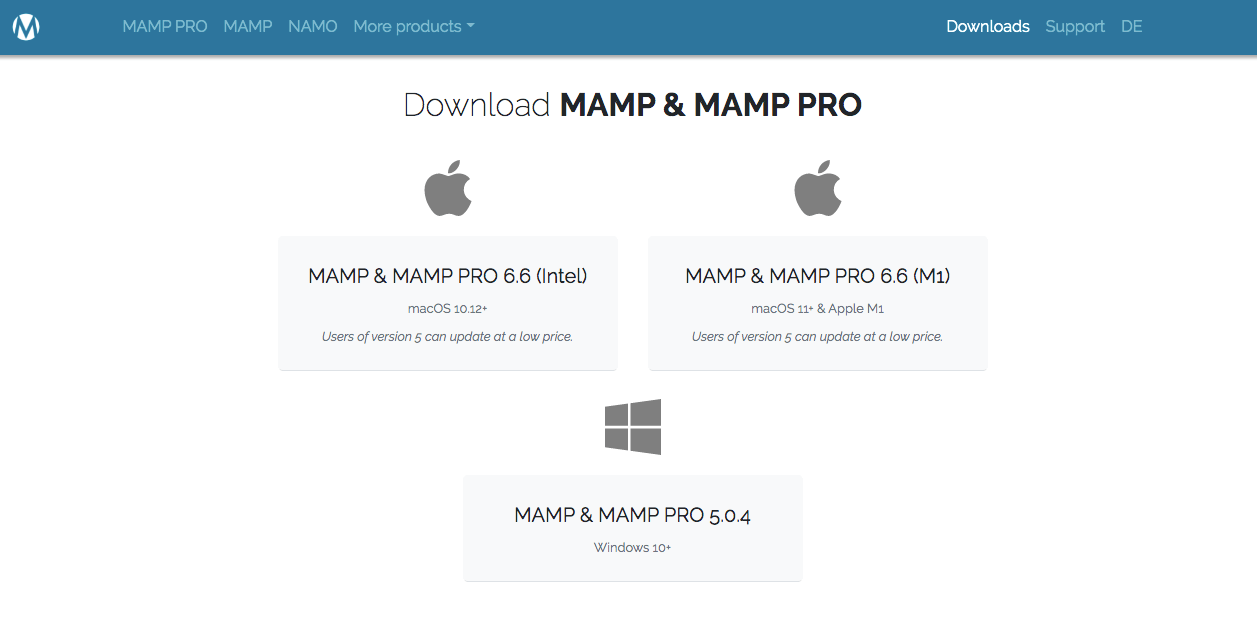
When downloading any of these options, you’ll be able to access both MAMP and MAMP PRO. However, you can delete MAMP PRO to only use the free version.
Then, open the downloaded MAMP file. This will launch the step-by-step installation instructions.
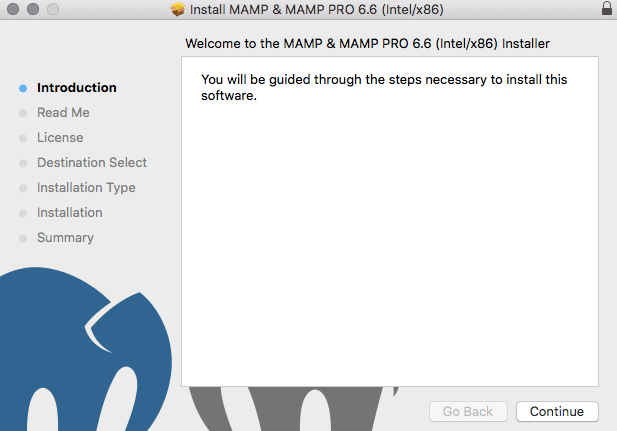
Start by accepting the license agreement and choosing the disk you want to install MAMP on. Before installation, the program will tell you exactly how much storage space the software uses.
After you follow the installation guide, you should receive a success message telling you that the installation was successful.
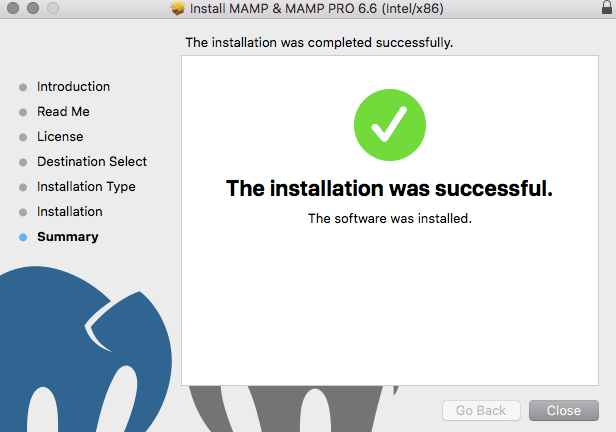
Once you see this, you are free to close the installation wizard.
2. Customize Your Preferences
Now, launch the MAMP app by double-clicking on its icon. Find the Preferences menu in the upper left-hand corner, and select the Ports tab.
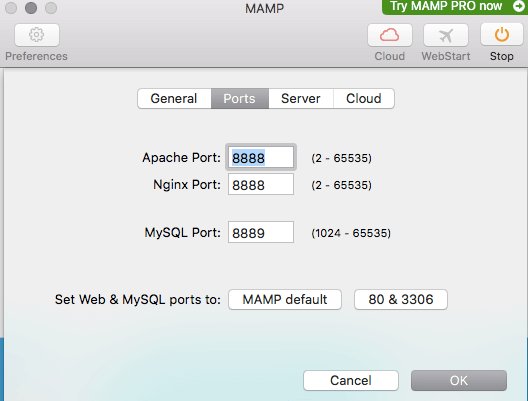
In the Apache Port section, enter “80”. This enables you to access your local site using the URL http://localhost instead of http://localhost:8888. However, keep in mind that using “80” as your Apache port will always prompt you for your password.
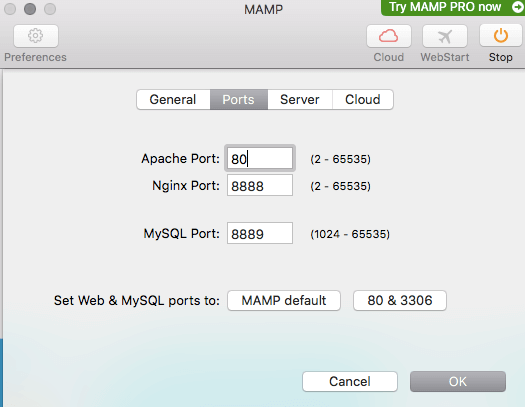
Keep the Nginx Port at “8888” and the MySQL Port at “8889”. After you’ve finished customizing the ports, select OK.
Then, go to the Web Server tab. Choose the folder where you want to store your website (the default location will be Applications/MAMP/htdocs).
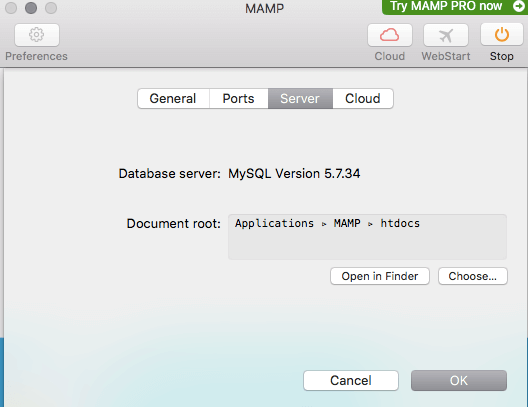
You can choose a new folder and name it anything you want. For example, your document root could be /Users/Username/Sites/wordpress/.
After you make your changes, click on OK.
3. Download WordPress and Move It to the Root Directory
Now it’s time to download WordPress. Navigate to the WordPress.org website and click on Get WordPress. Then extract the ZIP file and copy the WordPress folder.
Go to your Finder and navigate to Applications -> MAMP. Find the root directory folder you named in the previous step, and paste the WordPress folder there.
Rename the WordPress folder anything you like. For example, you could use a memorable name such as “testing-site”.
4. Create a Database
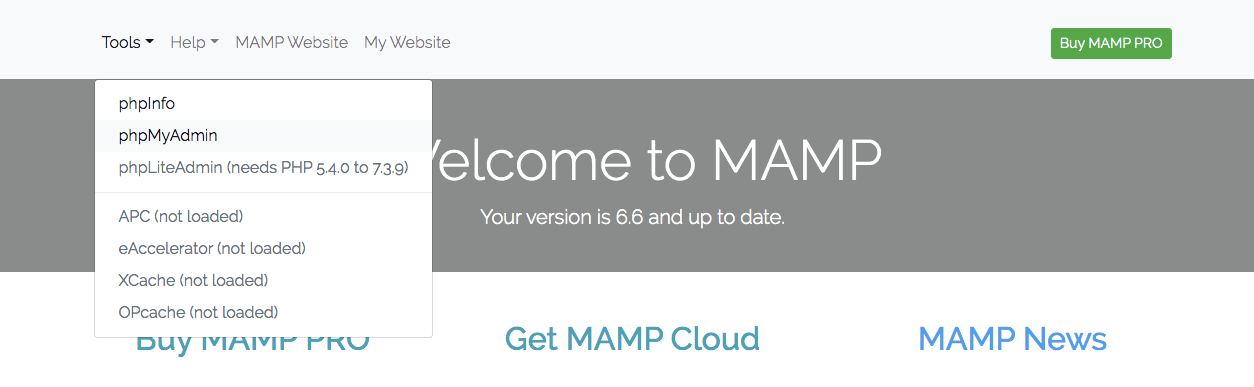
Go back to your MAMP control panel and click on the button labeled WebStart. This will open a browser and take you to the MAMP welcome page. Find the Tools drop-down menu, and click on phpMyAdmin.
On your phpMyAdmin page, navigate to the Databases tab. Under the Create Database section, enter a database name. Be sure to choose utf8_general-ci as shown in the following selection.

After this, click on Create.
5. Go to the Testing Site
Now, let’s install WordPress on localhost. To start, open your web browser and enter http://localhost. If you’ve configured your settings correctly, this will pull up a WordPress welcome page.
Now you’ll need to enter your database information. Start by identifying your database name. Then enter the same username and password we used previously, and add “localhost” to the Database Host.

Next, fill in the username, password, and email address you’ll use for your WordPress site. Give your site a title and click the Install WordPress button.

Finally, click the Log In button to access your testing site!
If you face any problems when completing these setup steps, consider looking through MAMP support forums to find specific advice about troubleshooting and solving common issues.
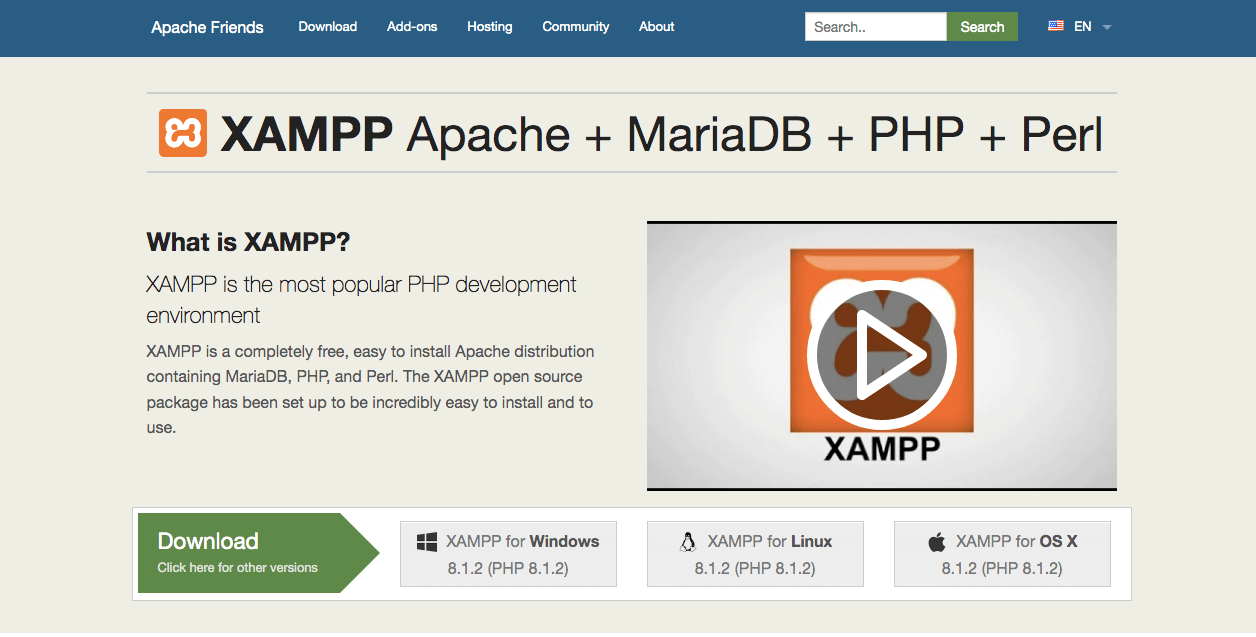
Method 3: Install WordPress Locally with XAMPP
Similar to WAMP and MAMP, XAMPP comprises Apache HTTP Server, MySQL, and PHP software. All of these software packages are free to download and can effectively install WordPress locally.
However, XAMPP is a cross-platform software, meaning that it supports the Windows, macOS, and Linux-based operating systems. Due to its simple interface, beginners will find it easy to learn how to use XAMPP. Additionally, it comes with an additional high-level programming language called Perl.
1. Download XAMPP
To start building a local WordPress site with XAMPP, go to the official Apache Friends website.
Then, navigate to Click here for other versions to see the different download options.
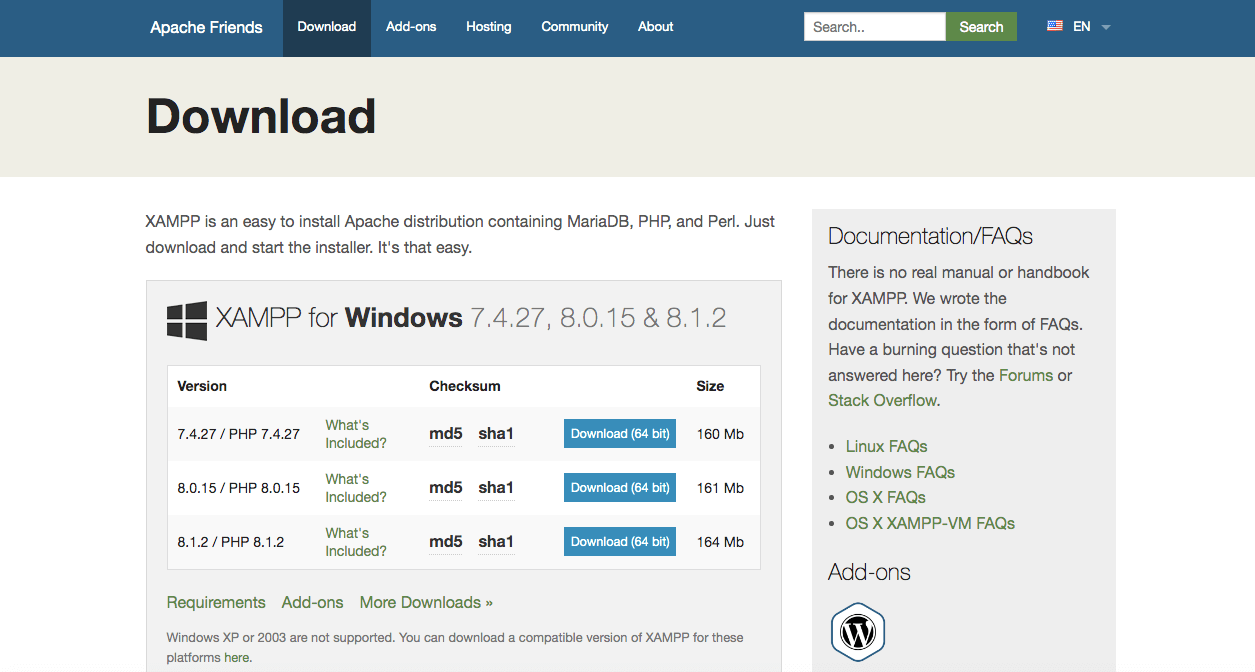
Choose the XAMPP version that aligns with your operating system. For this example, we will use XAMPP for Mac OS X.
Under that section, click on More Downloads. This will take you to SourceForge, where you can get a downloadable file of the latest version of XAMPP.
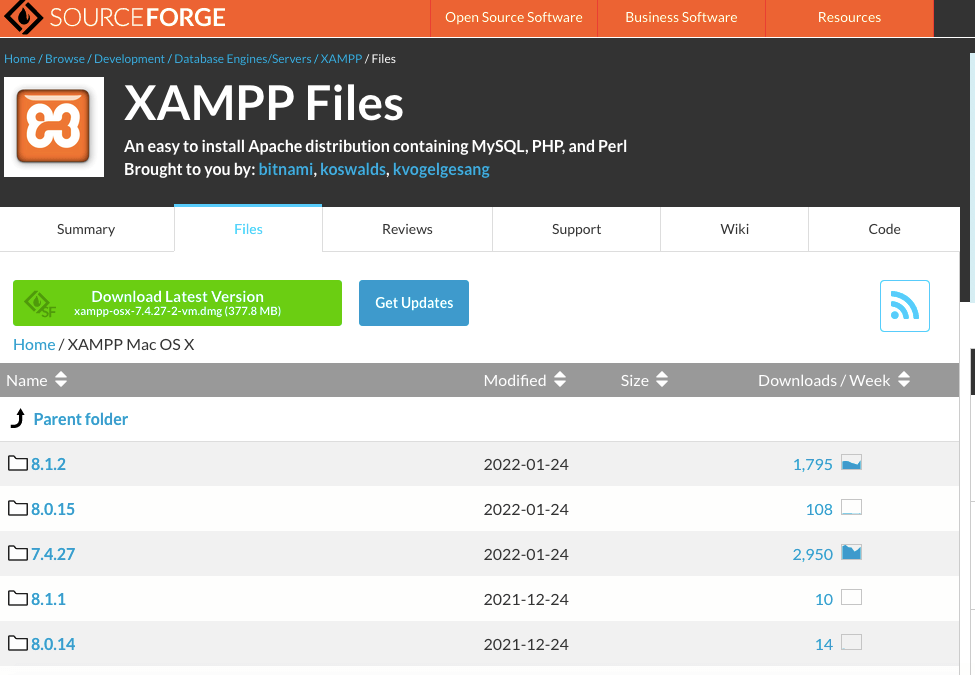
You can click on the newest version and then find the file that ends in either DMG or EXE. macOS users will want the DMG file, while Windows users should download the EXE file.
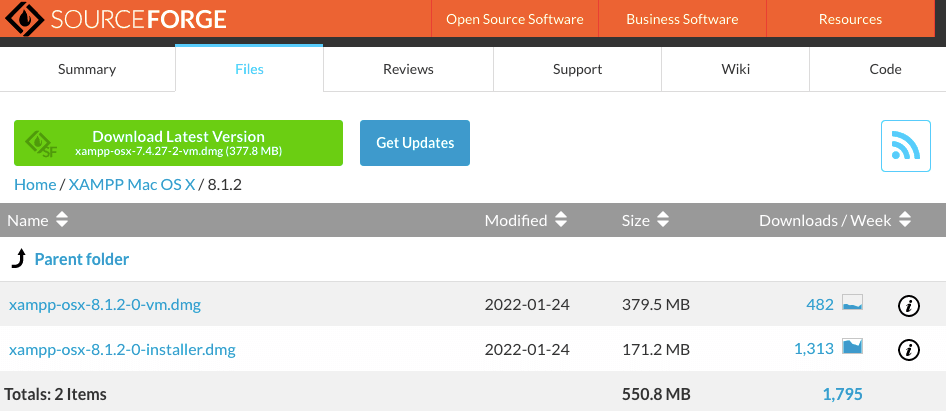
Since we are downloading XAMPP software for macOS, we chose the former.
2. Choose From the List of Components
Once you’ve downloaded the correct XAMPP file, double-click on its icon to open the installer. You’ll be able to go through a step-by-step setup wizard.

First, select the components you want to install.
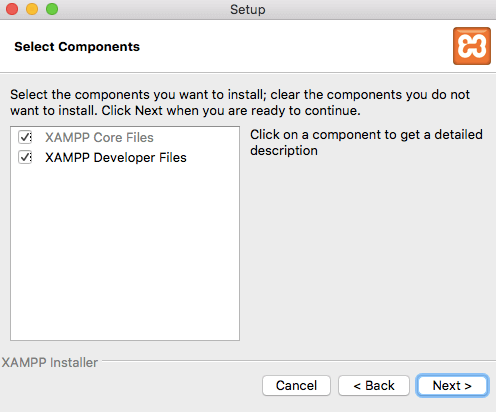
When you click on specific components, you’ll see additional features such as program languages and server types.
To install WordPress locally, you’ll only need to access Apache, MySQL, PHP, and phpMyAdmin. Although you can leave extra components checked, you won’t need them for these steps.
Once you’re finished, click on Next. This will begin an automatic installation of the XAMPP core files.
3. Launch the Control Panel and Test the Server
After XAMPP is finished downloading, you’ll be able to access the control panel. Be sure to click on the Manage Servers tab to view the status of the Apache Web Server, ProFTPD, and MySQL databases. If any of these are red, click on Start All or Restart All.

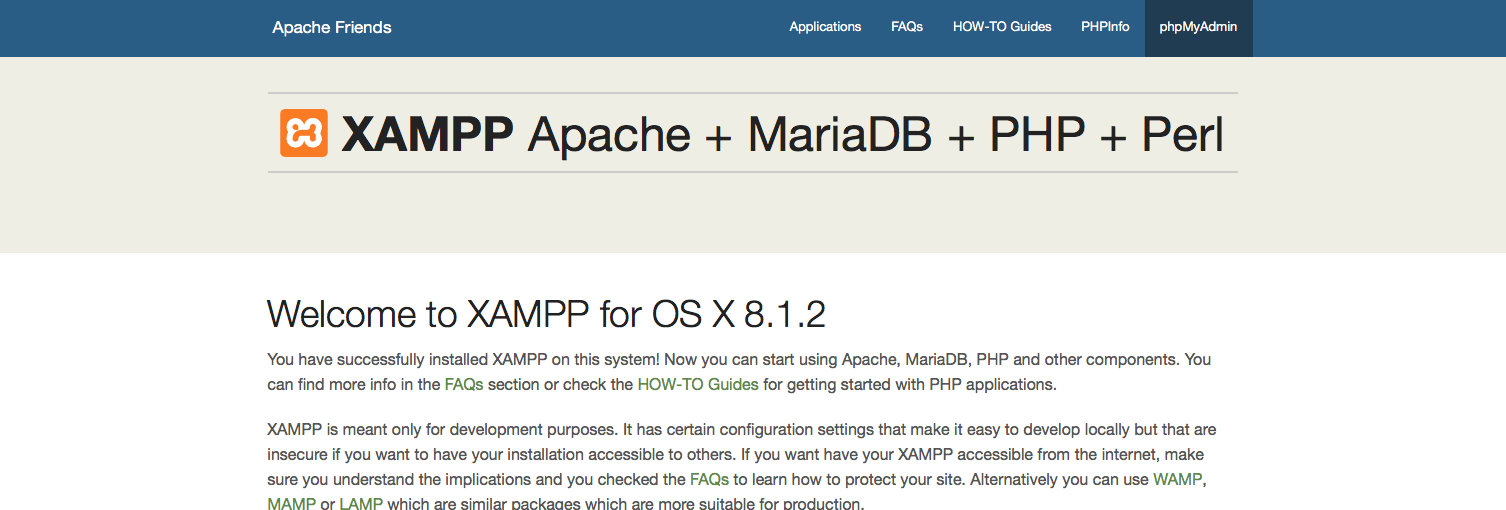
To check and see if your server is running, search your browser for http://localhost. This will open a XAMPP welcome page with applications, PHP information, and your phpMyAdmin.
4. Download WordPress and Add the Folder to XAMPP
Before creating a database, you’ll need to download WordPress. Go to the WordPress.org website and download the latest version. Extract the WordPress folder and copy it.
Then navigate to your XAMPP folder and find the htdocs folder. Paste the WordPress folder there.
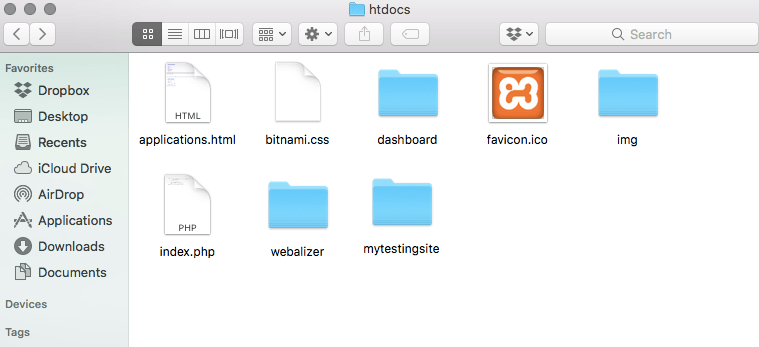
Rename the WordPress folder with a recognizable title, such as “mytestingsite”.
5. Create a Database
Now, go back to your XAMPP information page at http://localhost. In the top-right corner, click on phpMyAdmin.
Select the Databases tab and create a new database. You can use any name you want, but be sure that the second drop-down menu is labeled Collation:

After you click on Create, you’ll be able to access your new testing site.
6. Go to Your Testing Site
Finally, finish installing WordPress on localhost – open a new browser window and search for http://localhost/mytestingsite. It’s important to replace “mytestingsite” with the name you chose earlier.
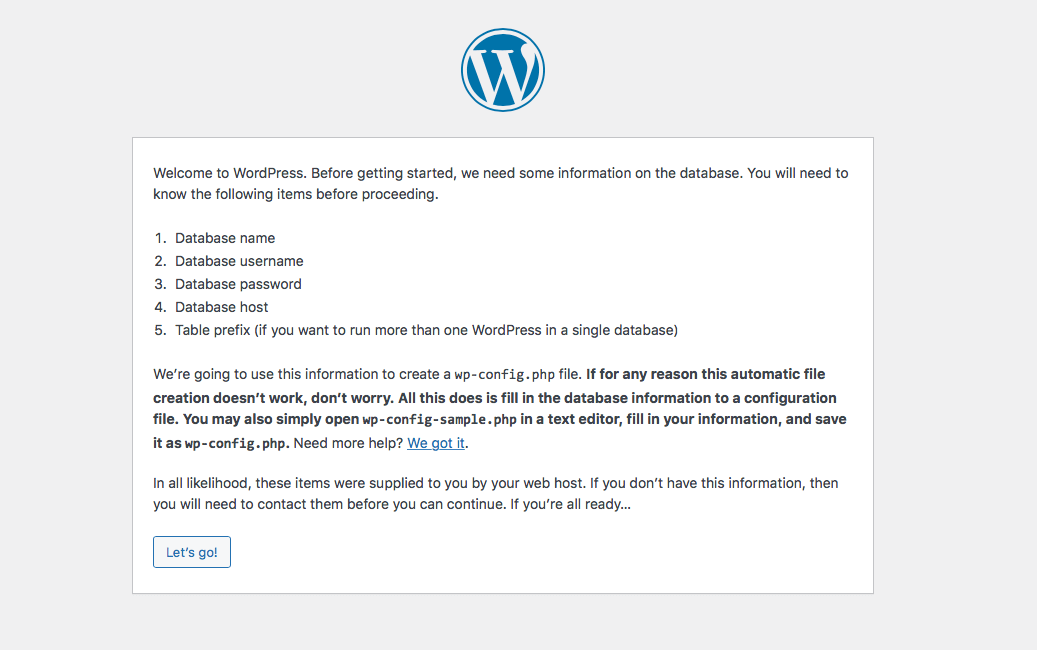
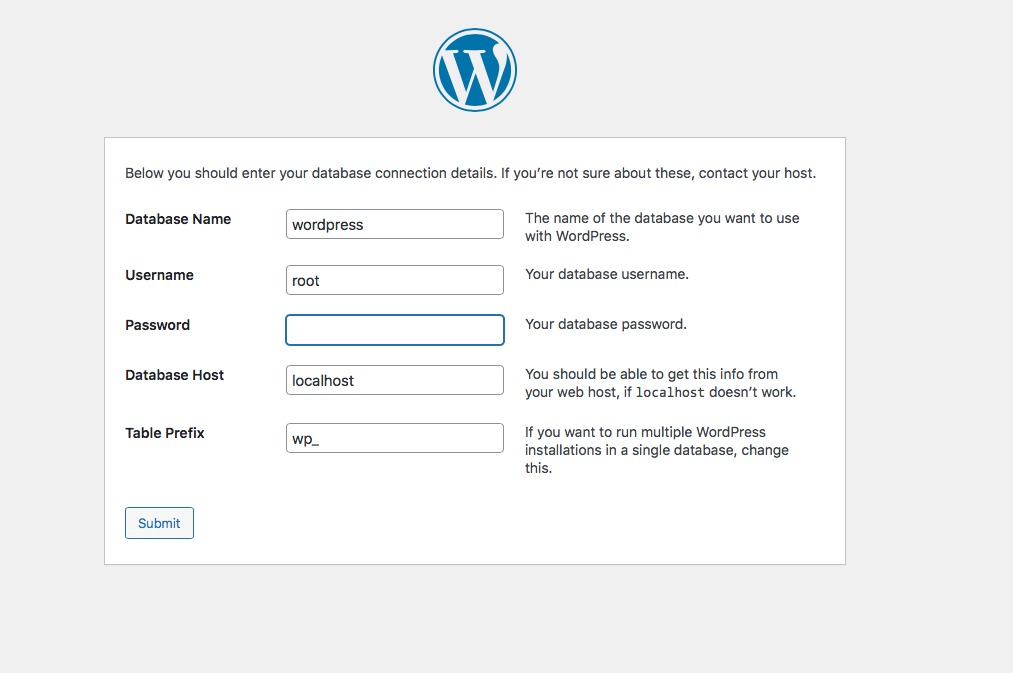
On this page, WordPress will give you a list of the information it needs to create your testing site. This includes a database name, username, password, host, and table prefix.
After you click the Let’s Go! button, you’ll need to enter your database connection details. Simply add the database name you created in phpMyAdmin. Then, enter “root” as the username, and keep the password space blank.
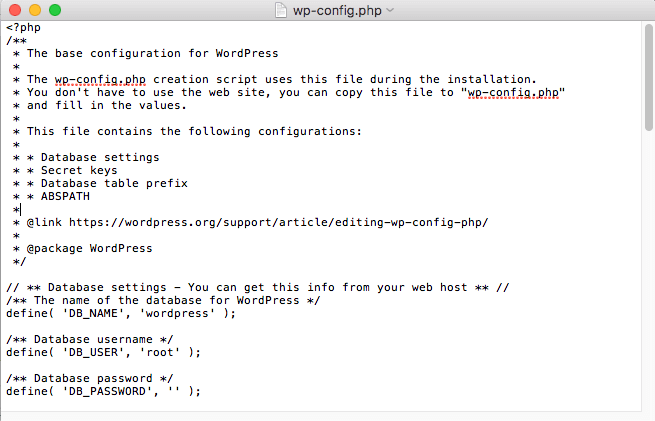
For Windows and Linux users, WordPress will automatically store this information in a wp-config.php file. However, macOS users will be shown manual code you can use to create this file yourself.
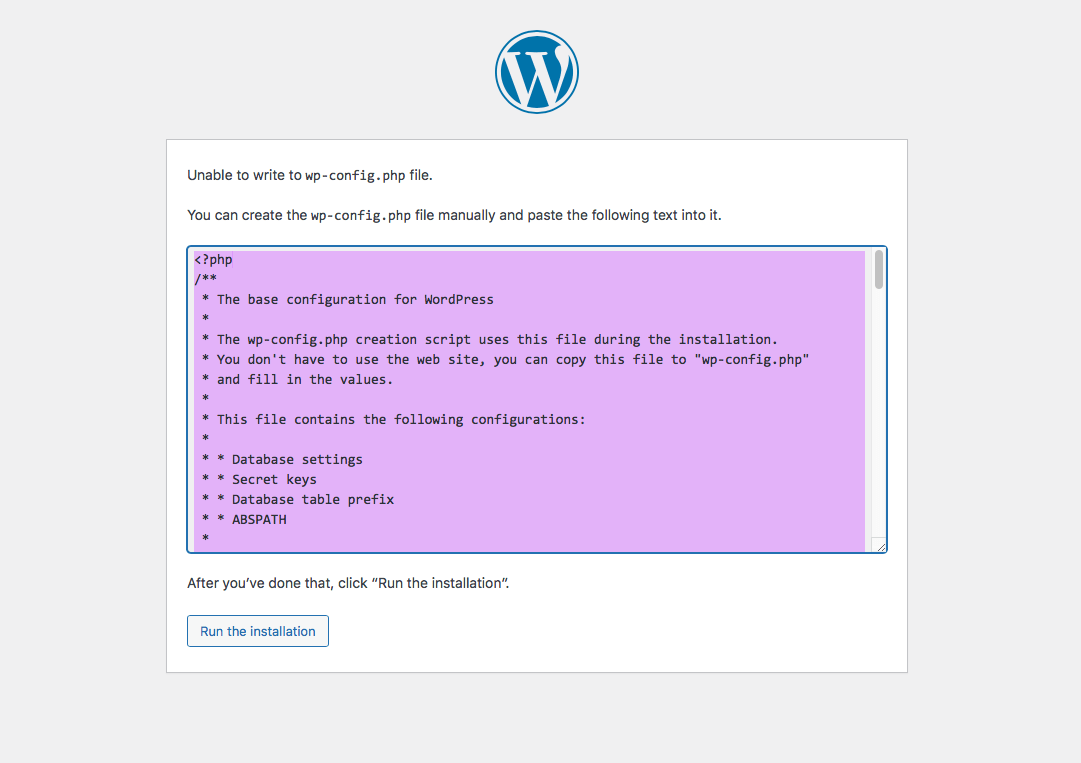
To do this, go to your original WordPress folder and find the wp-config-sample.php file. Then use a text editor such as TextEdit to open it.
Copy the code that WordPress gave you and paste it into the file. Then, rename the file to “wp-config.php”.
Finally, move the file into your root directory. After you’re finished with it, you can continue with your WordPress installation.
On the next page, enter the title for your testing site. Then create a username, password, and email address to log in to WordPress. Finally, select Install WordPress.
To sign in to your local WordPress site, go to /localhost/mytestingsite/wp-admin. Be sure to use the login credentials you just created.
If you encounter any connection issues, you can search the Apache Friends support forum. You can find users who went through similar problems and found solutions for them.
Alternatively, you can create a new topic if a specific error hasn’t been discussed.
Pro Tip
Once you’ve done developing on a local WordPress site, you can migrate it to a live server so that you don’t have to build from scratch again. Follow our guide on how to make a WordPress site live.

Conclusion
No matter what operating system you have, you can learn to install WordPress locally.
WAMP, MAMP, and XAMPP are free, easy-to-use local server environments that make this process simple. You can create a staging site to test software and troubleshoot WordPress performance issues with these tools.
To summarize, here are the best methods for locally installing WordPress.
- WAMP – using this free web development environment, Windows users can get the Apache, MySQL, and PHP software needed to install a local version of a WordPress website.
- MAMP – unlike WAMP, MAMP can support both the macOS and Windows operating systems.
- XAMPP – this cross-platform software has a clean interface and high-level programming language that even beginners can use to create their first staging sites.
Do you have any questions about the steps to install WordPress locally? Ask us in the comments section below!
Install WordPress Locally FAQ
After learning three methods on installing WordPress locally, the following are frequently asked questions.
What to Do if I Want My WordPress Website to Go Online?
First, it’s important that you have the right hosting provider. Once you’ve chosen the appropriate web host then comes the actual installation of WordPress itself. Most hosts offer tools such as auto-installer or one-click installation for WordPress, which makes setting it up incredibly easy.
What Are the Requirements to Install WordPress Offline?
The primary requirement is to have a web server installed depending on the operating system of your computer, such as Apache, MAMP, and LAMP. You will also need to create a database to store data from WordPress, such as MySQL.
What Is the Best Way to Install WordPress?
As there are multiple ways to install WordPress, the best option depends on your technical skill. We recommend using an auto-installer to install WordPress for beginners. However, web developers often find installing locally offers more flexibility.

Will Morris is a staff writer at WordCandy. When he's not writing about WordPress, he likes to gig his stand-up comedy routine on the local circuit.

Comments
October 11 2023
Hi guys, I'am trying to install WordPress locally with XAMPP on macOS and I don't get to the page where I can create a username, password etc. to log in to WordPress and select Install WordPress. I was able to create the wp-config.php file copying the code that WordPress gave me. The file is in the root directory (where WP sub-directories like wp-admin & Co. are) but after I click on "Run the installation" it jumps back to that page where WordPress gives me that list of information (database name, username, password etc.) with the "Let's go" button, so I'm in an endless loop. Can you please advise? Thank you in advance for your help. Kind regards, Evelin
November 02 2023
Hi there! One possible reason for this issue is that the database credentials in the wp-config.php file are incorrect or not properly configured. To fix this, please make sure that the database credentials in the wp-config.php file are correct. Double-check the database name, username, password, and host values to ensure they match the settings in your XAMPP environment. I hope this helps! ?
January 13 2024
The part of the tutorial that reads "Paste the WordPress folder into this root directory." should probably be updated to say "Paste the WordPress folder into the www folder under this root directory." or " Paste the WordPress folder into the folder pictured be;low" The picture shows the correct folder, but the text threw me off
January 30 2024
Hi Elliott! Thanks for your feedback. We've taken note of your suggestion and made the necessary changes to the tutorial ?
July 09 2024
Hi, I followed the steps of method 2 for Mamp for Mac and on step 5, when I enter localhost on the web server, it doesn't appear the Wordpress. Instead, it pops up a white page showing: Index of , testing site. When clicking on it, asks if I allow to download o testing site. I clicked and it downloaded an empty sheet. I don't know what I have done wrong, because I followed all the steps, but it is not working. Could you please let me know how to fix it? Thank you.
July 17 2024
Hi there! It sounds like there are a couple of things you can check to resolve this issue. First, ensure there's a .htaccess file in your WordPress root directory. Next, verify that your WordPress files have the correct permissions. Lastly, check your database permissions to ensure your database user has the necessary access rights for WordPress ;)