There Has Been a Critical Error on This Website: 7 Quick Fixes
Encountering the “There has been a critical error on your website” message can be concerning for WordPress site owners. It may restrict access for users and even prevent entry into the admin panel.
Fortunately, resolving this problem can be relatively quick. This article explains what the error message indicates and presents five methods to fix it.
Download all in one WordPress cheat sheet
What Does “There Has Been a Critical Error on Your Website” Mean?
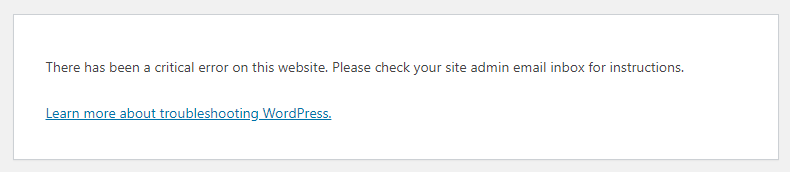
Some WordPress errors may block you from accessing the dashboard, displaying the message, “There has been a critical error on this website. Please check your site admin email inbox for instructions.”
This message means that there’s a fatal PHP error on the site. It occurs when a PHP script stops running and is unable to complete its process.
To help its users, WordPress has a feature that detects when a plugin or a theme causes a fatal error and sends a notification to the admin email address. In the email, users receive more details about what is causing the issue.

The email also contains a URL to access the site in recovery mode. Click the link to safely log in to the WordPress dashboard and fix the issue.
If you encounter this WordPress error and don’t see any email notification in your inbox, check your spam folder. However, there may be cases when site owners don’t receive the email and have to locate the issue by themselves.
7 Ways to Fix a Critical Error in WordPress
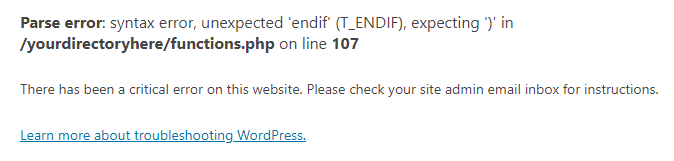
To fix a critical WordPress error, you have first to locate the cause of the problem. The notification email from WordPress provides more details about which file and line of code caused the issue, but don’t worry if you didn’t receive it.
There are seven methods to locate and resolve the critical error in your WordPress site.
1. Check Error Logs
The first method is by checking the error_log file, which stores PHP error information. Use the File Manager of a File Transfer Protocol (FTP) client on your hosting account and go to home/[username]/.logs/error_log_[domain].
The file records four types of PHP errors – warning, notice, parse, and fatal. At the beginning of each log, you’ll see the type of error that was found. If you find a parse or fatal error, you’ll have to fix it.
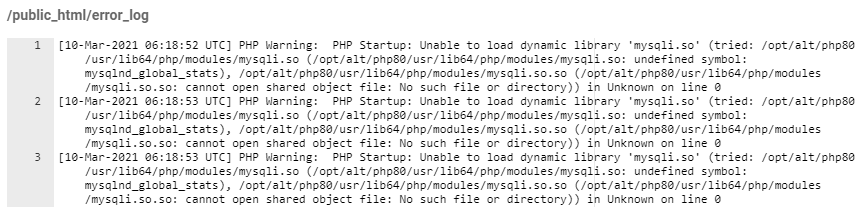
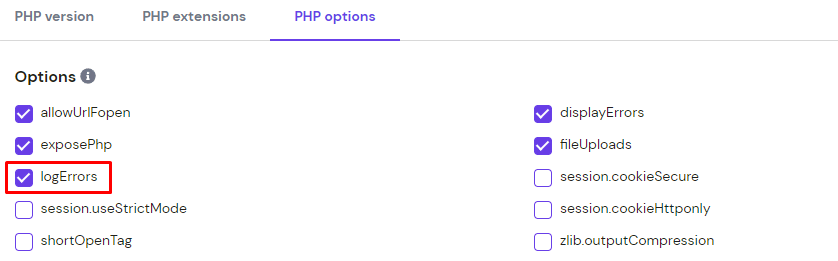
If you can’t locate the error_log file, ask your hosting provider for help. Keep in mind that the error_log file will only be available if you enable PHP error logging. To do so, configure the PHP settings from your hPanel.
If you still can’t check the error log file, try the following method using the debug mode.

2. Debug WordPress
WordPress comes with a built-in debugging system that identifies code errors in the core software, themes, and plugins.
To activate the WordPress debug mode, open the wp-config.php file in your public_html directory. Then, find the following lines:
define( 'WP_DEBUG', false );
define( 'WP_DEBUG_DISPLAY', false );
define( 'WP_DEBUG_LOG', false );
define( 'SCRIPT_DEBUG', false );
The “false” values mean that WordPress debug mode is deactivated. Replace “false” with “true” on all lines to activate it.
These four lines contain PHP constants. When they’re activated, they perform the following tasks:
- WP_DEBUG – triggers the debug mode in WordPress.
- WP_DEBUG_DISPLAY – shows debug messages on the pages’ HTML.
- WP_DEBUG_LOG – stores error details in the debug.log file.
- SCRIPT_DEBUG – runs the “dev” versions of core CSS and JavaScript files instead of the minified versions.
If you can’t find those lines in the wp-config.php file, simply add them to the script. Remember to input the “true” value on each line.
After enabling the debug mode, refresh your site. You should see the details above the error message.
Fix the issue according to the instructions, and your site should work normally again. Deactivate the debug mode by changing the values to “false” once you’ve resolved the problem.
3. Solve Any Theme or Plugin Conflicts
The following method will help find conflicts in your theme and plugins.
Start by checking your theme. If you have access to the WordPress admin area, simply switch the active theme to a default one such as Twenty Twenty.
However, if you can’t access the admin panel, use the File Manager or an FTP client like FileZilla and go to public_html → wp-content → themes. Find your active theme’s folder and rename it into youractivetheme-disabled.
Once you’ve done that, reload the site. If it loads as expected, then there’s a conflicting theme present, and you may have to roll back to the theme’s previous version or get an entirely new theme instead.
On the other hand, if the error persists, you should check if there’s an issue with your plugins.
The process is similar to checking your theme. If you have access to the WordPress admin panel, disable all plugins.
If you can’t access the admin panel, use the File Manager or an FTP client and go to public_html → wp-content → plugins. Rename all plugin directories into yourplugin-disabled except the Elementor plugin folder if you have it installed.
If you’re using hPanel, there’s an easier way to do this. Go to the WordPress → Security section and simply disable all plugins.
Refresh your site. If it loads normally, that indicates a conflicting plugin.
To find out exactly which plugin caused the error, you have to reactivate them one by one, reloading the web page every time.
If you’ve renamed your plugins’ folders, go to public_html → wp-content → plugins. Revert all plugin folders into their original directory names one by one.
Pro Tip
Conflicting plugins of themes often cause errors like this. Deactivate and remove unused themes and plugins to improve your site’s security, performance, and reliability.
4. Restore the Site From a Backup
Using this method, you need to restore the website files from a backup. An error like this is one reason why backing up your WordPress site is essential.
Using hPanel
To restore the backup files using hPanel, go to Files → Backups and select Files backups.
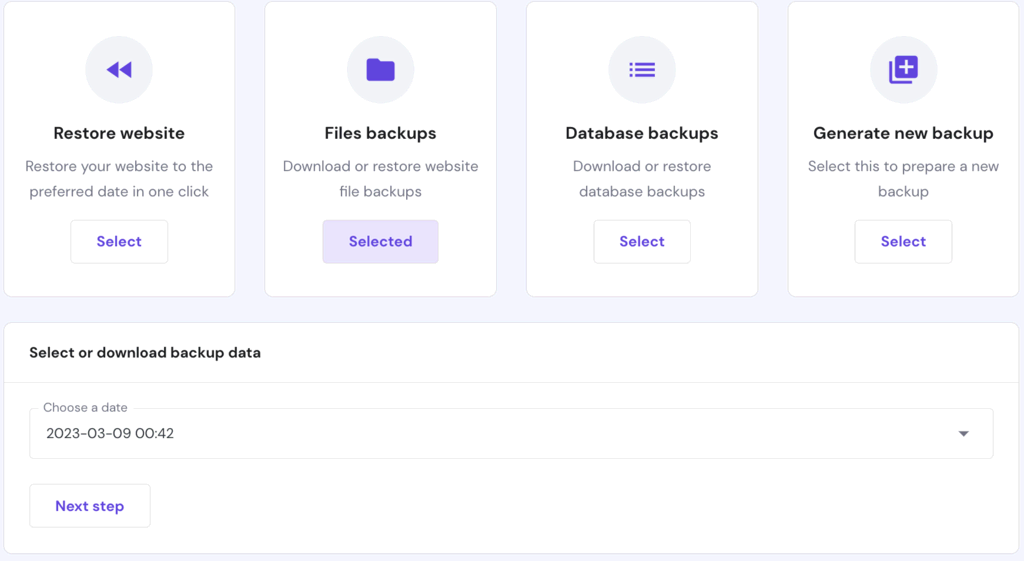
Choose the backup version you want and click Show Files. A new section will appear at the bottom, showing the backup files directory. If you want to restore the whole site, select the public_html folder and click Restore Files.

The next step is to restore the database. Go to the Database backups section and select the backup data to restore. Once you’ve selected the correct backup data, click Restore.

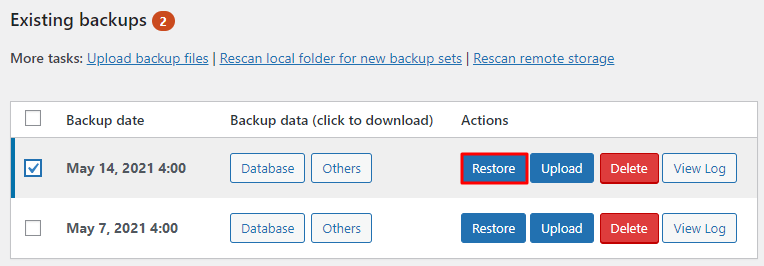
Using WordPress plugins
If you have a backup plugin like UpdraftPlus and want to use it instead, go to your WordPress admin using the recovery mode URL you received in the email about the error.
Go to the backup plugin’s panel and find the restore function. Different plugins may have different interface layouts, but in general, you only need to choose a backup file and restore the website.
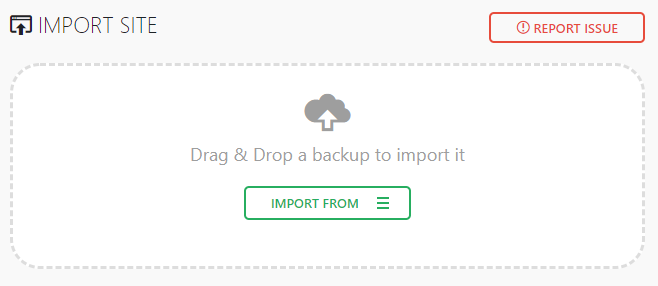
Another option is using a migration plugin such as All-in-One WP Migration. It allows importing .wpress backup files from local storage easily. Go to All-in-One WP Migration -> Import, and select the .wpress file you wish to upload.
5. Upgrade PHP Version
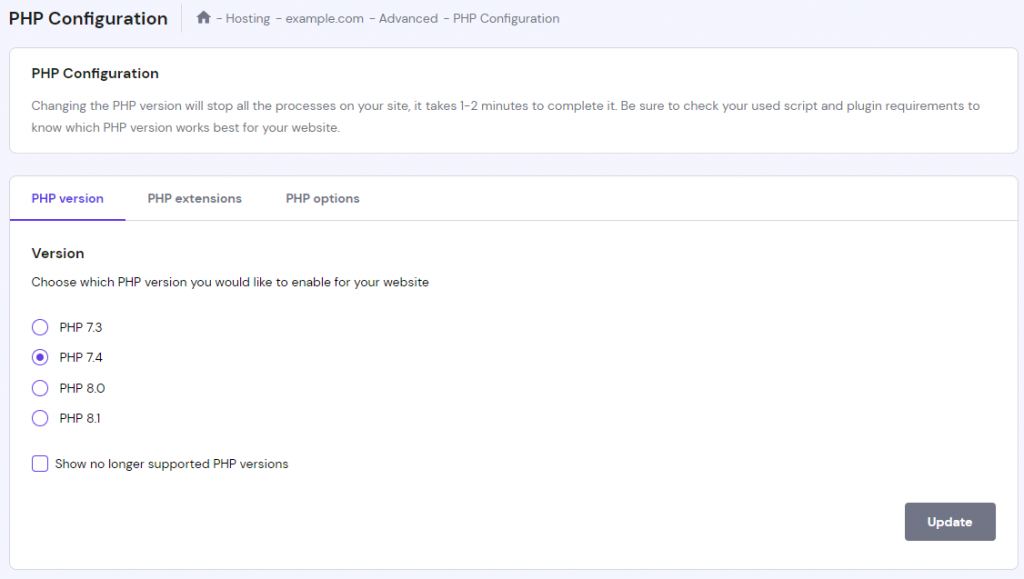
WordPress requires PHP 7.4 or greater. Check the PHP version on your web host, and if you find you’re using an older version of PHP, upgrading it to 7.4 or greater can fix the “There has been a critical error on your website” error.
Using hPanel, go to the Advanced → PHP Configuration section. You should see the active PHP version on the PHP Version tab. If it runs on PHP 7.3 or lower, select PHP 7.4 or PHP 8.0 and click Save.
6. Reupload WordPress Core Files
If there are conflicts on the WordPress core files, reuploading them should fix the critical WordPress error. The easiest way to do it is to select the Re-install version x.x.x button on the Updates page of your admin dashboard.
You can reupload the core files using an FTP client if you no longer have access to your WordPress admin dashboard. Download the core files from the official WordPress website and upload them to your site while also excluding wp-content folder.
Alternatively, download the core files using WP-CLI by following these steps:
- Log in to your website using your hosting account’s SSH access.
- Run the following command to access your website directory. Replace domain.tld with your actual domain directory.
cd domains/domain.tld/public_html/
- Download WordPress core files using the following command.
wp core download --skip-content --force
7. Increase PHP Memory Limit
By default, WordPress sets the PHP memory limit to 128 MB. Increasing the WordPress memory limit value should resolve the critical WordPress error if it’s due to insufficient memory.
Hostinger users can set the new memory limit via the hPanel. Navigate to PHP Configuration → PHP Options, then click on the dropdown menu of the memoryLimit field.
Another way to try this method is to modify the wp-config.php file using an FTP client or the File Manager in your hosting control panel. Here’s how to do it:
- Locate your wp-config.php file in the public_html directory.
- Open the file and add the following line above /* That’s all, stop editing! Happy blogging. */.
define('WP_MEMORY_LIMIT','1536M');
- Save the changes and refresh your website.
If you’re already at the maximum limit, the last solution will be to upgrade your hosting plan.
Conclusion
There’s no need to panic if you encounter the “There has been a critical error on your website” message.
Simply check your email address and find an email from WordPress to locate the issue and quickly fix it.
Even if you don’t receive the email, there are five ways available to resolve the problem:
- Check the site’s error logs
- Use the WordPress debug mode
- Solve potential theme or plugin conflicts
- Restore the site using backup files
- Upgrade the site’s PHP version
We also recommend creating backups regularly. Therefore, you’ll be able to restore your site quickly if you get a WordPress error message such as this.
Learn How to Solve WordPress Errors when Making Changes
How to Fix “Sorry, This File Type Is Not Permitted for Security Reasons” Error
How to Fix WordPress HTTP Error when Uploading Images
How to Fix “Failed to Write to Disk” in WordPress
How to Fix “Missing a Temporary Folder” Error
How to Fix “Is Its Parent Directory Writable by the Server?” Error on WordPress
How to Fix Being Locked Out of WordPress
How to Fix the Login Redirect Loop

Leo is a Content Specialist and WordPress contributor. Armed with his experience as a WordPress Release Co-Lead and Documentation Team Representative, he loves sharing his knowledge to help people build successful websites. Follow him on LinkedIn.

Comments
August 01 2023
So I have the same window error message but log_error isn't being generated, I'm not getting and email of the error and debug flag doesn't show anything either. Already tried restrablishing older version and changed theme to the default ones still have issues. What else can I do?
August 04 2023
Hello, I would highly suggest enabling display errors option and visiting your website via incognito (so it's shown without cache). Then you will see the exact error. Alternatively, you can try restoring website to an even older backup, also don't forget to restore the database too.