401 Error: 7 Effective Ways to Troubleshoot and Resolve It
The 401 error is one of the most common error codes – it indicates that the request to the website or web application was unable to be authenticated. Fortunately, in most cases, it’s easily solved.
In this tutorial, you will learn what the 401 error is, the different variations of the error page, and what causes it. We will also cover the most common troubleshooting methods.
| Error code | HTTP 401 Unauthorized Error |
| Error type | Often a client-side error, but can also be due to server-side configurations |
| Error variations | HTTP Error 401 Unauthorized 401 Unauthorized Error Error 401 Unauthorized Access Denied 401 Authorization Required |
| Error causes | Incorrect login credentials (username/password) Session expiration requiring reauthentication Misconfigured server authentication settings Access Control List (ACL) restrictions Outdated or corrupted browser cache and cookies IP address blocking due to security settings or restrictions |
Download comprehensive HTTP status codes cheat sheet
What Is the 401 Error Code?
The 401 error is an HTTP status code indicating the request sent to the website’s server lacks valid authentication credentials. This means that the server understands the request but refuses to authorize it.
What Causes the 401 Error
A 401 error page typically occurs for a few reasons:
- Incorrect authentication credentials. Entering the wrong username or password when trying to access a web page or resource that requires valid authentication credentials is one of the most common reasons for this error.
- Incorrect URL. Ensure you are trying to access the correct URL.
- Session timeout. Your session might have expired, especially if you’ve been logged in on a page for a long time. Log back in to solve the error.
- Misconfigured permissions. The settings on the server might be incorrectly set up, denying access to users who should have it.
- Faulty authentication methods. The error can also arise if the server or the resource you’re trying to access expects a different authentication method or protocol than what’s being provided.
401 Error Variations
When encountering a 401 response, instead of reaching the intended web page, your browser will display an error message. These messages serve as indicators of the specific type of 401 error you’re experiencing.
Commonly seen messages include:
- HTTP Error 401
- 401 Authorization Required
- 401 Unauthorized Error
- Access Denied
- Unauthorized
Each variation of the 401 error provides insights into why the authentication process failed, aiding in diagnosing and resolving access issues.
Below is a detailed list of various 401 error codes, along with their specific meanings:
- 401.1. The login attempt has failed, usually due to incorrect authentication credentials being provided.
- 401.2. The login attempt has been obstructed by server configuration issues, preventing successful authentication.
- 401.3. Access is denied due to the access control list (ACL) settings, which restrict resource access based on user permissions.
- 401.501. Too many requests have been generated by the client, or the client has reached the maximum request limit.
- 401.502. This error occurs when a particular client (same IP) sends multiple requests to a single server, reaching the dynamic IP Restriction Concurrent request rate limit.
- 401.503. The client’s IP address is included in the server’s deny list.
- 401.504. The client’s hostname is included in the server’s deny list.
How to Fix the 401 Unauthorized Error
In this section, we will go over the most common methods to solve 401 error messages.
Important! Before you proceed with any of the methods, check whether the website is down for everyone or just you. This will help determine whether the issue is local or server-side.
1. Confirm the URL Is Correct
A wrong URL is a common culprit behind 401 HTTP status codes. Ensure the address is typed correctly in your browser’s address bar, especially if it includes special characters or numbers.
Typos in hyperlinks from other sites can also lead to this error. If unsure, navigate from the website’s homepage or use a search engine to find the correct web pages.
2. Clear Your Browser’s Cookies and Cache
A corrupted or outdated browser cache and cookies may lead to a server authentication failure. It’s also possible that the current cache and cookies are outdated and in need of manual refreshing.
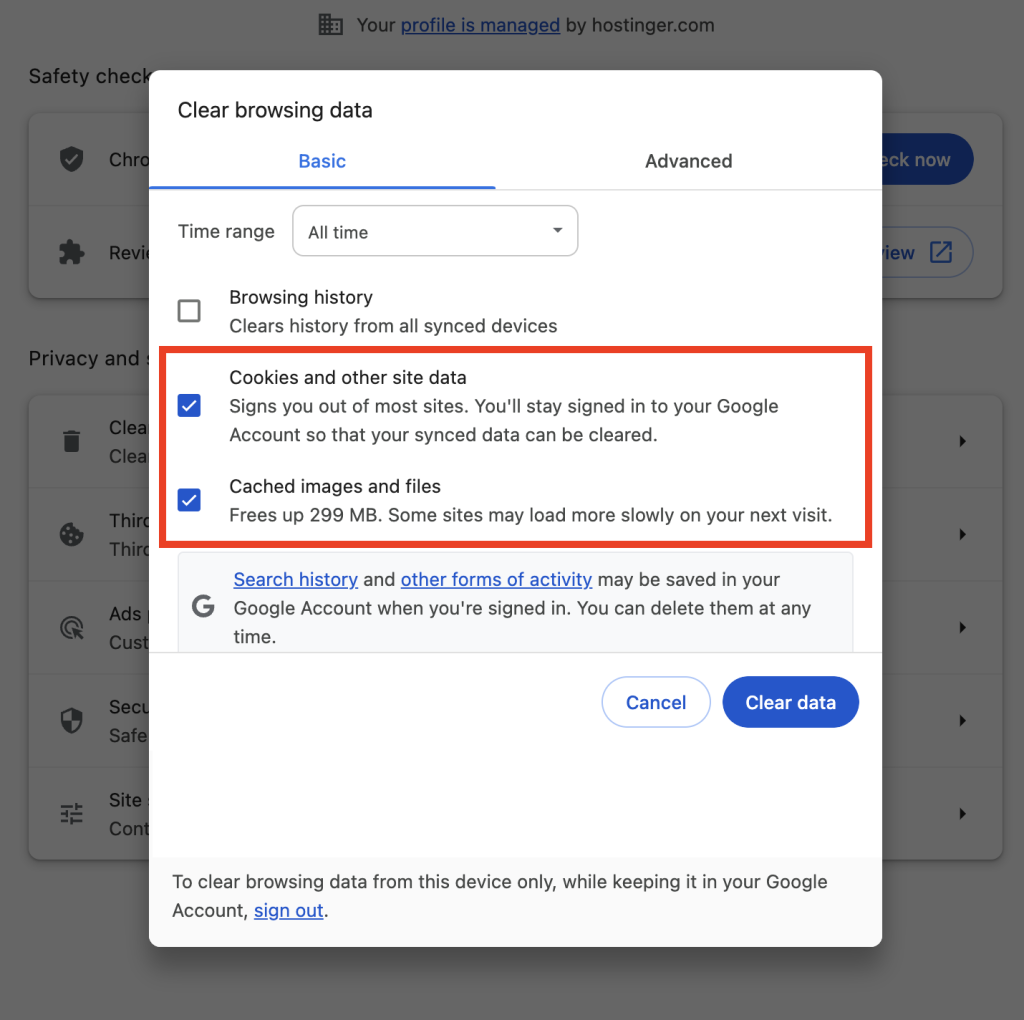
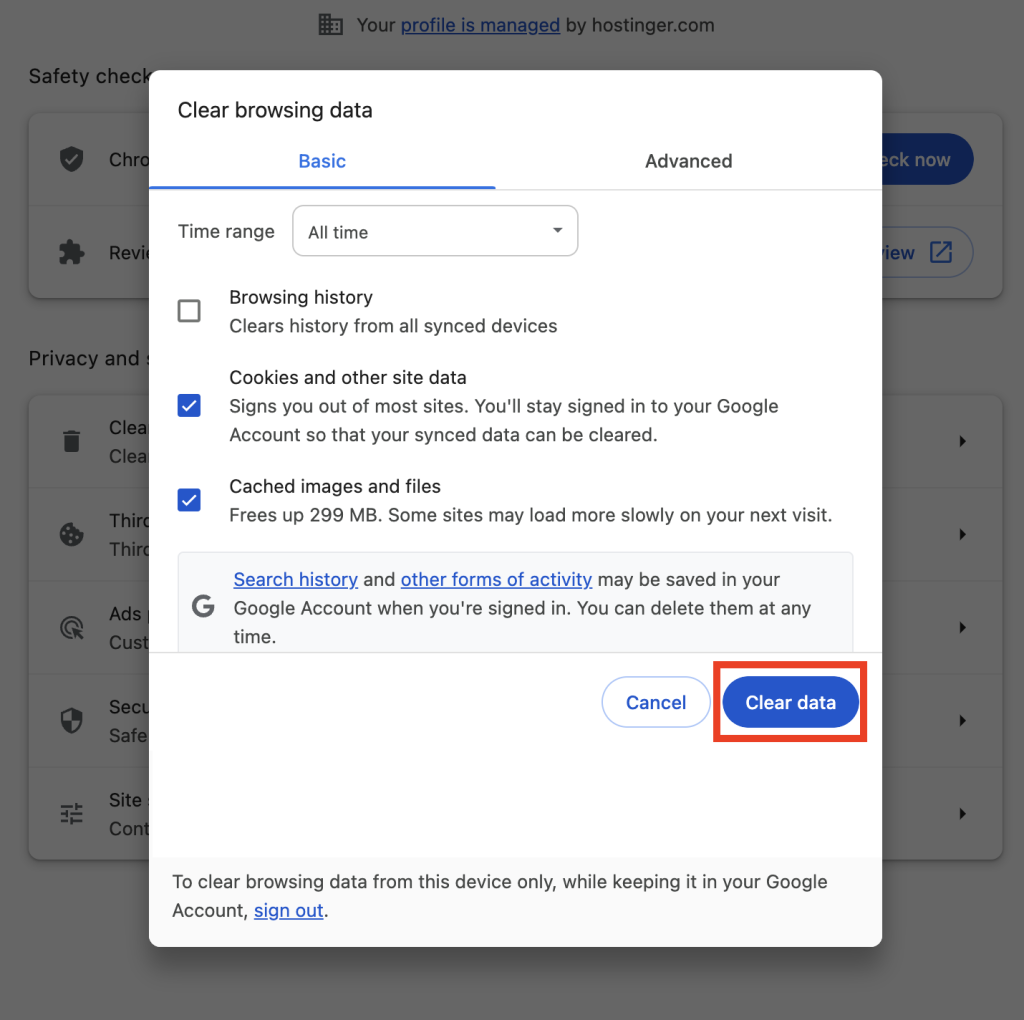
To clear the cache data and browser cookies, go to your browser’s settings and find the option to clear them. If you use Google Chrome, follow these steps:
- Click the three-dotted menu icon on the top-right corner.
- Select Clear Browsing Data.
- In the Time range drop-down menu, select All time.
- Check Cookies and other site data and Cached images and files.
- Select Clear data.
For a detailed guide on how to do this on other browsers, check out our tutorial on how to clear browser cache.
3. Flush DNS Cache
The data in the domain name system (DNS) cache lets your device match URLs to their IP addresses faster for shorter loading times. However, unlike the browser’s cache and cookies, the DNS cache operates on the system level.
Although rare, a DNS error may result in the 401 HTTP status code. The cache may be outdated and contain incorrect URL and IP address details.
Flushing your DNS will clear the existing DNS records of your device, forcing it to make a completely new request and re-authenticate the URLs.
Follow our guide on how to flush the DNS cache if you’re not sure how to do it.
4. Check Authentication Credentials
The 401 page may appear when you’re trying to gain access to restricted resources, such as a password-protected page, with invalid authentication credentials. As a consequence, you won’t be able to open the page.
Double-check whether you’re logged in with a valid user ID and password. If you’re sure that you have entered valid authentication credentials, try changing the password.
If you’re having trouble accessing a password-protected WordPress site, make sure you know how to change your WordPress admin password.
5. Disable Password Protection
If you’re a website owner trying to solve the 401 error, it’s worth temporarily disabling password protection for the problematic section of your website.
If you have enabled password protection using .htaccess and .htpasswd files, follow these steps to disable it:
- Go to your web hosting account’s File Manager.
- Open the password-protected website directory.
Find the .htaccess file that you created when you first enabled password protection. Its content should look similar to this:
AuthType Basic
AuthName "Your authorization required message."
AuthUserFile /path/to/.htpasswd
require valid-user
- Back up the content of the .htaccess file in case you want to re-enable password protection in the future.
- Delete the .htaccess file from the directory.
- Find the secret location of the .htpasswd file, back it up, and delete it as well.
hPanel has a user-friendly feature that lets Hostinger users manage password-protected website directories.
For more information, follow this guide to learn how to locate and create a WordPress .htaccess file.
6. Check the WWW-Authenticate Header
According to the IETF, a server generating a 401 (Unauthorized) response has to send a WWW-Authenticate header field containing at least one challenge applicable to the target resource.
This response header determines the authentication method the web browser should follow to access a specific page. Knowing what response the header sends and which authentication method is used will help determine the problem.
To check a WWW-Authenticate header for the cause of the 401 error, follow these steps:
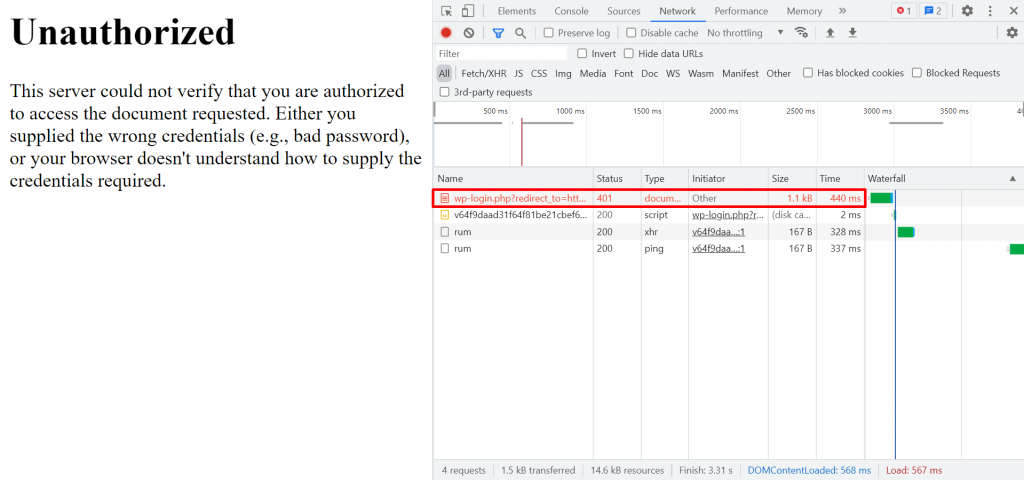
- Access the page that generates the 401 error code. If you’re using Chrome, right-click it and select Inspect or press Ctrl+Shift+J to open the developer console.
- Open the Network tab, then reload the page. Click on the entry with the 401 error status.
- Open the Headers tab. Find the WWW-Authenticate entry under the Response Headers section. It will show the authentication method the server enforces to provide access to the content.
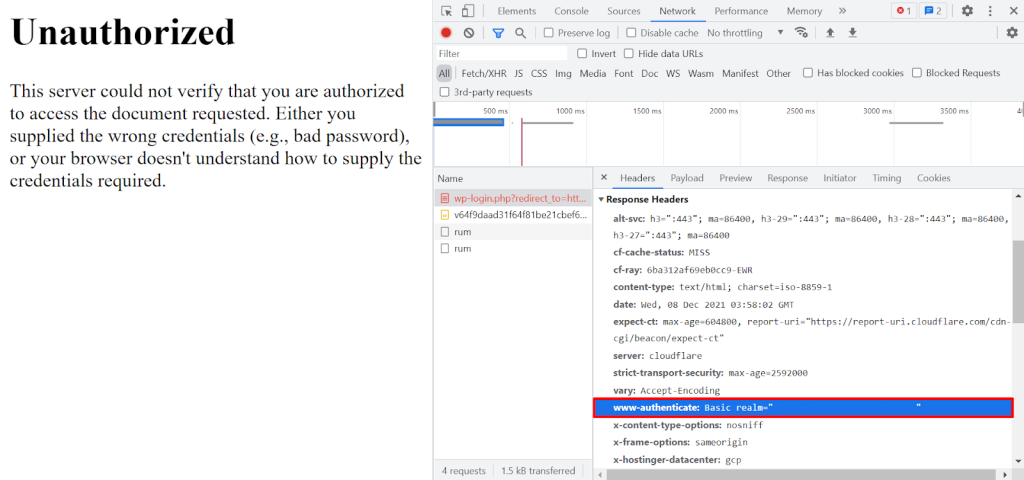
- Refer to the HTTP Authentication Scheme Registry to find out the page’s authentication method. In this case, the page uses the basic authentication method, which means that it only requires standard login credentials.
7. Disable Plugins, Modules, and Themes
If you encounter the 401 error as the website’s administrator, you can identify its cause by disabling the plugins, modules, and themes you have installed on your website.
For example, if you have a WordPress site and can access its admin dashboard, consider changing your theme to the default one and disabling all your plugins.
To change back to the default theme, go to Appearance → Themes and Activate the default theme.
To disable all WordPress plugins at the same time, go to Plugins → Installed Plugins. Bulk-select all the plugins, choose Deactivate from the drop-down menu, and click Apply.
The process to change your design template and disable the modules should be similar to any other CMS dashboard.
If you don’t have access to your WordPress admin dashboard, you can disable your WordPress plugins by opening the File Manager on your hosting account and renaming the Plugins folder. Hostinger users can manage their plugins straight from hPanel.
Similarly, you can change your WordPress theme without opening the admin dashboard by making changes to files through File Manager and phpMyAdmin.
Conclusion
The HTTP error 401 occurs when the browser’s request to the server lacks valid authentication credentials. While it’s most commonly caused by a client-side issue that is easy to fix, it can also stem from a server error.
In this guide, we’ve gone over the most common methods to solve the 401 error:
- Confirm the URL is correct. Double-check the URL in case it’s misspelled or outdated.
- Clear cache. Clear the browser’s cache and cookies for a possible solution. If that fails, try flushing your DNS cache.
- Check authentication credentials. Make sure you’ve entered a valid username and password. If the issue persists, try resetting the password.
- Disable password protection. If you experience this issue as the website administrator, try temporarily disabling the problematic section’s password protection by deleting the .htaccess and .htpasswd files.
- Troubleshoot the code. Check the WWW-Authenticate header and try disabling problematic plugins, modules, or themes.
We hope that the information in this article has helped you fix the 401 error. If you have any questions or tips, feel free to leave us a comment in the section below.
401 Error Message FAQ
Find answers to the most frequently asked questions about the 401 error message below.
Why Do I Get a 401 HTTP Error?
A 401 error occurs when you try to access a page that requires valid authentication credentials, but your current ones aren’t recognized or are missing. To resolve this, contact the page administrator to obtain the correct access details.
How Does a 401 Error Affect My Ability to Access a Website?
A 401 error temporarily blocks access to a specific page or resource until you provide valid login credentials. It doesn’t affect your ability to access other parts of the website that don’t require authentication.
What Is the Difference Between a 401 Error and a 403 Error?
While a 401 error means unauthorized access due to invalid or missing credentials, a 403 error indicates you’re forbidden from accessing the page, even with valid credentials, often due to permissions set by the website administrator.


