Localhost Refused to Connect: 5 Solutions to Fix the Error
Among the different network connection errors you might encounter is localhost refused to connect or the ERR_Connection_Refused error.
When you try to connect to an IP address, you usually try to connect to a different computer. However, since localhost uses the loopback address network, connecting to it means you’re establishing a connection with your own computer.
That’s why many users, like developers and network administrators, use localhost to test programs or sites that are still in development, as it reduces the risk of breaking a live site.
Thus, when you can’t access localhost, you won’t be able to access your project in a local environment.
There are various causes of this error, as shown in the table below:
| Error code | Localhost Refused to Connect |
| Error type | Browser/Firewall |
| Error variations | ERR_CONNECTION_REFUSED 127.0.0.1 refused to connect This site can’t be reached localhost refused to connect. |
| Error causes | Server blocked by firewall Server running on a wrong port Apache server not running properly Browser settings need to be reconfigured |
Also, note that you have to be on your local machine to access your localhost – you can’t access it on any other devices.
This article will explain what the localhost refused to connect error is and five methods to solve it.

What Is the Localhost Refused to Connect Error?
It is a common error that can happens when working on local machines. The localhost simulates a web server running on your computer. When the “localhost refused to connect” error appears, it is likely due to misconfigured port. Other common reasons include insufficient permissions and the Apache webserver not running properly.
How to Fix Localhost Refused to Connect – Video Tutorial
Learn how to fix the localhost refused to connect error with four simple methods in our video tutorial.

Also, keep in mind that when trying to access localhost, you may encounter two potential errors – ERR_CONNECTION_REFUSED and ERR_CONNECTION_TIMEOUT. Both are closely related but require different solutions.
ERR_CONNECTION_REFUSED localhost error indicates that the server rejected the attempted connection, while ERR_CONNECTION_TIMEOUT indicates that nothing happened and the client is still waiting for a response.
Therefore, to solve ERR_CONNECTION_REFUSED localhost issue, you need to check the firewall since it’s what rejects the data packets. You’ll also need to look at the Listen directive in the httpd.conf file and make sure it’s correctly set.
Meanwhile, to solve ERR_CONNECTION_TIMEOUT on Chrome, you’ll need to look at your connection settings because this error means the service is not running as it should or is not correctly installed.

5 Methods to Solve the Localhost Refused to Connect Error
Here are five methods to solve the localhost refused to connect error, in no particular order.
1. Temporarily Disable Your Firewall
A firewall is a security system that monitors and filters your traffic, blocking potential threats. While it’s an important tool, the detection protocols may run inaccurately sometimes.
A firewall might incorrectly block safe web pages or incoming connections. Therefore, if you’re currently developing a website and you need to access its locally-hosted version, it’s best to temporarily disable the firewall while you’re working on the site. That way, your test site won’t be blocked.
Keep in mind that once the website goes live and you no longer see the ERR_CONNECTION_REFUSED localhost problem message, re-enable your firewall immediately.
Here are the steps to disable the firewall on Mac, Windows, and Linux, respectively.
How to Disable the Firewall on Mac
- Navigate to System Preferences.
- Select Security and Privacy.
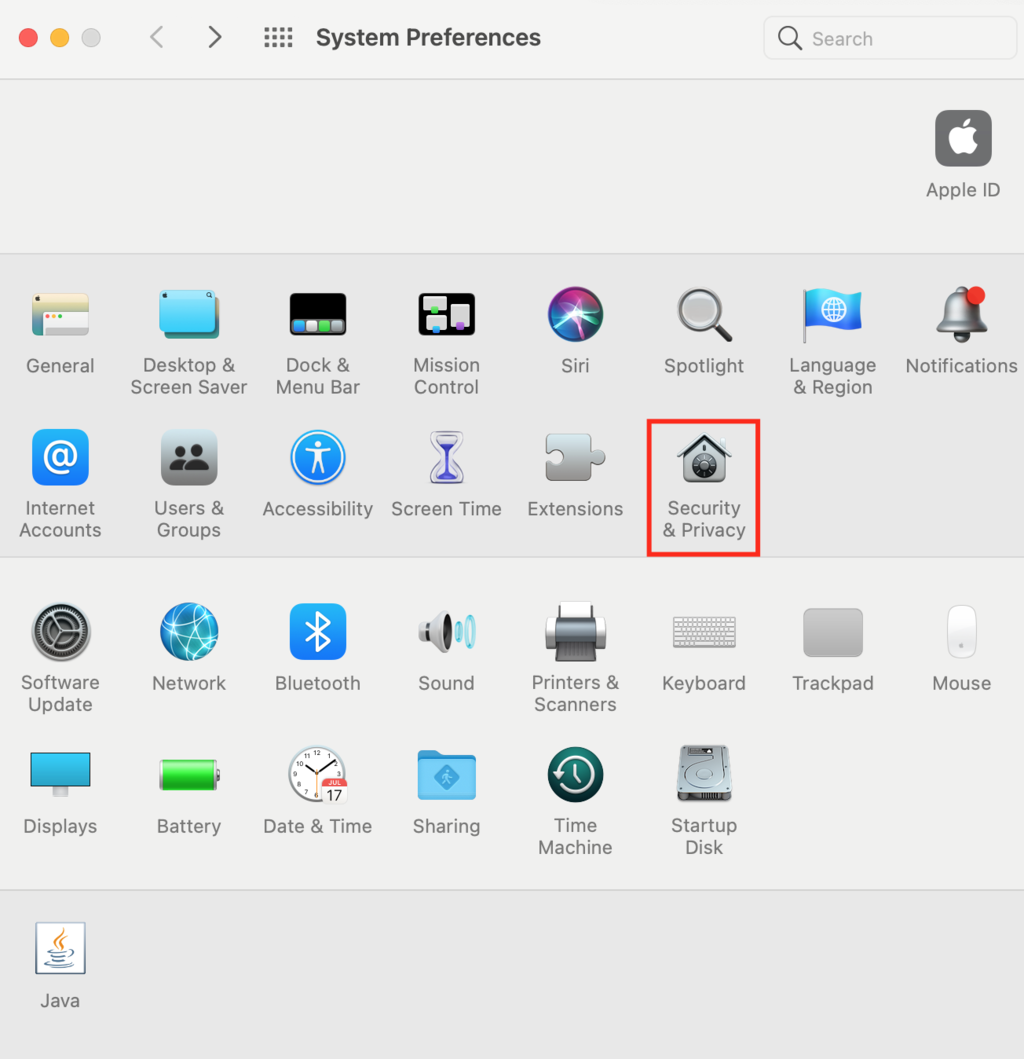
- Select the Firewall tab to see the complete firewall settings.
- Click the lock icon, then enter your username and password.
- You’ll see a message informing you that, if you turn off the firewall, you’ll accept all incoming connections, including those that potentially carry unauthorized resources. Click the Turn off Firewall button.
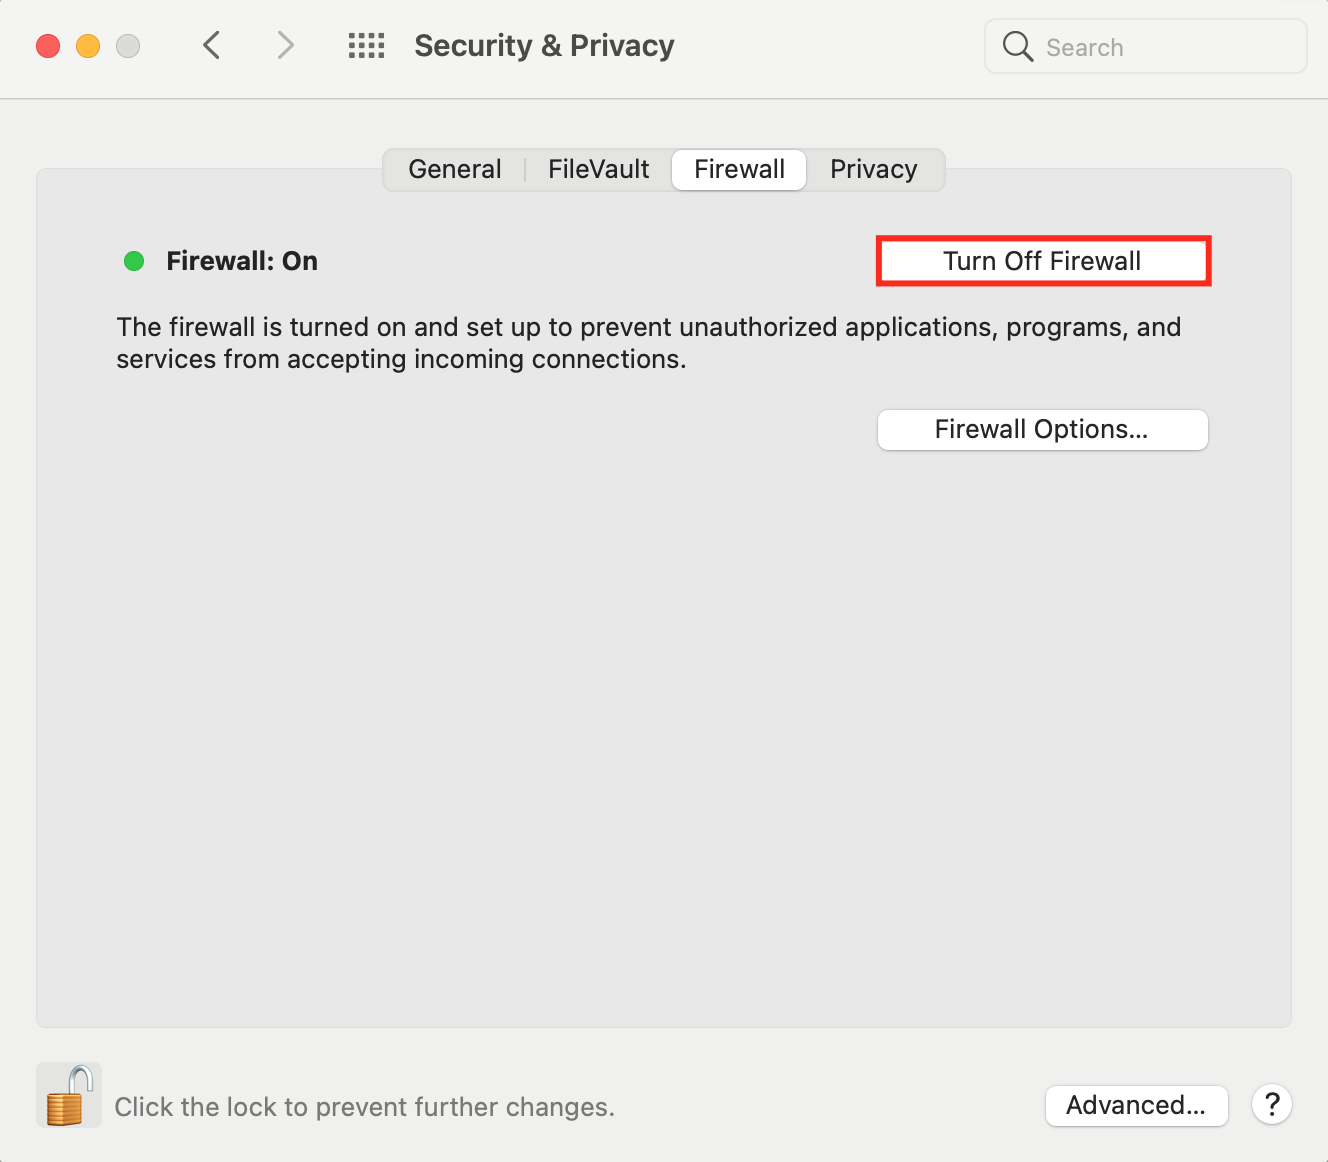
- Click the lock to prevent further changes on this setting without your permission.
Note that the steps to disable the firewall in Mac might be slightly different depending on the version of macOS you use.
How to Disable the Firewall on Windows
There are two ways to disable the firewall on Windows 10, 8, 7, and Vista – via the control panel or command prompt.
Here are the steps to disable the firewall using the control panel:
- Open the control panel, then navigate to System and Security -> Windows Defender Firewall.
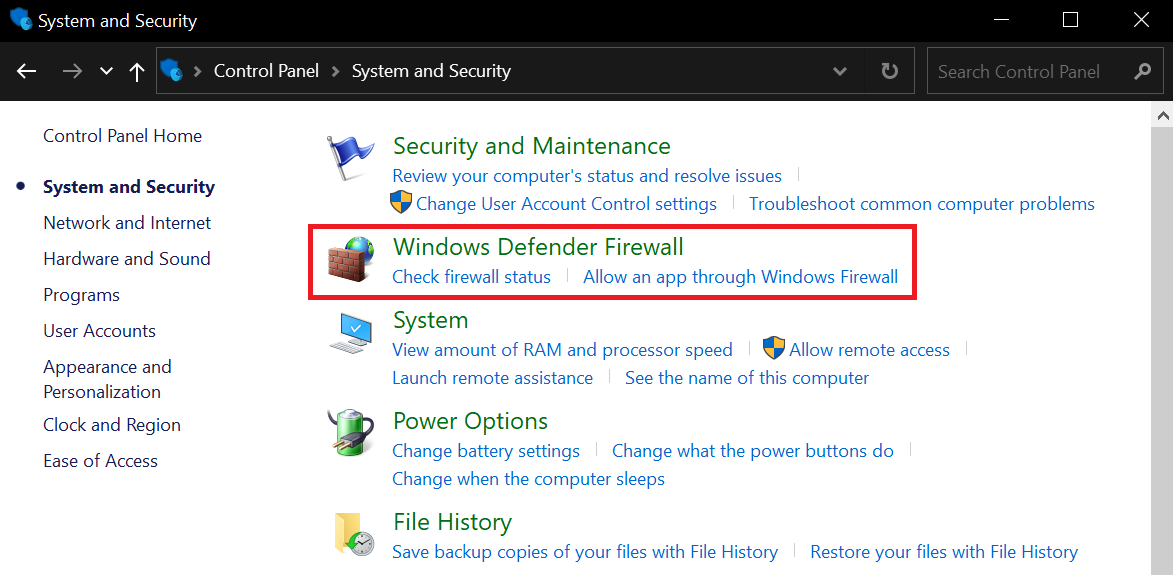
- Select Turn Windows Defender Firewall on or off.
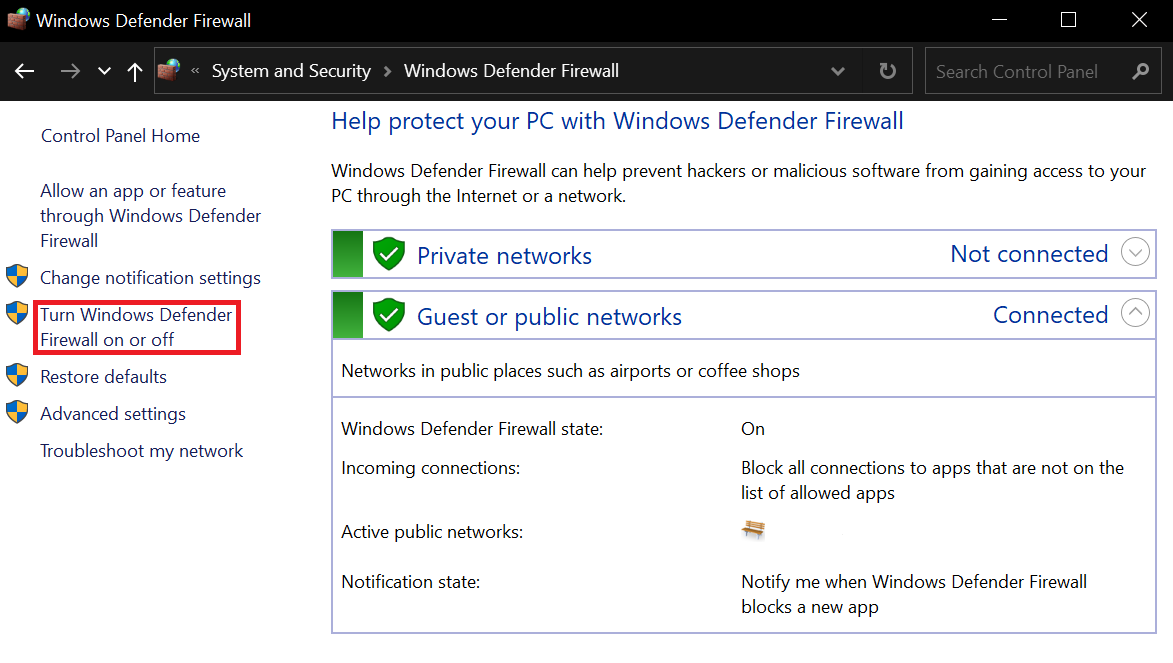
- Switch off both firewalls in the private and public network settings.

- Click the OK button to apply the changes.
If the option is not clickable, it means the firewall settings are under another security program’s control. If this is the case, you might want to uninstall that app first.
Meanwhile, these steps apply for turning off the firewall via the command prompt:
- Open the command prompt as administrator.
- Enter the following command:
netsh advfirewall set allprofiles state off
How to Disable the Firewall in Linux
The steps to stop and disable the firewall vary according to your Linux distribution.
If you use Ubuntu or Debian, your firewall should be managed by ufw. If you use CentOS or RHEL, the default firewall management tool will be firewalld.
It’s important to stop the firewall first before disabling it. Otherwise, you’ll experience errors during the process.
To disable the firewall on ufw, follow these steps:
- Stop the ufw using this command:
sudo ufw disable
- Once the firewall successfully stops, run a command to disable the ufw service at boot time.
sudo systemctl disable ufw
- Verify that the ufw is disabled by using this command:
sudo ufw status
sudo systemctl status ufw
- Re-enable the ufw.
sudo systemctl enable ufw
sudo ufw enable
## verify that ufw started ##
sudo ufw status
Alternatively, here are the steps to stop and disable the firewall on firewalld:
- Stop the firewalld using the following command.
sudo systemctl stop firewalld
- Disable the firewalld at boot time by using this command.
sudo systemctl disable firewalld
sudo systemctl mask --now firewalld
- Simply enter this command to verify if the firewalld has been disabled.
sudo systemctl status firewalld
- Run the following commands to enable firewalld again.
sudo systemctl unmask --now firewalld
sudo systemctl enable firewalld
sudo systemctl start firewalld
## verify that the firewalld started ##
sudo firewall-cmd --state
2. Flush Your DNS
The DNS cache stores data from websites you visit, so these web pages will load quicker the next time you access them.
However, if the DNS contains too many records, it might fail to function.
To solve this, flush the DNS to erase the records:
- Open the command prompt by typing cmd on the search bar next to the start menu.
- Enter this command:
ipconfig /flushdns
- Check whether the 127.0 0.1 refused to connect issue has disappeared or not.
3. Connect with Specified Port
The default port number for the web server is 80. If you’re trying to access it by typing localhost in your browser – which will direct to localhost:80 – but it turns out your web server is not configured to use the default port, you’ll get the localhost error or 127.0 0.1 refused to connect message.
However, port 80 may sometimes be used by another application on your computer. For example, if Skype is currently using it, you wouldn’t be able to run the Apache server on the same port simultaneously.
To solve this problem, first, let’s check whether port 80 is free. We’re going to use XAMPP to do this.
XAMPP is a web server solution stack used to build websites offline on a local web server. It’s a cross-platform tool, so it works on Windows, Mac, and Linux. It’s commonly used to install WordPress on a local computer.
Here are the steps to check free port number on Windows and Linux – it will be slightly different on Mac.
- Click the Start Menu to start XAMPP.
- Click the Netstat button on the right side of the control panel.
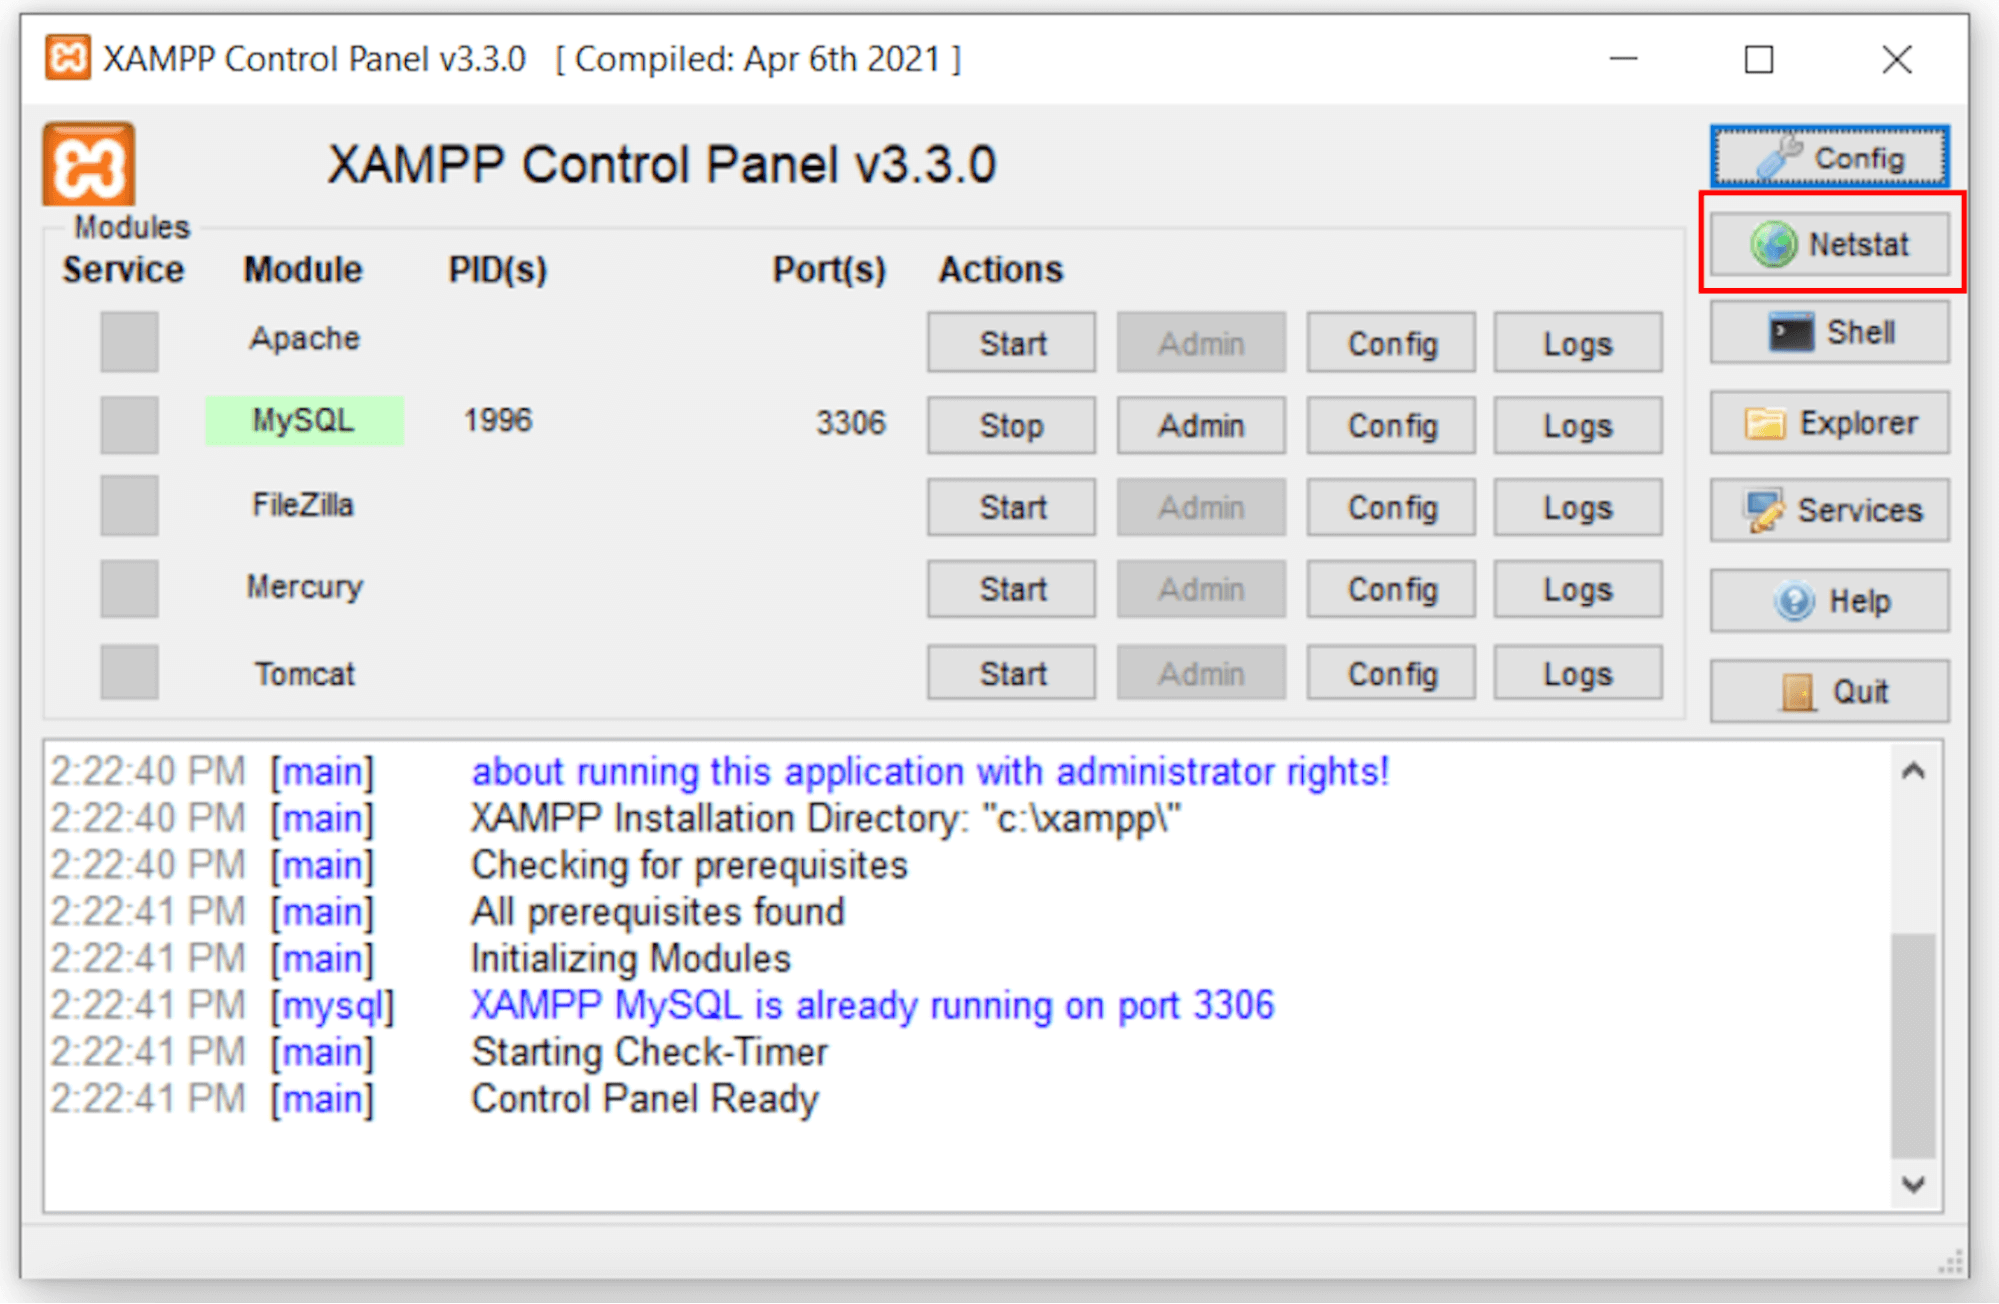
- You’ll see all the used ports on your computer. Check whether port 80 is free or used by another application.
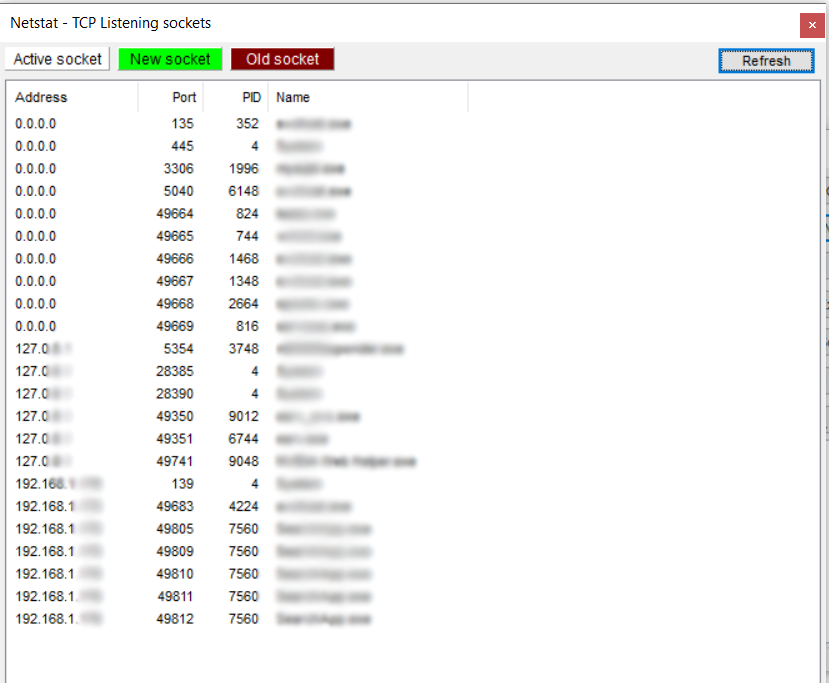
- If port 80 is already used by another application, choose a free port number, for example port 8080.
Next, let’s proceed to connect with the correct port number using the listen command.
The listen command is required to instruct Apache HTTPd to listen to only specific IP addresses or ports. If this command is not present in the config file, your server will fail to start.
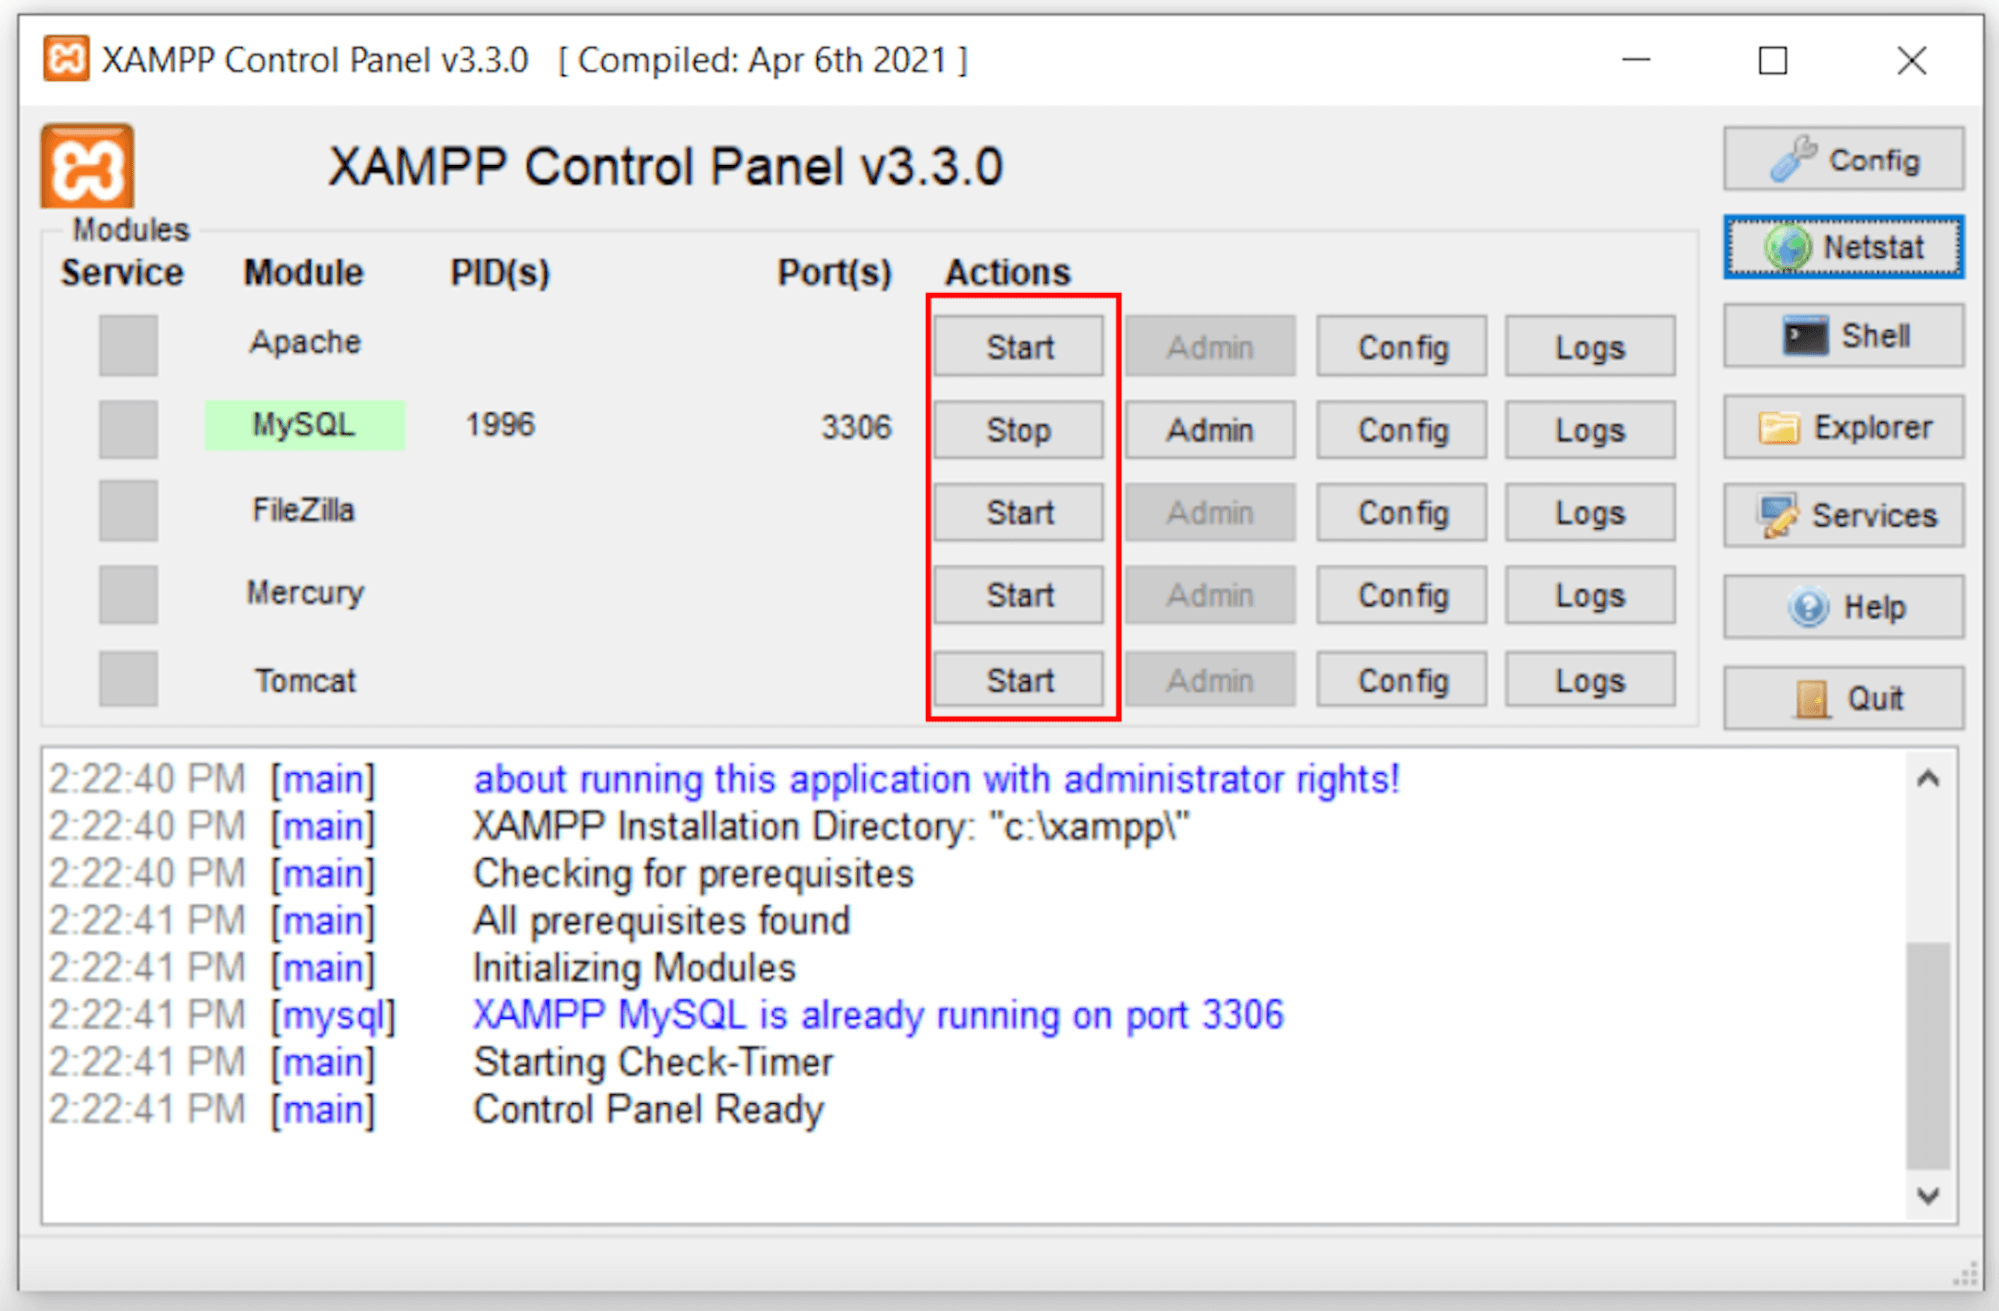
Here are the steps to change Apache’s port in XAMPP:
- Click the Start Menu to start XAMPP.
- You’ll see the XAMPP icon in your taskbar’s system tray. Double click it.
- The XAMPP control panel window will appear. It will show a list of all currently running services.
- Click on the Stop button next to Apache.
- Open the file explorer, then find the httpd.conf file in the config folder. If you use Windows, it will be in the C:\xampp\apache\conf directory. If you use Linux, it will be in bin/apache. On Mac, the path will be Applications/XAMPP/xamppfiles/etc/httpd.conf.
- Open it using Notepad or any other text editor available. Then, look for these lines inside the file:
Listen 80
ServerName localhost:80
- If your port 80 is free, just make sure that the port number in the Listen command matches the port number for the localhost. If another application is using port 80, replace it with an available port number. In this example, we’ll change it to port 8080.
Listen 8080
ServerName localhost:8080
- Save the file. It will ask for administrative privileges, choose Yes.
- Open the XAMPP control panel again, then start the Apache web server.
- Access http://localhost:8080 or https://127.0.0.1:8080/ to check whether the localhost is working.
If you’re using WAMP – a solution stack for the Windows operating system – do the following steps to change the running port.
- Right-click the taskbar and select Task Manager.
- Click End Task for any instances of WAMP that are still running.
- Next, open file explorer and navigate to the config folder in C:\wamp\apache2\conf.
- Look for the HTTPD config file. Open it with a text editor like Notepad.
- Look for these lines inside the file:
Listen 80
ServerName localhost:80
- If your port 80 is free, just make sure that the port number in the listen command matches the port number for the localhost. If port 80 is already used by another application, replace the number with an available port.
Listen 8080
ServerName localhost:8080
- Save the file.
- Open WAMP again to see if you still get the same error.
4. Ensure Apache Is Running
If your Apache web server is not running, you won’t be able to access localhost.
To check the status of your Apache, the command will vary depending on the distribution that you use.
Here’s the command for Debian or Ubuntu:
$ sudo systemctl status apache2
And here’s the command for CentOS/RHEL/Fedora:
# systemctl status httpd
The result from this status check will tell whether your server is running or stopped.
If it tells you that the server is stopped, try to troubleshoot by restarting it using the following command.
For Debian and Ubuntu:
sudo systemctl restart apache2
For CentOS/RHEL/Fedora:
# systemctl restart httpd
The output of the restart command will look like this:
* Restarting web server apache2 [ OK ]
If the restart attempt fails, you’ll get an error message. The message may vary depending on your choice of distribution, but it will fall along these lines:
apache2: unrecognized service
Failed to restart apache2.service: Unit apache.service failed to load: No such file or directory.
If you see these error messages, try to reinstall the service. Once you’re sure the web server is installed correctly, restart it using the corresponding command.
5. Go Through Browser Settings
Your browser settings can also cause the 127.0 0.1 refused to connect error because every web browser has a different setup and characteristics.
For instance, when you enter an HTTP web address, some browsers automatically redirect you to its HTTPS equivalent. However, if that site has an invalid SSL certificate or doesn’t have any, you’ll get the localhost refused to connect error message.
If you’re using Chrome browser, follow these steps:
- Enter chrome://net-internals/#hsts on your browser’s address bar.
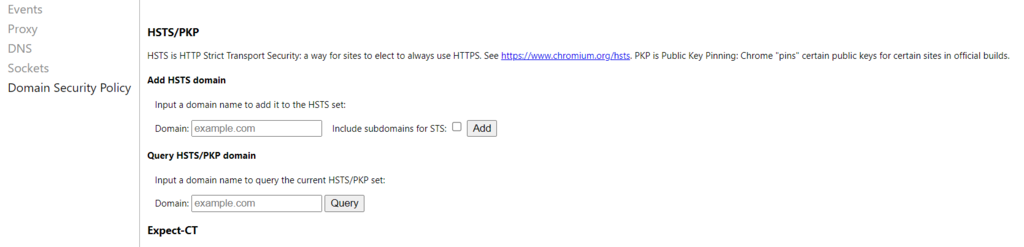
- Locate Delete domain security policies, then type localhost.

- Restart the browser.
Troubleshooting Other Errors
What Are HTTP Status Codes
How to Fix Too Many Redirects Error
How to Solve HTTP 400 Error
How to Solve ERR_CACHE_MISS Error
How to Fix ERR_CONNECTION_CLOSED Error
How to Fix ERR_NAME_NOT_RESOLVED Error
How to Resolve PR_END_OF_FILE_ERROR
How to Fix cURL Error 28
How to Fix “Your Connection Is Not Private” Error
Conclusion
Localhost refused to connect is a type of network connection error you might encounter when working on a project on your local web server.
It is triggered if the firewall wrongly blocks your server or you’re using the wrong port. The localhost error can also happen if your Apache web server or Chrome browser is not configured correctly.
There are five methods to solve the localhost refused to connect error:
- Temporarily disable your firewall – Disable the firewall so it won’t flag the project on your localhost as malicious and block its access.
- Flush DNS – Clear existing browser data.
- Connect with specified port – Check if the running port of the Apache web server is port 80 or a particular port number specified for localhost.
- Ensure Apache is running – Make sure the Apache web server is running and installed correctly.
- Go through browser settings – Enable connections to sites without SSL certificate, like your test site.
We hope this article helps you solve the localhost refused to connect error.
Localhost Refused to Connect FAQs
Learn more about localhost refused to connect error.
What Is an Alternative to Localhost?
One alternative to using localhost for local development is to use your computer’s IP address as the host. You can find your IP address in your system preferences or by typing ipconfig in the Command prompt for Windows or ifconfig in the Terminal for Mac or Linux.
What Is a Localhost IP Address?
A localhost IP address refers to the computer that the user is currently using. It is the IP address of the loopback network interface, which is typically assigned the IP address 127.0.0.1. Users use this IP address to access the computer’s own network services without connecting to an external network.

Maya is a Content Specialist and WordPress Contributor. With years of journalistic experience under her belt, her main goals are to help people understand complex processes in a simpler way, and tell the stories of people who thrive thanks to technology. When she’s not writing, you can find her watching sci-fi movies while eating ramen. Follow her on LinkedIn.