How to Install phpMyAdmin on CentOS 7
MySQL is a database that is popular above all kinds of developers! It’s open source and maintains a perfect balance between speed and features. That’s why in this tutorial, we’ll show you how to install phpMyAdmin on CentOS 7 – an amazing tool for MySQL database management. Your VPS will have an additional utility to increase the quality of life.
The main reason for having phpMyAdmin is that the native tool for accessing MySQL is the command line. Not everyone can access the command line at any point, and the lack of GUI – graphical user interface – can be a pain for novice users. phpMyAdmin supports a wide range of operations on MySQL and MariaDB (a fork of MySQL).

Why Use phpMyAdmin?
When you install phpMyAdmin on CentOS 7, you get to enjoy a new, intuitive user interface through your browser, instead of using the command line. Through this web interface, you can perform all the typical operations like managing databases, tables, columns, relations, users etc, while at the same being able to execute any SQL statement directly.
To increase its adoption rate, phpMyAdmin is translated into 72 different languages and supports both RTL (right-to-left) and LTR (left-to-right) languages.
Some other phpMyAdmin features:
- create, browse, edit, and drop databases, tables, views, columns, and indexes
- display multiple result sets through stored procedures or queries
- create, copy, drop, rename and alter databases, tables, columns and indexes
- maintenance server, databases and tables, with proposals on server configuration
- load text files into tables
You can read more features at official project page.
How to Install phpMyAdmin on CentOS 7
Let’s run down the step-by-step process of how to install phpMyAdmin on CentOS 7:
Important! CentOS Linux 8 has reached it’s End of Lifetime (EOL) on 2021-12-31. While CentOS Linux 7 is still supported, it will reach EOL on 2024-06-30. We recommend keeping that in mind when choosing this OS. You can read more about it in their official website.
1. Access Your VPS
Before we start, we’ll need to access our VPS platform using SSH! If you’re having trouble, check out our PuTTY tutorial!

2. Install an Apache Web Server and PHP
The first prerequisite of phpMyAdmin is an Apache web server. Use the following command to install Apache on your CentOS 7 virtual private server:
yum install httpd -y
Next, check the status of apache with the command:
systemctl status httpd
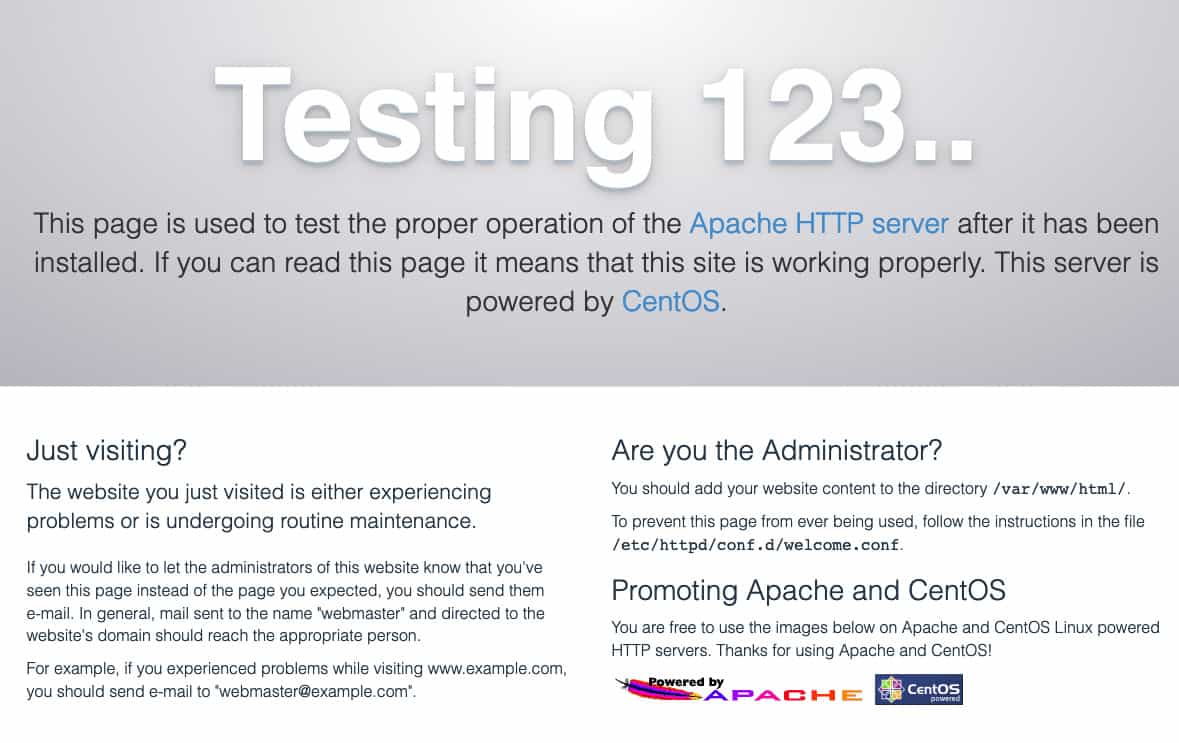
Next, we should make sure that Apache is running. Enter your server’s IP address into a browser address bar. You should see the Apache testing splash screen:
Now that Apache is ready, go ahead and install PHP using the following commands:
yum install php
systemctl restart httpd
3. Install the EPEL Repository
phpMyAdmin comes in the EPEL repository (Extra Packages for Enterprise Linux). To access EPEL you need to install a special package – epel-release. Use the following command to install epel-release on your CentOS:
sudo yum install epel-release
Now that the EPEL repo is made available, we can proceed to install phpMyAdmin on CentOS 7.
4. Install phpMyAdmin on CentOS 7
Issue the following command:
sudo yum install phpmyadmin
Once the installation is complete, you will have to edit the phpMyAdmin configuration file.
5. Configure the phpMyAdmin.conf File
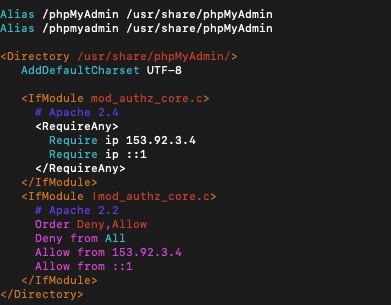
The edit will make sure that you can access your phpMyAdmin client remotely. We’ll open the phpMyAdmin.conf file located in the directory /etc/httpd/conf.d/ using the vim editor:
vim /etc/httpd/conf.d/phpMyAdmin.conf
Here you will see four different require ip strings matched with long IPs. The default value is 127.0.0.1. Replace that value with the IP of the machine you will be using to access phpMyAdmin. You can use a tool like WhatsMyIP to check your IP. Save and exit the file by hitting escape and typing in :wq.
You can see an example of the phpMyAdmin.conf file below:
6. Restart the Apache Web Server
Next we’ll restart the Apache web server by entering the following command in the command line:
systemctl restart httpd
7. Check if phpMyAdmin is Working
Finally, we can open phpMyAdmin utility by entering in your server’s IP address in a browser’s address bar with the addition /phpmyadmin string like so – 127.0.0.1/phpmyadmin. There you should see the login screen.
8. Locate Your phpMyAdmin Username and Password
Your username and password will be located in the file config.inc.php. The file will be in the phpMyAdmin installation directory. For us it is /etc/phpMyAdmin.
Open the file using the vim editor:
vim config.inc.php
Inside you can set the username and password, as shown in the screenshot below:
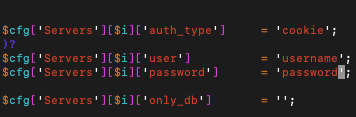
Save and exit the file by hitting esc and :wq as before.
Conclusion
That’s it, now you can log in! You have completed the phpMyAdmin install on CentOS 7.
After you login you will see the intuitive dashboard, that is most likely familiar to any shared or cloud hosting users.
phpMyAdmin is easy-to-use and acts as an all encompassing solution for many business database needs. You don’t need to be an experienced database administrator in order to work with phpMyAdmin, which is the primary reason of its popularity. Happy management, and we’ll see you in the next article.
Learn More About Database Management
How to Install MySQL on CentOS 7
How to Install PostgreSQL on CentOS 7
How to Install PostgreSQL on Ubuntu
How to SHOW USERS in MySQL

Edward is a content editor with years of experience in IT writing, marketing, and Linux system administration. His goal is to encourage readers to establish an impactful online presence. He also really loves dogs, guitars, and everything related to space.

Comments
September 15 2020
Hi Edward, Thanks for this tutorial. I am just confused about the config.inc.php file. The user and password are blank in there. Do I need to setup a specific user in here to connect via phpmyadmin? When I try to connect with root I am getting "Cannot log in to the MySQL server" error message. What should I do? Thanks!
November 18 2020
Hey there Leo. Each database requires a user to login to phpmyadmin with :)